Order Online
- Straight to your door!
Straight to your door


Ever tried to hang something on a plasterboard wall, only for it to come crashing down a few days later? You’re not alone. The simple truth is that standard screws and nails just aren't up to the job. To get a secure, lasting mount, you need specialised fixings like hollow wall anchors for medium-weight items or spring toggles for the really heavy stuff.
So, why did that picture frame fall? It wasn't your DIY skills letting you down; it's the very nature of plasterboard. Once you understand what it’s made of, you’ll see why a different approach is needed.
Plasterboard is basically a sandwich – a layer of gypsum plaster pressed between two sheets of thick paper. It’s brilliant for creating those smooth, flat walls we all want, but it has next to no structural integrity on its own. Imagine trying to hang a heavy coat on a hook pushed into a digestive biscuit. It’s just going to crumble.
That’s exactly what happens in your wall. When you drive a normal screw into plasterboard, the threads have nothing substantial to grip. The gypsum core is soft and brittle, so any real weight will simply pull the screw straight out, leaving a messy, crater-like hole behind.
This is where specialised plasterboard fixings save the day. They're cleverly engineered to get around this weakness by expanding or gripping the material from behind the board, spreading the load over a much wider area.
The secret to a good plasterboard fixing is load distribution. Instead of putting all the pressure on one tiny, weak spot, it uses the back of the plasterboard as an anchor, stopping the fixing from ever pulling through the front.
This smart design is what makes all the difference. In the UK, the most common board you'll come across is the standard 12.5mm plasterboard (https://neasdenhardware.co.uk/products/standard-plasterboard-tapered-edge-12-5mm-x-2400mm-x-1200mm), and its thickness plays a huge role in how well a fixing holds.
While some heavy-duty fixings can handle impressive peak loads of over 40 kg in tests, a sensible, safe working limit is often much lower. To be on the safe side, it's best to assume around 15 kg per fixing for anything you want to stay on the wall long-term.
Choosing the right plasterboard fixing can feel like a bit of a minefield, but it really comes down to one simple question: how heavy is the thing you’re hanging? Grabbing the wrong fixing is a classic DIY mistake, and using one meant for a photo frame to hang a heavy mirror is just asking for trouble.
To make things easy, we can break it down into three common-sense categories: light, medium, and heavy-duty. Figuring out which category your project falls into is the key to getting it right the first time, saving you from patched-up walls and broken belongings.
For the small stuff, you don't need to bring out the big guns. This category is all about everyday items that won't put much strain on your wall.
This is where most of us live when it comes to DIY. We're talking about items with enough heft to yank a simple plug clean out of the wall, so they need a bit more support from behind the plasterboard.
This image gives a great visual breakdown of which fixings work best for different weight classes.
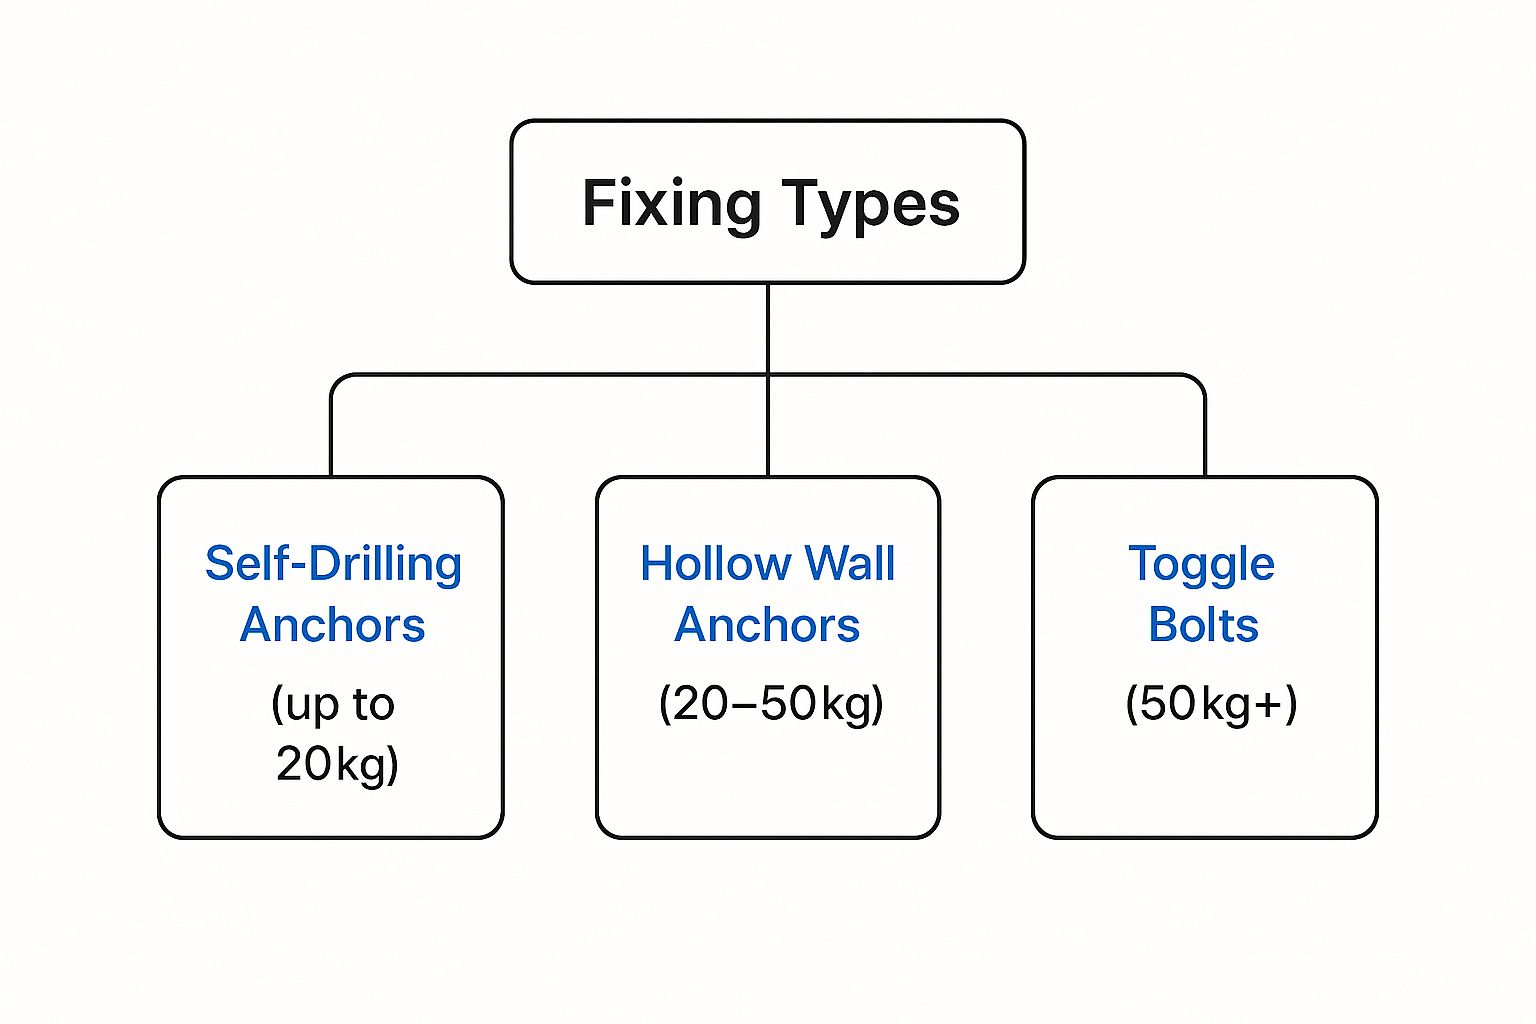
As you can see, it's all about matching the hardware to the weight. It’s a simple rule that guarantees a safe and sturdy result.
Now we're talking about the really heavy stuff. For these jobs, failure isn’t an option, so you need a fixing with some serious muscle for your own peace of mind. It’s also worth noting that for weighty furniture, knowing how to secure furniture to walls properly is a vital safety measure.
Pro Tip: For anything seriously heavy like a big TV or kitchen cabinets, your first choice should always be to fix directly into the wooden studs behind the plasterboard. Nothing beats a solid timber anchor. A stud finder is your best friend here.
But when a stud just isn't where you need it, these are the fixings you can count on:
To help you quickly find what you need, here’s a simple comparison table.
Use this table to quickly match your project's weight requirements to the most suitable type of plasterboard fixing.
| Fixing Type | Load Category | Ideal for Hanging | Primary Advantage |
|---|---|---|---|
| Self-Drive Plugs | Light (up to 10 kg) | Picture frames, clocks, smoke alarms | Incredibly fast and easy to install. |
| Hollow Wall Anchors | Medium (10-25 kg) | Shelves, curtain rails, mirrors | Creates a strong, expanding clamp. |
| Spring Toggles | Heavy (25 kg+) | TVs, radiators, kitchen cabinets | Spreads weight over a large area. |
By simply matching the weight of your item to one of these three categories, you can confidently choose from the huge range of https://neasdenhardware.co.uk/collections/screws-fixings available. This methodical approach means you’ll have the right gear on hand before you even think about drilling a hole.
To pick the right fixing, you first need to understand the clever little tricks they use to get a grip. Each one has a unique way of creating a solid anchor point in that empty space behind the plasterboard, turning what is essentially a soft, crumbly surface into something you can confidently hang things on. Let’s pop the bonnet and see how they do it.
Think of it like having a mate on the other side of the wall, holding your picture up for you. That's essentially what these fixings do. They create a brace that spreads the weight far more effectively than just whacking a screw in and hoping for the best.
These are the simplest of the lot. A self-drive plug is basically a big, aggressive corkscrew. Its deep, wide thread is designed to bite straight into the soft gypsum core of the plasterboard, meaning you don't even need to drill a pilot hole first.
As you drive it in, it carves its own way, creating a snug sleeve that you can then put a standard screw into. This makes them incredibly quick and handy for light-duty jobs where speed is everything.
Stepping up in strength, we have hollow wall anchors, often known by the brand name 'Molly bolts'. These are much more robust and work by creating a clamp. You pop one into a pre-drilled hole, and as you tighten the screw, the anchor's metal body collapses and expands behind the board.
This expansion creates a shape like a mushroom or a star, which clamps tight against the inside of the wall. This is key, as it spreads the hanging load across a much larger area, stopping the fixing from just pulling straight back through the hole.
The real magic of a hollow wall anchor is that it creates a permanent, threaded fixture in the wall. You can take the bolt out and put it back in as many times as you like—perfect for things like shelves or curtain rails that you might need to take down for redecorating.
Properly fixing things to plasterboard is a must for any secure and lasting job in UK homes. Experts often lean on hollow wall anchors and spring toggles, which have proven their worth in British building conditions. These fixings spread the load by expanding behind the plasterboard, which prevents the kind of pull-out failures you see with simple screws. This is especially important for meeting UK building standards when mounting anything from shelves and brackets to electrical fittings. You can find detailed guides from UK suppliers that match fixings to different plasterboard thicknesses and load needs, like the ones covered in this overview from Direct Channel.
When it comes to the really heavy stuff, the spring toggle is the undisputed champion. This fixing uses a simple but brilliant 'butterfly' mechanism to achieve its incredible strength. It’s just a bolt with a pair of spring-loaded metal wings on the end.
To install one, you pinch the wings together, push them through your drilled hole, and they’ll immediately spring open inside the wall cavity. Then, as you tighten the bolt, it pulls these wings hard up against the back of the plasterboard, creating a wide, solid brace.
The massive contact area distributes the weight exceptionally well, making it the go-to choice for mounting heavy items like TVs, kitchen cabinets, and radiators.
Once you get your head around these simple mechanics, you can pick the right tool for the job with real confidence. It’s not just about grabbing any old fixing; it’s about knowing why it’s the best and safest choice for your project.
Theory is one thing, but getting your hands dirty is where the real learning happens. Let's move from figuring out which fixing to use, to fitting it perfectly. Honestly, getting the installation spot-on is just as crucial as picking the right bit of kit in the first place.
We’ll walk through the process for two of the most common choices: a simple self-drive plug for lighter items and a beefy spring toggle for when you need some serious holding power. A sloppy installation can make even the best fixing fail, so taking your time pays off.
Think of this as the sprinter of the fixing world—it's fast, efficient, and brilliant for light jobs. You'll have that picture frame up in just a few minutes.
What You'll Need:
Step-by-Step Installation:
Crucial Tip: If the plug starts to spin as you're driving it in, stop immediately. You've probably made the hole too big. The best bet is to take it out, fill the hole, and start again a few centimetres away.
When you're hanging something heavy like a large mirror or a small radiator, the spring toggle is your go-to. It’s an absolute workhorse. This one takes a bit more care, but the strength you get is well worth it.
What You'll Need:
Step-by-Step Installation:
Even with the best plasterboard fixings in your toolbox, some walls just don’t play by the rules. It's one thing dealing with a standard hollow wall, but what happens when you hit insulation? Or worse, you discover you're up against a 'dot and dab' wall? Let's break down how to handle these common headaches.
These non-standard walls can throw a spanner in the works for even the most experienced DIYer. The secret, however, isn't about brute force; it's about correctly identifying the wall type and picking a fixing designed specifically for that job.
"Dot and dab" is just a nickname for a very common building method. It’s where plasterboard sheets are stuck onto a solid block wall with big dabs of adhesive. This leaves a small, and often uneven, gap between the plasterboard and the solid wall. Using a standard plasterboard fixing here is a recipe for disaster—it's only gripping the flimsy board and won't hold any real weight.
For these walls, you need to reach for long-reach fixings. These are purpose-built to pass straight through the plasterboard, bridge that void, and anchor firmly into the solid blockwork behind. It takes a bit more effort, but it's the only way to get a fixing you can actually trust.
Hollow wall anchors are clever bits of kit, but they’ll never beat the sheer holding power of solid timber. Hiding behind every plasterboard wall is a wooden frame, built from vertical posts we call studs. For anything truly heavy, screwing directly into a stud is the gold standard.
Think of a stud as the wall's skeleton. When you screw into it, you're not relying on the plasterboard at all; you're anchoring your item to the actual structure of the house. That's as strong as it gets.
So how do you find them? An electronic stud finder is your best friend here. Just slide it across the wall, and it'll beep or light up when it passes over the dense wood. If you're hanging something hefty like a big TV or a run of kitchen cabinets, make it your mission to line up at least one of the fixings with a stud.
But what if your item is both heavy and wide—like a big radiator or a massive mirror—and there’s no stud exactly where you need one? Don't panic. You can still create a rock-solid mount by being clever about how you distribute the weight.
Instead of putting all your faith in one fixing point, use several high-quality fixings spaced evenly apart. Imagine you're hanging that heavy radiator. Using four heavy-duty spring toggles, with two at the top and two at the bottom, spreads the entire load across four different points. This dramatically reduces the stress on any single spot, giving you a secure installation that’s built to last.
Even after getting to grips with the different types of fixings out there, you might still have a few questions rattling around. It's completely normal. We’ve pulled together some of the most common queries we hear about working with plasterboard to give you clear, practical advice for a safe and secure finish.
Think of this as a final checklist to clear up any lingering doubts, so you can tackle your next project with total confidence.
It's always tempting to save a few pennies and reuse an old fixing, but in most cases, it's a really bad idea. Whether you can even try depends entirely on the type of fixing you're dealing with.
For guaranteed security and your own peace of mind, always use a fresh fixing for every new job. It's not worth the risk.
This is the million-pound question, but there’s no single answer. How much weight a fixing can hold really depends on the fixing itself, the thickness and condition of your plasterboard, and how well it’s been installed.
A simple plastic wall plug might only be rated for 5 kg, whereas a heavy-duty toggle bolt could handle upwards of 70 kg in the right conditions.
The golden rule is to always check the manufacturer’s specified Safe Working Load (SWL). This is the number you can trust, as it already includes a safety margin. For anything truly heavy, like a large TV or kitchen cabinet, your best bet is to spread the load across multiple fixings or, even better, anchor directly into the wooden studs behind the board.
Ah, the dot and dab wall – a common source of DIY headaches. These walls have a gap between the plasterboard and the blockwork, which makes standard plasterboard fixings completely useless and unsafe.
For this job, you need specialised long-reach fixings designed specifically to bridge that void and anchor firmly into the solid blockwork behind. It means drilling right through the plasterboard, across the gap, and deep into the masonry. Whatever you do, don't rely on a short plasterboard fixing here; it simply won't hold.
We’ve all been there. A spinning fixing is the classic sign that the hole is too big or the plasterboard around it has crumbled, which often happens if you've been a bit too enthusiastic with the screwdriver.
The proper solution is to take the fixing out, fill the damaged hole with a good quality filler, and let it dry completely. Then, drill a fresh, correctly sized pilot hole in a slightly different spot. Avoid the temptation to bodge it with matchsticks or tape wrapped around the plug – it’s a temporary fix that won’t provide a reliable hold for anything with any real weight.
From simple screws to the very best fixings for plasterboard walls, Neasden Hardware stocks a huge range of high-quality products and has the expert advice to match. Find exactly what you need at https://neasdenhardware.co.uk.