
Order Online
- Straight to your door!
Straight to your door


You've swapped an old MR16 halogen lamp for an LED equivalent, only to find the new lamp flickers, buzzes or refuses to light. The lamp may be perfectly good. In many UK homes, the culprit is the transformer hidden above the ceiling, inside a cupboard or behind the fitting.
A 12V LED transformer, more accurately called an LED driver in many applications, has to match the lamps, the output type, the load and the installation location. Replacing an old halogen transformer with another unit of a similar wattage sounds sensible, but it can be the wrong approach. The important details are usually printed in small type on the existing transformer and the replacement fitting.
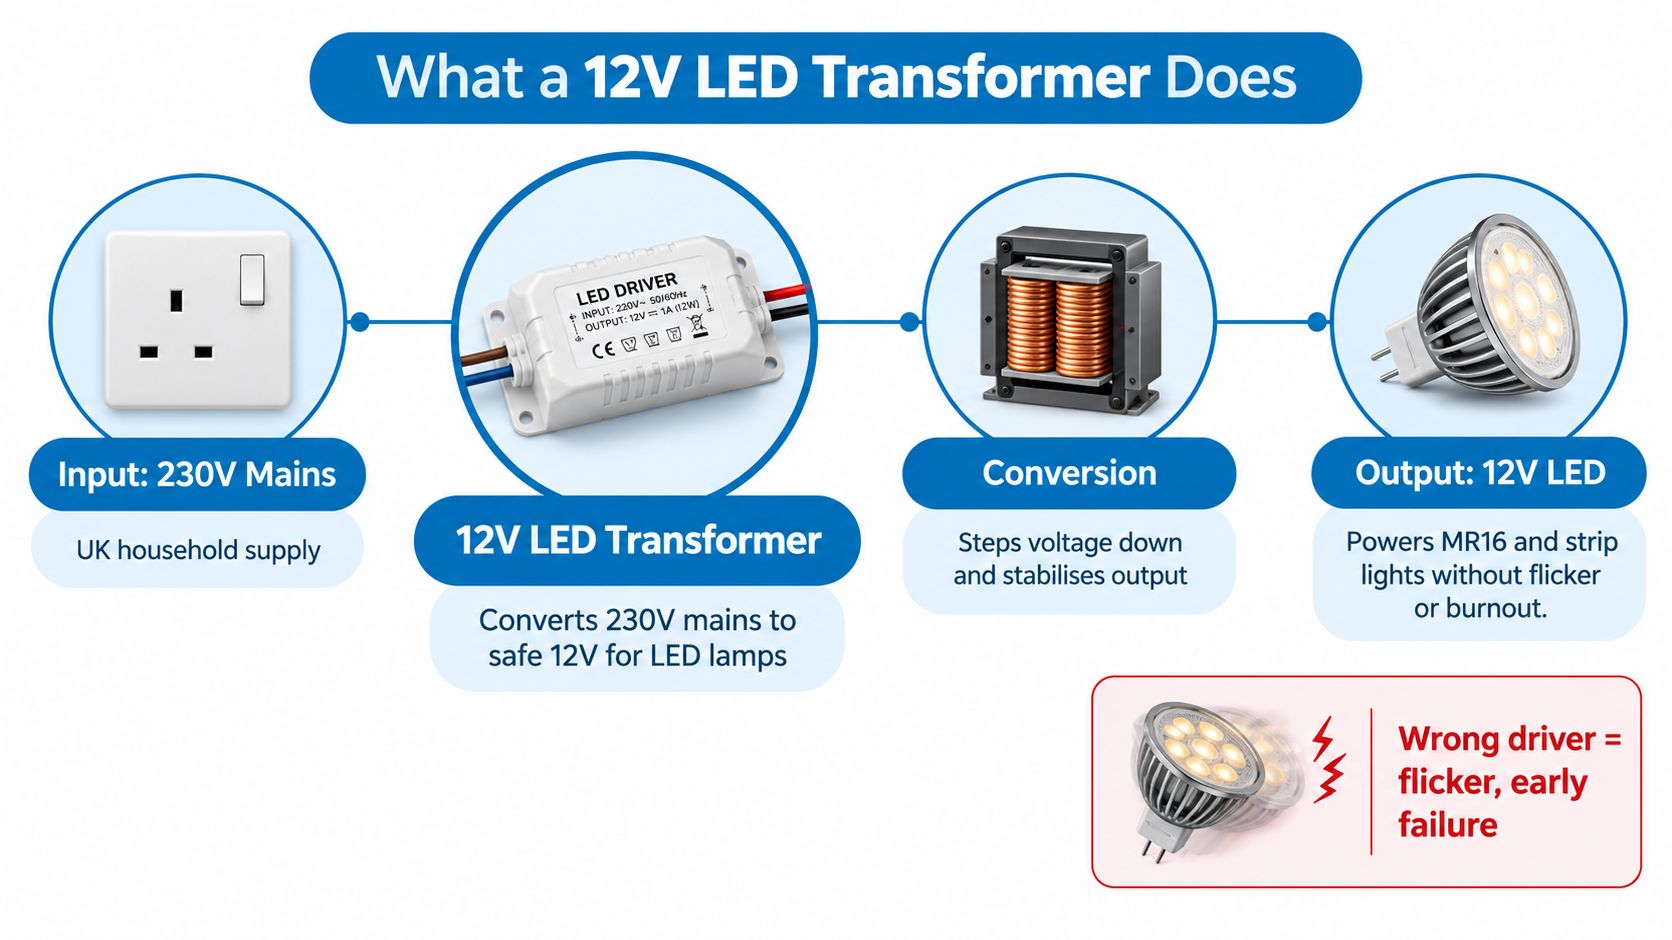
A 12V LED transformer takes the UK's 230V mains supply and converts it to an extra-low-voltage output for compatible LED lamps and luminaires. UK guidance identifies 12V as a typical extra-low-voltage supply for downlights, while warning that the driver must be compatible with the LED fitting and replacement lamp. Electrical Safety First's downlight guidance also recommends that ceiling downlights are installed by a registered electrician.
A simple water analogy helps. Imagine the mains supply as water arriving through a pipe at pressure that's far too high for a delicate garden sprinkler. The transformer acts rather like a pressure-reducing valve. It lowers the electrical pressure to a level the light can use, while the driver's electronics help provide the sort of output that the LED expects.
That last part is where many retrofit jobs go wrong. An LED transformer isn't a smaller version of a halogen transformer. LED products commonly need a stable constant-voltage 12V DC supply, whereas some older halogen transformers were designed for alternating-current loads and minimum wattages. A transformer that worked properly with several high-wattage halogen lamps may behave badly when connected to a single low-wattage LED lamp.
Start at the lamp or luminaire, not the product name on an online listing. Check whether it states 12V AC, 12V DC, constant voltage or constant current. An MR16 retrofit lamp may include the regulation it needs and therefore expect a suitable constant-voltage supply, while an integrated LED module may require a dedicated constant-current driver.
Then inspect the old unit if it's accessible without disturbing the ceiling. Look for its output type, minimum and maximum load, input rating, dimming instructions and any restrictions on mounting. A label that only says “12V” doesn't tell you enough.
You'll need to make several decisions before ordering:
The rest of the job is about matching those details rather than guessing from the voltage alone.
The words constant voltage and constant current describe what the driver controls. A constant-voltage driver holds its output at a specified voltage, such as 12V DC. A constant-current driver regulates the current flowing through the LED, even as the LED's voltage changes within its designed operating range.
Constant-voltage drivers suit LED products that contain their own current-limiting components. Typical examples include 12V LED tape, under-cabinet strip lighting and many MR16-style retrofit lamps. The fitting or strip is designed to receive a fixed voltage, and its internal arrangement determines how much current it draws.
For an under-cabinet strip, the specification should state 12V DC if that's what the strip requires. The driver must provide that output type and enough capacity for the complete length being powered. Polarity also matters on a DC system, so the positive and negative connections must be identified and kept consistent.
An MR16 replacement lamp can look almost identical to a halogen lamp while having a completely different electrical requirement. Treat the lamp's specification as the authority. Don't assume that a transformer labelled for MR16 lamps will suit every LED MR16 product.
Constant-current drivers are normally used with dedicated LED luminaires and integrated LED modules. Instead of supplying a fixed 12V output, the driver is selected for the LED module's specified current and voltage range. The luminaire manufacturer will usually state the required output current and the permissible voltage range.
Mixing the two types can damage the fitting or create unreliable operation. Supplying excessive current can overdrive an LED, creating heat and shortening its working life. A driver that supplies too little current may produce a dim light, intermittent operation or no light at all.
Practical rule: Match the driver to the fitting's electrical specification, not to the physical shape of the old transformer.
Dimming adds another layer. Leading-edge and trailing-edge dimmers control electronic loads differently, and not every LED driver works with both. A lamp that works perfectly from a standard switch can flicker on a dimmer because the driver and dimmer aren't compatible. Check the driver's dimming method and the dimmer manufacturer's compatibility information before changing either component.
A wattage-for-wattage swap often fails when an old halogen transformer is replaced with LED lamps. The transformer may be labelled 12V, yet its output range and minimum-load requirement may not suit the new LEDs. Start by identifying the lamps' electrical requirements, then calculate the total load.
Add the wattage of every lamp or LED section supplied by the driver. For five MR16 LED lamps rated at 5W each:
5 lamps × 5W = 25W
Allow 20% headroom when choosing the driver. The LED lighting upgrade guidance explains this retrofit approach and the problems older halogen transformers can cause. For the example:
25W × 1.2 = 30W
Look for a suitable 12V driver rated for at least 30W, then confirm whether the lamps need 12V AC or 12V DC. A much larger driver is not automatically the right choice. Check its minimum and maximum load, physical dimensions, dimmer compatibility and installation instructions.
Older electronic or magnetic halogen transformers may require a minimum load of roughly 20–60W. An LED MR16 may draw only about 5–7W, leaving one lamp well below the transformer's operating range. UK LED retrofit guidance documents these minimum-load figures.
Typical results include flickering, buzzing, delayed starting or complete failure to start. Adding more lamps can bring the total into range, but it treats the symptom rather than correcting the mismatch. An LED-compatible driver with a suitable low-load operating range is usually the better replacement.
Before opening a ceiling, read the existing transformer label if it can be reached safely. Note its output type, minimum and maximum load, dimming information and model reference. Photograph the replacement lamp or fitting specification as well. These details can identify the correct replacement before you remove a downlight or disturb plasterboard.
| LED Load | Typical Draw | Recommended Driver | Watch Out For |
|---|---|---|---|
| One MR16 LED lamp | 5–7W | 12V LED driver with a suitable low-load range | An old halogen unit may expect a much higher minimum load |
| Five MR16 LED lamps | 25W total | At least 30W capacity after adding 20% headroom | Confirm whether the lamps require 12V AC or 12V DC |
| Small under-cabinet LED strip | Use the strip's stated wattage | 12V DC constant-voltage driver above the calculated load | Check polarity, cable length and dimmer compatibility |
| Larger under-cabinet strip run | Total the complete installed run | 12V DC driver with suitable spare capacity | Voltage drop and cable sizing can affect the far end |
| Integrated LED module | Use the luminaire's stated current | Matching constant-current driver | Don't substitute a constant-voltage transformer |
The table is a starting point, not a substitute for the fitting's specification. Use the exact figures printed on the lamps, strip or luminaire. If the old unit says 12V AC and the replacement says 12V DC, matching the wattage will not correct the incompatibility. Where identifying or replacing the unit involves fixed wiring, isolation, or uncertain connections, use a registered electrician.
Mounting location affects both safety and service life. A driver produces heat, so it should sit in a ventilated location on a heat-dissipating surface, away from combustible materials. Technical installation guidance also warns that inadequate cable sizing can cause overheating and fire, and limits output cable length to 2 metres in the cited product context for electromagnetic-compatibility compliance. The LED driver installation manual sets out those product-specific requirements.
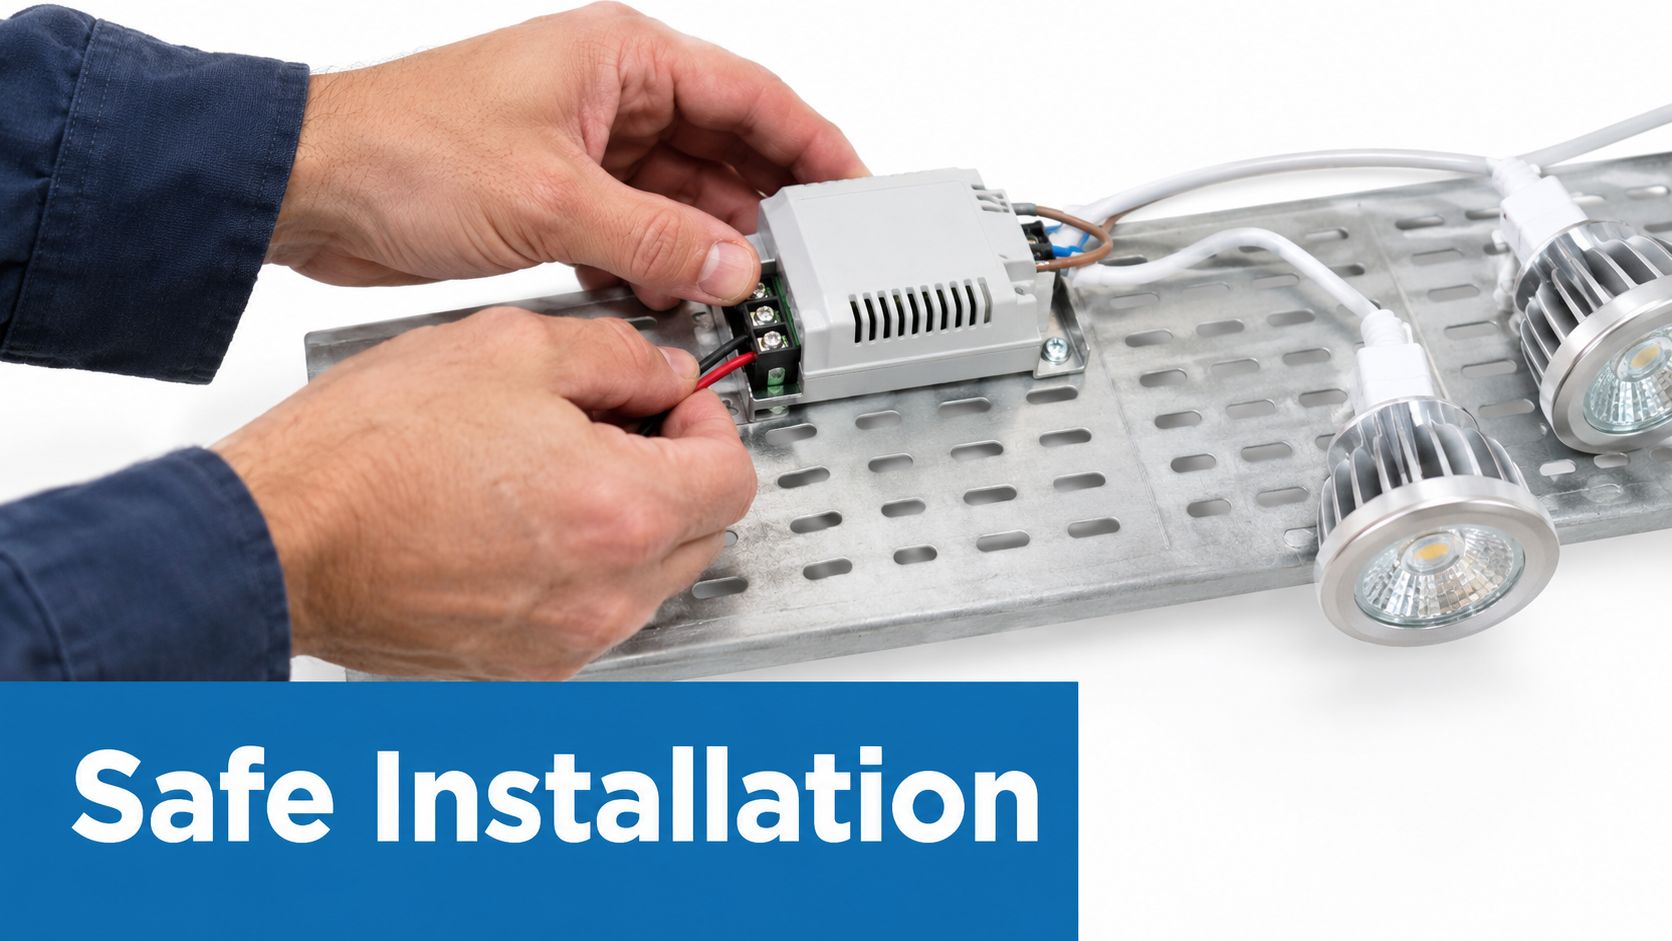
Don't bury a driver casually above loft insulation, wedge it behind plasterboard or surround it with other heat-trapping materials. Insulation can restrict airflow, and a concealed driver can become difficult to inspect or replace. Inside a kitchen unit, it needs a location where heat can escape and where stored items can't press against the casing or connections.
The driver should generally be close enough to the fitting to keep the output cable within the manufacturer's permitted length. Longer runs introduce voltage drop, and the effect becomes more noticeable when the cable is too small for the current. The far end of an LED strip may appear dimmer, while a run of spotlights may show uneven performance.
Use the cable type and size specified for the driver and installation. Don't rely on a thin speaker cable or an improvised lead because the output is only 12V. Low voltage doesn't mean low current, and a poor cable choice can create heat at the cable or its terminations.
For neat, secure low-voltage connections, use correctly rated terminals or connectors rather than twisting conductors together. A guide to push-wire connectors for secure electrical connections can help with the connection options, but the connector still has to suit the conductor, enclosure and installation conditions.
Here's a useful separation of responsibilities:
The mains input isn't made safe merely because the output is 12V. Isolate the circuit properly, prove it's dead using an appropriate tester and never work on exposed mains connections if you're not trained and competent to do so.
This video provides a visual reference for the type of installation arrangement involved:
A 12V output sits below the voltage range covered by the Low Voltage Electrical Equipment (Safety) Regulations 1989. Those Regulations apply to equipment designed for 50–1,000V alternating current or 75–1,500V direct current, so the 12V output itself falls below those thresholds. The mains-input side remains electrical equipment connected to the UK supply and still needs safe design, suitable insulation and competent installation. The UK legislation covering electrical equipment safety provides the relevant voltage thresholds and safety framework.
Current electrical equipment is also covered by the Electrical Equipment (Safety) Regulations 2016. Designated standards include EN 61347-2-13:2014 for electronic controlgear supplied to LED modules. Standards documentation doesn't replace checking the product's actual specifications, but it's a useful part of assessing whether a mains-powered driver is appropriate for the UK market.
“12V means harmless” is an unsafe shortcut. The output may be extra-low voltage, but the driver still connects to the mains, generates heat and relies on sound wiring, connections and enclosure arrangements. A short circuit, loose terminal or unsuitable cable can still damage equipment or create a fire risk.
The regulations also support a practical distinction between the input and output sides. The mains side needs suitable shock protection, insulation and supply connections. The 12V side needs correctly rated cable, secure joints, suitable polarity and protection for its location.
Before buying, check:
A metal enclosure or consumer unit may form part of a wider electrical installation, but it doesn't make an unsuitable driver suitable. For background on enclosure arrangements, this guide to metal consumer units is a useful reference. The final choice still belongs to the fitting's own specification and the conditions in which it will operate.
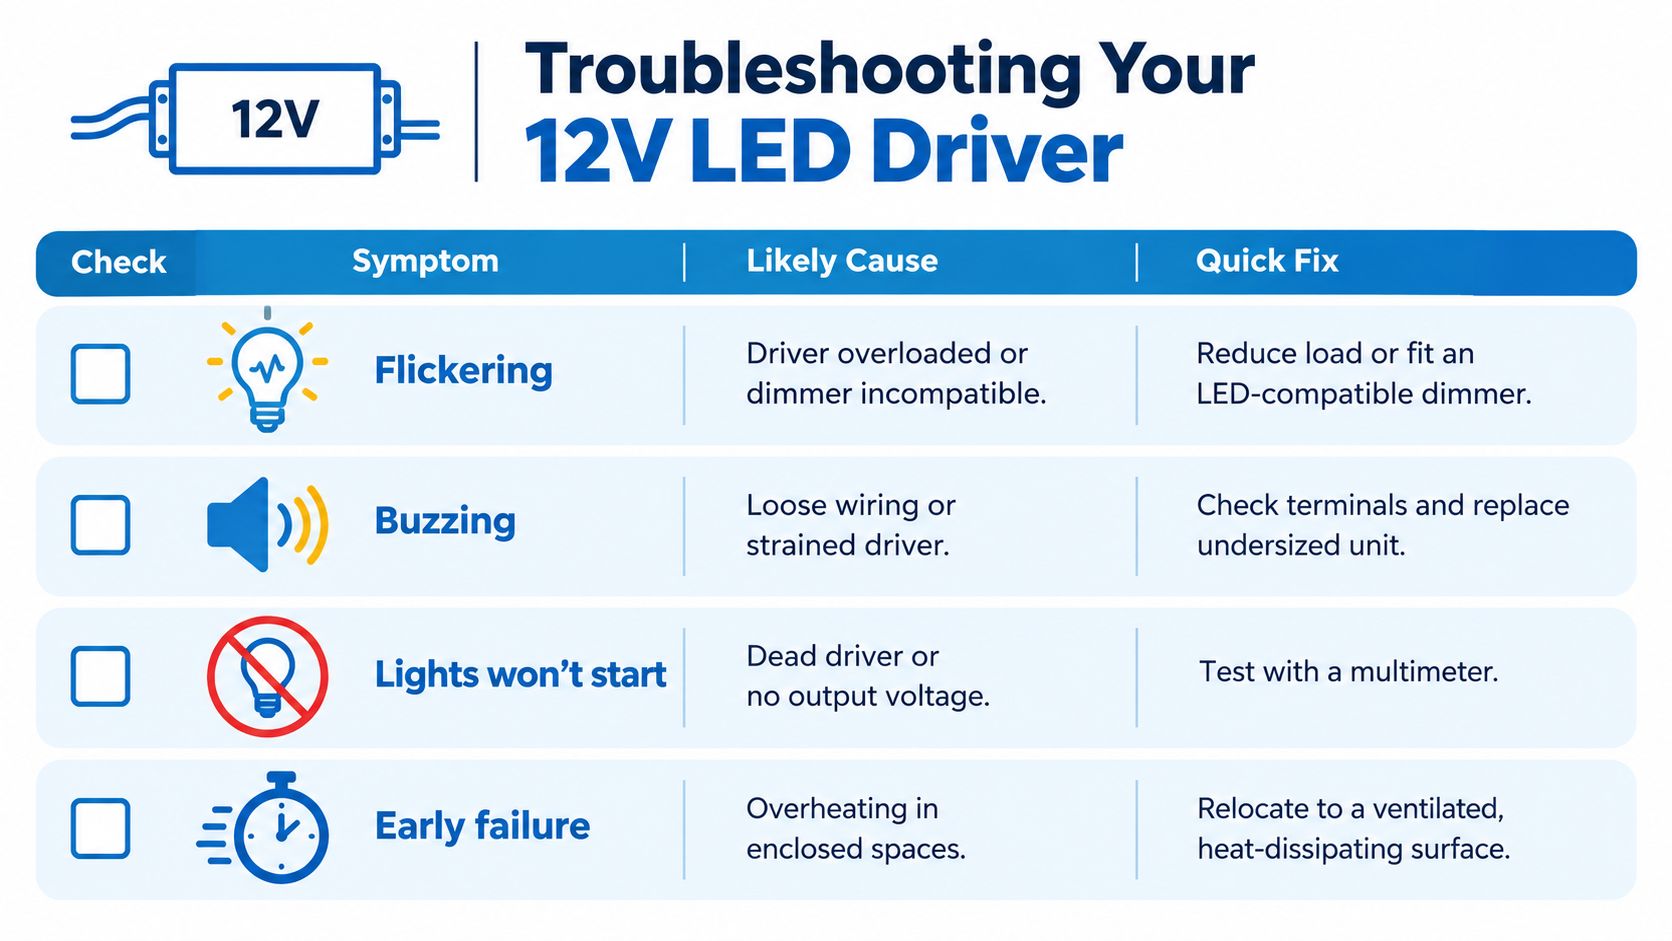
A failed LED lamp is often blamed first, but the driver deserves attention. Start with the old halogen transformer, particularly if the symptoms appeared immediately after an LED replacement.
Likely cause: The legacy transformer has a minimum load that the new LED lamp can't meet. An LED MR16 drawing only a small load may leave the old unit outside its working range.
Fix: Read the old transformer label and compare its minimum load with the combined LED wattage. Replace it with a compatible LED driver rather than repeatedly changing lamps. If the circuit is dimmed, check the driver and dimmer compatibility as a separate issue.
Likely cause: The driver may be strained, the load may be incompatible, or a connection may be loose. A buzzing transformer shouldn't be ignored, particularly if the casing is hot or there's discolouration around a terminal.
Fix: Isolate the supply before inspecting accessible connections. For low-voltage cleaning and contact maintenance, this electrical contact cleaner guide explains the type of product used for suitable contacts, but cleaner won't repair an overloaded or incorrectly specified driver. Replace the unit or call an electrician if the fault is on the mains side.
Likely cause: The driver may have failed, the circuit may not be receiving power or the output may not match the fitting. An AC/DC mismatch can produce a dead lamp even when the nominal voltage looks correct.
Fix: Don't probe exposed mains terminals unless you're competent and equipped to do so. A qualified person can test the supply and output with an appropriate multimeter, verify polarity on a DC circuit and confirm whether the driver is producing the specified output.
Likely cause: An undersized driver may be operating close to its limit, or the unit may be enclosed without enough ventilation. Poor cable sizing can also create heat and voltage loss.
Fix: Compare the connected load with the driver rating, inspect the mounting location and follow the manufacturer's ventilation requirements. Move the driver to a ventilated, heat-dissipating surface if the installation allows it, or have an electrician redesign the arrangement.
Work through these questions before ordering another lamp:
Stop troubleshooting and call an electrician when the fault involves exposed mains wiring, repeated tripping, burning smells, heat damage, inaccessible joints or uncertainty about circuit isolation. A 12V fitting can be straightforward to specify, but the supply feeding it is still part of a mains installation.
Treat the replacement as a specification exercise, not a like-for-like purchase. Identify the fitting, total the LED wattage, add 20% headroom using the cited retrofit guidance, confirm 12V AC or DC, check the dimmer and plan the driver's mounting position and cable route before you order.
For a tradesperson upgrading a client's spotlights, photograph the old label and the new lamp specification. For a DIYer fitting under-cabinet strip, confirm that the strip and driver are both constant-voltage 12V DC products. For a landlord replacing failed downlights, check the mounting and access arrangements rather than hiding a new driver in the same unsuitable space.
The key point remains simple: an old halogen transformer isn't automatically suitable for an LED load just because both systems are described as 12V. Verify the output, load range, enclosure requirements, dimmer compatibility and conformity documentation. If the project is commercial or involves complicated fixed wiring, a commercial lighting electrician can assess the complete installation rather than just swapping the visible lamp.
Once those checks are complete, order the correctly specified driver, keep the paperwork with the installation and arrange competent help for the mains-side work. A properly matched unit should give you steady, reliable lighting without the familiar flicker and buzz.
Neasden Hardware supplies practical hardware and electrical installation essentials for tradespeople, landlords and confident DIYers, backed by family-run experience from its London showroom and online shop. Visit Neasden Hardware to find the fixings, connectors and project supplies you need, and contact the team if you need help locating the right product for your installation.