Order Online
- Straight to your door!
Straight to your door

For most interior wood projects like skirting boards, doors, and furniture, a modern water-based paint is your best bet. It offers quick drying times and low odour, making it incredibly convenient. However, for high-traffic surfaces that need maximum durability, a traditional oil-based paint is still the superior choice for its hard-wearing finish. The final decision really comes down to balancing speed and convenience with long-term resilience.
Picking the right paint for interior woodwork can feel like a minefield, but it mostly boils down to two main options: water-based (often called acrylic or latex) and oil-based (or alkyd) paints. Getting to grips with their core differences is the first step to achieving a professional, lasting finish.
Each type has distinct characteristics that make it a better fit for different jobs, from upcycling a tired piece of furniture to protecting a busy door frame. While modern formulas have made water-based paints a versatile and popular option for many UK homeowners, oil-based paints still have a firm place for projects where a tough, glass-smooth finish is a must.
To help you decide, let's break down the key differences between these two paint types. This comparison should help you match your project’s needs with the right can of paint.
This table offers a snapshot of the core differences between water-based and oil-based paints to help guide your decision.
| Feature | Water-Based Paint | Oil-Based Paint |
|---|---|---|
| Durability | Good; modern formulas are increasingly tough. | Excellent; creates a very hard, durable shell. |
| Drying Time | Fast; touch-dry in 1-2 hours, recoat in 2-4 hours. | Slow; touch-dry in 6-8 hours, recoat in 16-24 hours. |
| Finish | Flexible; less prone to cracking over time. | Smooth and levelling; hides brush marks well. |
| Odour & VOCs | Low odour and low Volatile Organic Compounds (VOCs). | Strong odour and higher VOCs; requires good ventilation. |
| Clean-Up | Easy; requires only soap and water. | Difficult; requires mineral spirits or turpentine. |
| Colour Stability | Excellent; whites stay white and do not yellow. | Prone to yellowing over time, especially in low light. |
As you can see, the choice isn't always clear-cut, but understanding these trade-offs makes it much easier to select the right product for the job.
The growing preference for eco-friendly options is a trend seen across the home décor market. Globally, the demand for high-quality wood finishes is surging, with the market expected to grow from approximately £7.5 billion in 2023 to over £12 billion by 2032. This reflects a broader consumer shift towards products that are both effective and environmentally conscious.
For specific recommendations, especially for demanding applications like kitchens, a guide on the best paint for kitchen cabinets can offer valuable, expert-led insights. Choosing the right product from our extensive range of paint and decorating supplies will set you up for success from the start.
Choosing between water-based and oil-based paint is probably the biggest decision you'll make for any interior wood project. A quick glance gives you the highlights, but really getting to grips with the real-world differences will guarantee a finish that looks professional and actually lasts. It's the classic trade-off: modern convenience versus traditional resilience.
The choice you make here will affect everything, from the air you breathe while working to how that finish holds up in five years. So, let’s go beyond a simple pros-and-cons list and explore what these paints really mean for your skirting boards, furniture, and doors.
Modern water-based paints, often called acrylics or latex, have become the go-to for good reason. Their formulas have improved massively over the years, closing the gap on durability while keeping all their user-friendly perks.
Their biggest advantage is the low level of Volatile Organic Compounds (VOCs). These are the chemicals that evaporate into the air, causing that strong paint smell and potentially harming your health. A low-VOC paint means a healthier home, less odour, and a much more pleasant experience, especially if you're painting in a room without much ventilation.
This move towards healthier, eco-friendlier options isn't just a niche trend. Here in the UK, waterborne coatings now hold about 75% of the market share for architectural paints. This is largely down to stricter environmental rules and people simply wanting products that work well without the nasty side effects. You can read more about this market shift over on techsciresearch.com.
Key Takeaway: The single biggest benefit of water-based paint is speed. With recoat times as short as two to four hours, you can often get a primer and two topcoats done in a single day, massively speeding up your project.
While oil-based paints used to be the undisputed champions of durability, modern water-based formulas are now incredibly tough. They create a more flexible finish that's less likely to crack or chip as wood naturally expands and contracts with changes in temperature and humidity.
Another crucial benefit is colour stability.
Despite all the perks of water-based options, traditional oil-based paints still have their place, especially for specific jobs. Their standout feature is the ability to create an exceptionally hard, durable shell that offers unmatched resistance to knocks, scuffs, and general wear and tear.
This makes oil-based paint the perfect choice for high-traffic, high-impact surfaces. Think kitchen cabinets that are constantly opened and closed, busy hallway doors, or skirting boards in a home with kids and pets running around.
The painting process itself is also a different experience. Oil-based paints have a longer "open time," which means they stay wet for longer. This gives the paint time to self-level beautifully, smoothing out brush strokes for a glass-like, professional finish that’s hard to get with faster-drying paints.
Of course, that extended drying time is also their biggest drawback. You’ll need to wait 16-24 hours between coats, which can really drag out a project. The higher VOC content also means you must have excellent ventilation during and after painting, and clean-up requires mineral spirits instead of just soap and water.
Picking the right paint for interior wood goes way beyond just the colour. The finish, or sheen, is just as important—it completely changes how the surface looks, feels, and stands up to daily life. It dictates how light plays across the wood, how easy it is to clean, and how durable it will be.
The range of finishes is a spectrum, from a completely flat matt to a reflective, almost mirror-like high gloss. Getting to grips with this spectrum is the secret to a professional-looking job. A finish that looks fantastic on a rustic ceiling beam would be a terrible choice for a high-traffic kitchen cabinet. The right sheen can hide imperfections, show off architectural details, and make sure your hard work lasts.
At one end of the spectrum, you'll find finishes with very little to no shine. These low-lustre options are masters of disguise, creating a soft, modern look that's brilliant at hiding surface imperfections.
Matt finish has the least amount of shine, giving you a flat, non-reflective surface. This is perfect for older woodwork that has a few dings, dents, or uneven textures, as it won’t catch the light and highlight those flaws. It’s a common myth that all matt paints are a nightmare to clean, but modern formulas like Dulux Trade Diamond Matt are incredibly durable and washable, making them a really practical choice.
Eggshell finish is the next step up, with a very subtle, soft sheen that looks a bit like a hen's egg. It’s more durable and easier to wipe down than a traditional matt, which makes it a hugely popular and versatile option for:
Satin is arguably the most popular finish for interior woodwork in the UK, and for good reason. It strikes the perfect balance between looking good and being practical. It has a gentle, velvety glow that feels sophisticated without being distractingly shiny.
This mid-sheen option offers great durability and is easy to clean, making it a reliable workhorse for most projects around the house. It's tough enough for busy areas but forgiving enough that it doesn't shout about every tiny imperfection, unlike its glossier cousins.
Situational Recommendation: Go for a satin finish on skirting boards, door frames, and window sills. Its moderate sheen gives you a durable, scuff-resistant surface that’s easy to wipe clean, all while providing a modern, elegant look that fits with most interior styles.
For areas that need maximum durability and a look that really makes a statement, semi-gloss and high-gloss finishes are the top contenders. Their reflective surfaces create a tough, non-porous shell that is exceptionally easy to clean.
Semi-gloss has a noticeable shine and is highly resistant to moisture and stains. This makes it a superb choice for demanding spots like kitchens and bathrooms where wipeability is key.
High-gloss gives you the most reflective, mirror-like finish of them all. It delivers a luxurious, high-end look and is the most durable and scrubbable of every sheen available. But that high shine comes with a catch: it will highlight every single flaw on the wood's surface. Meticulous prep work isn't just recommended; it's absolutely essential for a successful high-gloss finish.
Consider these high-shine options for:
Let's be honest, even the best paint for interior wood is going to look dreadful without proper prep. A truly professional-quality finish isn’t about the final coat of paint; it’s all about the groundwork you put in beforehand. This guide will walk you through the practical, step-by-step process for preparing any interior wood surface, ensuring your paint job looks flawless and actually lasts.
Whether you're tackling bare timber, previously painted skirting boards, or a varnished door, the core principles are the same. Cleaning, filling, sanding, and priming are non-negotiable. Skipping any of these is just a false economy, usually leading to a peeling, patchy mess that you'll have to fix down the line.
First things first, you need a clean, sound base for the paint to stick to. Interior woodwork, especially in kitchens or hallways, is a magnet for grease, grime, and fingerprints that will stop paint from adhering properly.
Start by giving the surface a good wash with a sugar soap solution and a sponge. This degreasing step is absolutely crucial, whether you're working with bare or previously painted wood. Once it's clean, wipe it down with a cloth dampened with fresh water and let it dry completely.
Next, give the wood a proper inspection. Look for dents, scratches, or old nail holes that will ruin the final look. For these little repairs, a high-quality wood filler is your best friend.
For reliable results, using a product like a ready-mix wood filler from Toupret makes the job much easier and guarantees a smooth, sandable repair that blends right in.
Sanding might be the most vital step in wood prep, but it's also the one people rush or skip most often. It does two things: it smooths the surface and it creates a microscopic texture, or 'key', that gives the primer and paint something to grip onto.
If you're working on previously painted wood with a gloss or satin finish, a light scuff-sand is usually all you need to take the shine off. For bare wood or surfaces with bigger issues, you'll need to be more thorough.
Pro Tip: Always sand in the direction of the wood grain. Going against the grain can tear the wood fibres, leaving deep scratches that will show right through your final coat of paint.
Make sure you're using the right sandpaper grit for the job:
After sanding, the surface will be covered in a fine layer of dust. Just wiping it with a cloth won't cut it. For a truly flawless finish, use a tack cloth—a slightly sticky piece of cheesecloth designed to pick up every last particle, leaving you with a perfectly clean surface ready for priming.
Priming is the last essential step before you crack open your topcoat. A good quality wood primer does several critical jobs: it gives you a stable, uniform base for the paint, ensures it sticks properly, and stops any underlying problems from bleeding through later.
On bare wood, a primer is non-negotiable. It seals the porous wood, stopping the topcoat from soaking in unevenly and looking patchy. For woods like pine, oak, and cedar, it’s even more important. These woods contain natural oils called tannins, which can bleed through water-based paints and cause ugly yellow or brown stains.
When you're choosing a primer, think about what your project needs:
Knowing the theory is one thing, but putting it into practice is where a project really comes alive. Now that we’ve gone over the different paint bases, finishes, and prep work, let's apply that knowledge to common jobs you’ll find around the house. The key to a confident choice is understanding what each task demands and picking the best paint for the job.
It’s simple really: the perfect paint for a decorative chair just won’t cut it for hardworking kitchen cabinets. This section breaks down the best options for specific scenarios, so you can choose a product that not only looks great but performs exactly as you need it to.
Kitchen cabinets take a real battering. They face a daily onslaught of grease, steam, food splatters, and constant handling. This is one area where you absolutely cannot compromise on toughness; the paint you choose is critical for a finish that lasts.
Durability is your number one priority. You need a paint that cures to a hard, scrubbable shell that won’t chip or stain easily. For this, a modern water-based alkyd enamel is a brilliant choice. It gives you the easy application and low odour of a water-based paint but with the rugged resilience you’d normally only get from an oil-based formula.
Of course, traditional oil-based paint in a satin or semi-gloss finish is still a top contender. Its self-levelling properties create a beautifully smooth surface, and the cured finish is exceptionally tough. Just be prepared for longer drying times and a pretty strong smell while you work.
Key Consideration: The kitchen is a functional, high-traffic space. You have to prioritise performance. A beautiful finish that chips or can't be cleaned will quickly become a headache. A satin or semi-gloss sheen is non-negotiable for easy wipe-downs.
Upcycling furniture is a great way to put your personal stamp on your home. For projects like a wooden chair, a display cabinet, or a side table, your focus shifts to ease of use, quick drying times, and getting that perfect stylish look.
This is where water-based eggshell or satin paints really shine. They dry fast, meaning you can often get the whole job done in a single weekend. The low odour makes it comfortable to work indoors, and cleaning your brushes is as simple as using soap and water.
An eggshell finish provides a contemporary, low-sheen look that’s fantastic at hiding minor dings and imperfections on older pieces. If you want a bit more lustre and durability, a satin finish gives you a subtle, velvety glow that’s still very forgiving.
The tools you use will also make a big difference to your speed and the quality of the finish. This chart shows what you can expect from different applicators.
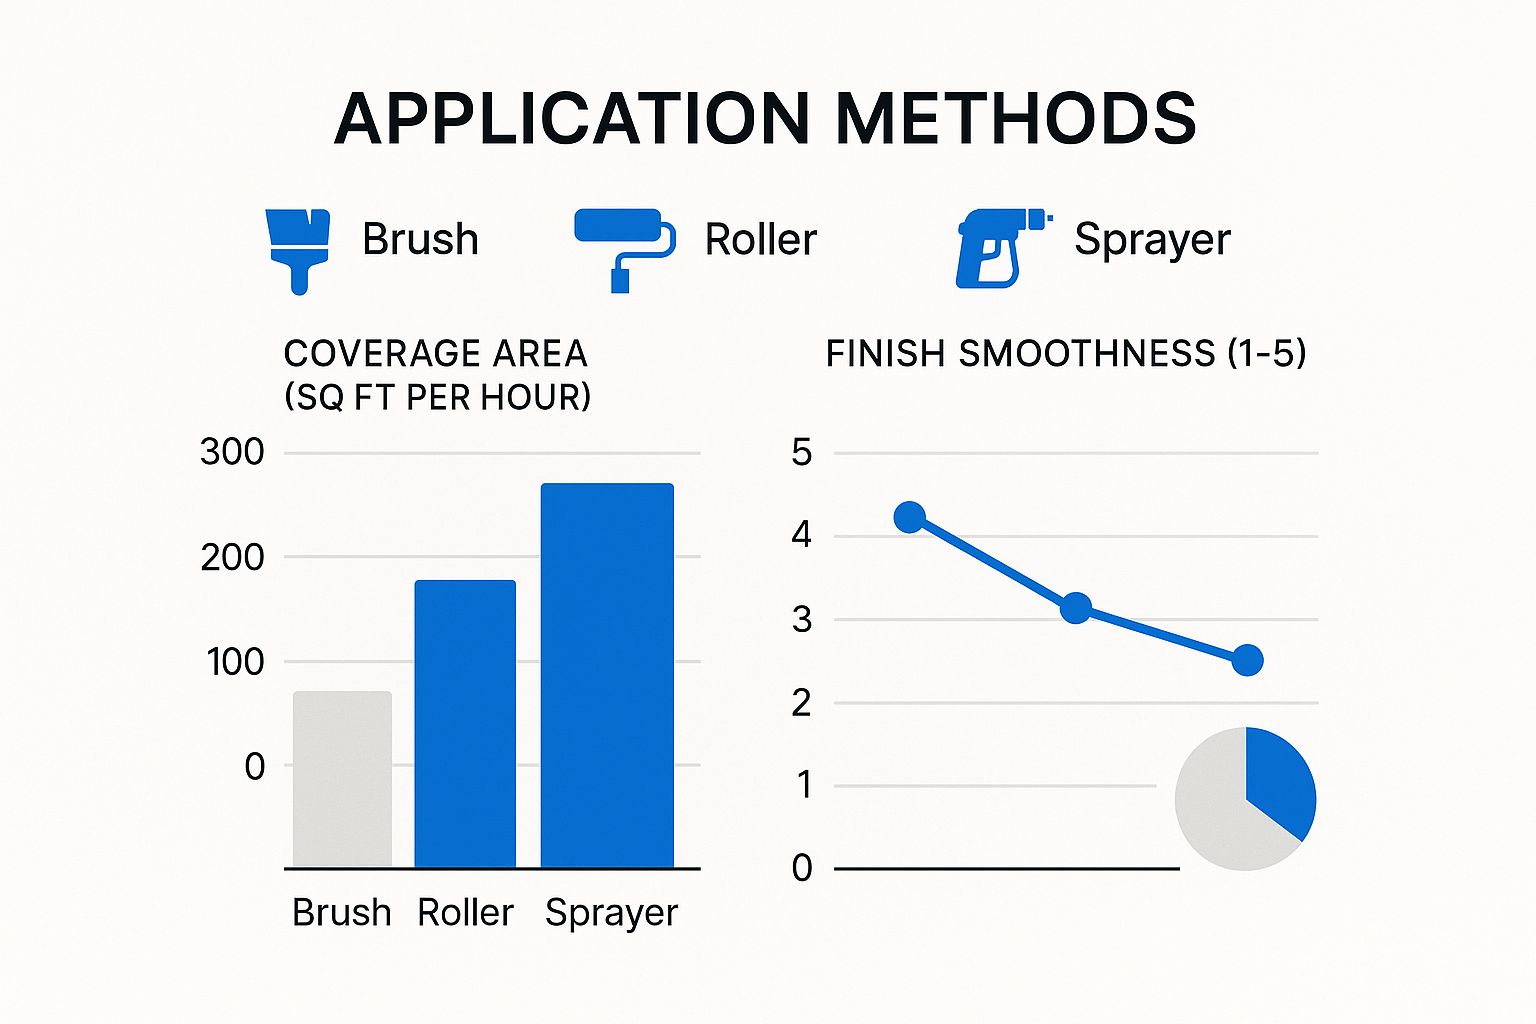
As you can see, a sprayer delivers the smoothest result in the least amount of time, whereas brushes give you precision control but take a bit longer.
Skirting boards, door frames, and architraves are the unsung heroes of your interior woodwork. They also take a constant beating from vacuum cleaners, shoes, and bags. The best paint for interior wood here has to be tough and scuff-resistant.
You’re facing a classic choice:
Using the right tools is essential for getting those clean, professional lines on your trim. A quality brush is a must, but a good roller can really speed things up on flatter areas like door panels. You can explore a wide range of roller frames and refills to find the perfect tool for your project.
Choosing the right combination of paint and finish can feel daunting, but it’s really about matching the product to the job. This table breaks down our top recommendations for common household projects to help you make the right call every time.
| Project | Recommended Paint Base | Recommended Finish | Key Considerations |
|---|---|---|---|
| Kitchen Cabinets | Water-Based Alkyd Enamel or Oil-Based | Satin or Semi-Gloss | Must be highly durable, scrubbable, and resistant to grease and moisture. |
| Interior Doors | Water-Based or Oil-Based | Satin or Semi-Gloss | Needs to withstand frequent handling. Semi-gloss is easier to clean fingerprints from. |
| Furniture (e.g., Chair) | Water-Based (Latex or Acrylic) | Eggshell, Satin, or Chalk Paint | Quick drying and low odour are priorities. Eggshell hides imperfections on older pieces. |
| Skirting & Trim | Water-Based or Oil-Based | Satin or Gloss | High scuff resistance is key. Non-yellowing water-based is best for crisp whites. |
| Window Frames | Oil-Based or High-Quality Water-Based Alkyd | Satin or Semi-Gloss | Needs to resist condensation and temperature changes. Durability is crucial. |
| Built-in Shelving | Water-Based Acrylic | Eggshell or Satin | Looking for a smooth, decorative finish that’s easy to apply and touch up if needed. |
By carefully matching the paint type and finish to the specific demands of your woodwork, you set yourself up for a successful, long-lasting result that you can be proud of.
Even with the best guide in hand, there are always a few practical questions that pop up mid-project. This final section tackles some of the most common queries we hear from both first-time DIYers and seasoned pros. We've handpicked these questions to clear up any lingering concerns and give you the last few pieces of the puzzle for a perfect finish.
From the mysteries of priming to achieving mess-free skirting boards, think of this as your go-to reference for those specific, practical problems that can make or break your project. These expert answers will give you the confidence to handle any challenge that comes your way.
Yes, priming is almost always essential for a professional, long-lasting finish. A good quality primer does several vital jobs that a topcoat simply can't handle on its own. It’s the foundation of a durable paint system.
A primer gives the topcoat something to grip onto, preventing peeling and chipping down the line. It also seals the wood, which stops the paint from soaking in unevenly and creating a patchy, inconsistent look.
Perhaps most importantly, it blocks stains. Woods like pine and oak contain natural oils called tannins, which can bleed through water-based paints and cause ugly yellow or brown discolouration. A stain-blocking primer is the only way to stop this from happening.
Expert Insight: While some modern paints are marketed as 'self-priming', this usually only works on previously painted surfaces that are in excellent condition. For bare wood, knotty wood, or when making a big colour change, a dedicated wood primer is non-negotiable. Skipping it is just false economy.
Achieving clean, sharp lines on skirting boards really comes down to meticulous preparation and a steady hand. The secret is to create a solid barrier that stops paint from creeping where it shouldn't.
First, make sure the skirting board is clean, dry, and has been lightly sanded. Then, apply high-quality painter's tape along the wall just above the skirting board and along the floor at its base. Use a flexible filling knife or even an old credit card to press the tape down firmly, creating a tight seal.
When you start painting, use a small, high-quality angled brush for better control, especially in the corners and along the edges. Remember to apply thin, even coats to prevent any drips or runs from forming.
Follow these steps for the sharpest possible lines:
You absolutely can, but success hinges entirely on proper prep work. If you slap a water-based topcoat directly onto an old, glossy oil-based finish, it will have nothing to grip onto and will likely peel or scratch off with the slightest knock.
The old oil-based surface is non-porous and slick, so you have to transform it into a surface the new paint can bond with. First, give it a thorough clean with a sugar soap solution to get rid of any grease or grime.
Next, you have to de-gloss the surface by sanding it with medium-grit sandpaper—120-grit is ideal. Your goal is simply to dull the shine and create a microscopic texture, or 'key', for the new paint to adhere to. After sanding, wipe away all the dust with a tack cloth.
Finally, apply a high-quality, adhesion-promoting primer designed specifically for bonding with glossy or difficult surfaces. Once the primer is fully cured, you can apply your water-based topcoats with confidence. Whatever you do, don't skip the sanding and priming steps.
Patience is a virtue in painting, and respecting recoat times is crucial for a smooth, durable finish. These times vary significantly between paint types, so your first port of call should always be the manufacturer's instructions on the tin.
As a general rule, there's a big difference between the two main types:
Rushing this process, especially with oil-based paints, will ruin your finish. Applying a new coat before the one underneath has hardened properly can cause dragging, wrinkling, and an uneven texture that is a nightmare to fix. Always err on the side of caution and give it a little extra time if you're unsure.
For all your project needs, from the best paint for interior wood to primers and professional-quality brushes, explore the extensive collection at Neasden Hardware. With over thirty years of experience, we have the products and expertise to help you achieve a flawless finish. Visit us online at https://neasdenhardware.co.uk.