
Order Online
- Straight to your door!
Straight to your door


It's a cold winter morning, the boiler has stopped, and the gauge is sitting at 0.8 bar instead of 1.5 bar. You top up the system, the heating comes back, then the gauge drops again, or climbs sharply whenever the radiators warm up. That pattern doesn't automatically mean there's a leak. On a sealed heating system, the expansion vessel may have lost its air-side pressure, or its diaphragm may have failed altogether.
This guide deals with the part many homeowners struggle with after the initial diagnosis, what to do when the gauge keeps falling, how to compare cold and hot readings, and how to tell a flat vessel from a genuine water leak. The figures and methods apply to UK domestic sealed heating systems, but the boiler manufacturer's instructions always take priority.
An expansion vessel is a sealed metal canister divided by a flexible rubber diaphragm. One side contains a nitrogen pre-charge, normally around 1.0 bar, while the other side connects to the heating water. As the water heats and expands, it pushes against the diaphragm rather than forcing the entire system pressure upwards. Viessmann's UK guidance explains why this pre-charge is necessary for maintaining constant pressure as water heats and cools.
On a typical combi boiler, you'll find the vessel inside the boiler casing, usually towards the rear. Some larger or more complex installations use an external vessel on the heating return pipe. The vessel must be correctly sized for the amount of water in the system. A small vessel connected to a large system has less room to absorb expansion, while an incorrectly selected or poorly positioned vessel can create unstable pressure behaviour.
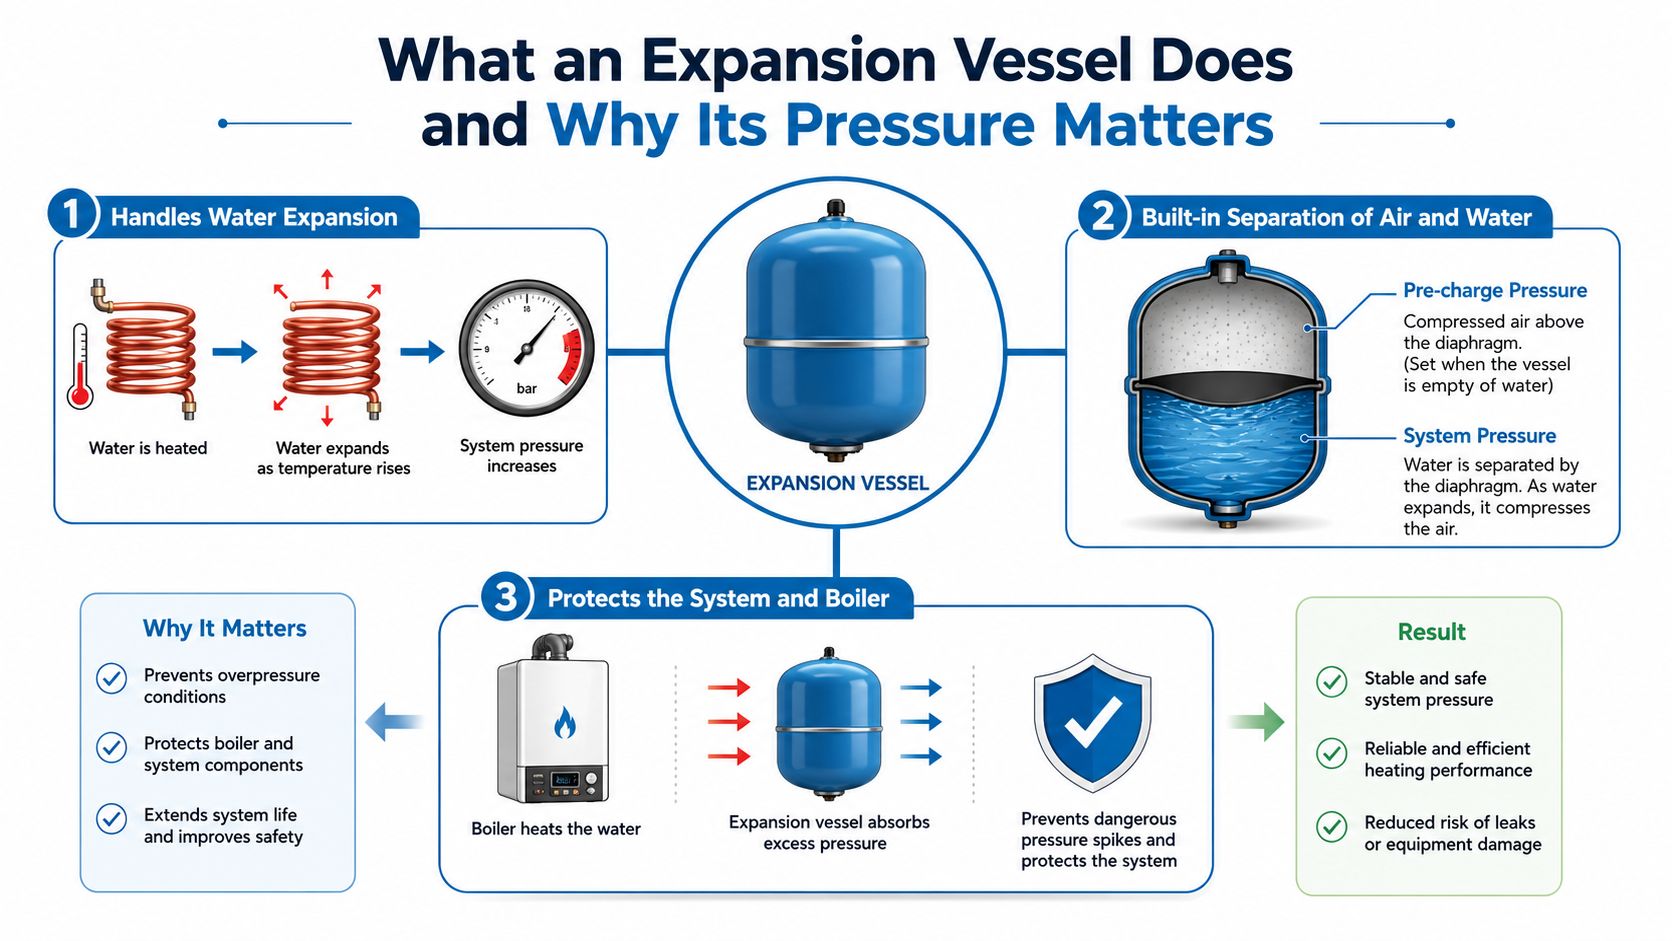
In an old open-vented heating system, expansion water can move into a feed-and-expansion cistern in the loft. A sealed system has no such open tank. The vessel provides the flexibility that the open cistern once supplied, keeping pressure within a usable range and reducing the chance of the pressure relief valve, or PRV, discharging.
When the gas cushion is flat, the diaphragm can sit against the vessel wall. Heated water then has nowhere effective to go. The gauge rises quickly, the PRV may discharge, and the system can lose pressure again after cooling. Topping up restores pressure temporarily, but it doesn't restore the vessel's ability to absorb expansion.
Practical rule: A healthy vessel is judged by how steadily the system behaves between cold and hot conditions, not by one gauge reading taken in isolation.
For general background on expansion tanks outside UK heating practice, homeowners may also find this water heater help for San Antonio homeowners useful. The equipment and regulations differ, so don't transfer American settings to a UK boiler. For most UK domestic sealed heating systems, the working target for the vessel pre-charge is about 1.0 bar, checked correctly with the water side unloaded.
The pre-charge pressure is the gas pressure inside the vessel before water enters the water side. It's measured through the Schrader valve, similar to a tyre valve, with the heating system isolated and drained so water pressure isn't adding to the reading. Operating pressure is what you see on the boiler gauge while the heating system is filled, circulating and warming.
Those values serve different purposes. Copying a vessel's 1.0 bar pre-charge as the cold fill pressure is a common mistake because it leaves no useful margin above the building's static water head. BS EN 12828-based guidance cited by CIBSE says the minimum system pressure should be at least 0.2 bar above the installation's static height, and the fill pressure must exceed the vessel gas pressure so water enters the vessel. The technical expansion-vessel guidance from Altecnic explains this distinction and the consequences of setting the cold fill too low.
Measure the vertical distance between the boiler or filling point and the highest part of the heating installation. A ground-floor combi has little static head, so a cold fill around 1.5 bar is commonly used in domestic commissioning practice. A two-storey installation with 3 metres of lift requires a minimum pressure of at least 0.5 bar, calculated as the static height allowance plus the 0.2 bar margin. The cold fill still needs to sit above the vessel gas pressure in practical commissioning, so the manufacturer's instructions and the installer's calculations matter.
A loft-conversion system can have a much greater vertical lift. Its minimum cold fill may rise to roughly 1.5 bar, depending on the actual installation height. That is why a single generic setting can't safely cover every property.
| Installation type | Static height (m) | Pre-charge (bar) | Min cold fill (bar) | Typical hot operating (bar) |
|---|---|---|---|---|
| Ground-floor combi | Low | 1.0 | Above static height and vessel gas pressure | About 1.5 to 2.0 |
| Two-storey system | 3 | 1.0 | At least 0.5 | About 1.5 to 2.0 |
| Loft-conversion installation | Greater lift | 1.0 | Roughly 1.5, subject to calculation | About 1.5 to 2.0 |
A common commissioning approach is to set the vessel at about 1.0 bar, fill the system to roughly 1.5 bar, and expect hot pressure around 2 bar, avoiding nuisance PRV operation. That approach is a starting point, not permission to ignore the boiler data plate or the system's measured height. The UK plumbers' discussion describes this practical commissioning method.
Testing only makes sense when the water side of the vessel has been unloaded. If the heating system remains pressurised, water pressure can make a flat or undercharged vessel appear to have an acceptable gas reading.
Start by switching off the boiler and allowing the system to cool fully. Close the filling-loop isolation valves, or isolate the relevant cold-water connection on a combi, then use the system drain point to reduce the heating-water pressure. Work over a suitable drain or container, wear gloves and eye protection, and expect hot water or dirty system water if the boiler hasn't cooled properly.
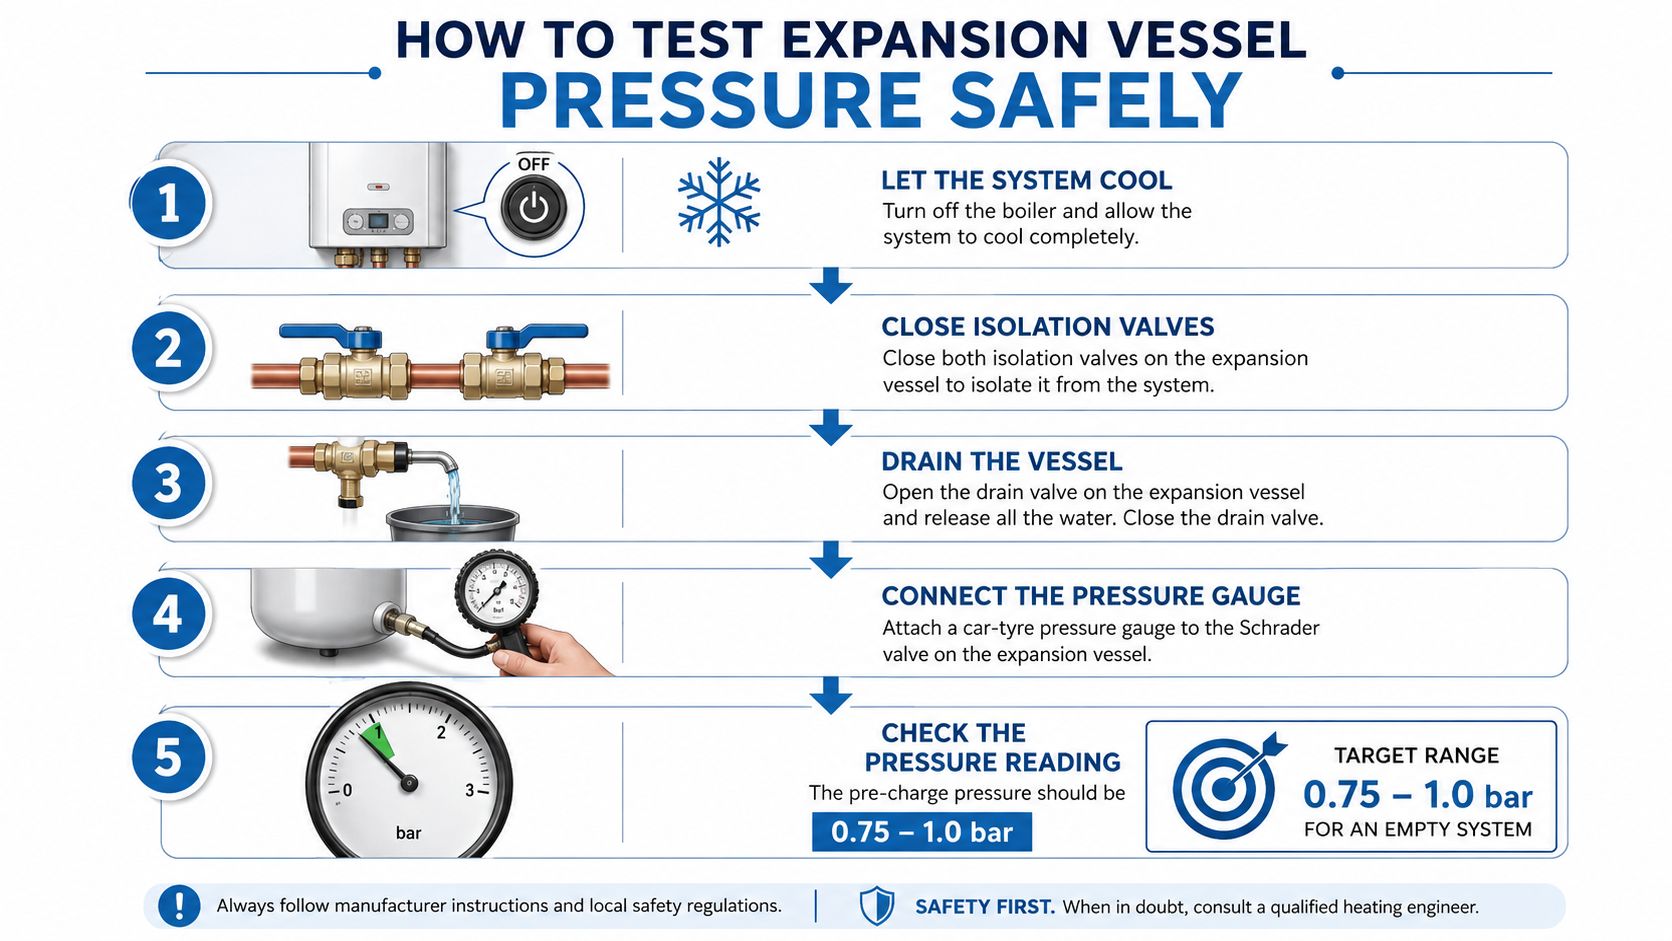
Never connect mains water to the Schrader valve. That valve is for the gas side only. Use an appropriate pump, and don't force air into a vessel that shows evidence of diaphragm failure.
Once testing is complete, close the drain, restore the system to the manufacturer's recommended cold pressure, reopen the filling-loop valves only as required, and close them securely. If you aren't confident identifying the drain cock, isolation valves or vessel, this is a job for a heating engineer rather than an experiment inside a live boiler installation.
For a visual walkthrough, the following video can help you understand the sequence before deciding whether to book a qualified person:
A typical service call starts with a homeowner saying, “I've topped it up twice recently, and it's already drifting again.” The useful question isn't how much water was added. It's what the gauge does after the system heats, then cools.
A vessel that has lost some gas charge may be repressurised. A vessel with a damaged diaphragm won't hold that charge, so pumping it up only delays the same fault. On a drained system, the reliable method is to isolate and drain the water side, connect a pump and gauge to the Schrader valve, restore the pre-charge to the specified value, then refill and test the heating circuit.
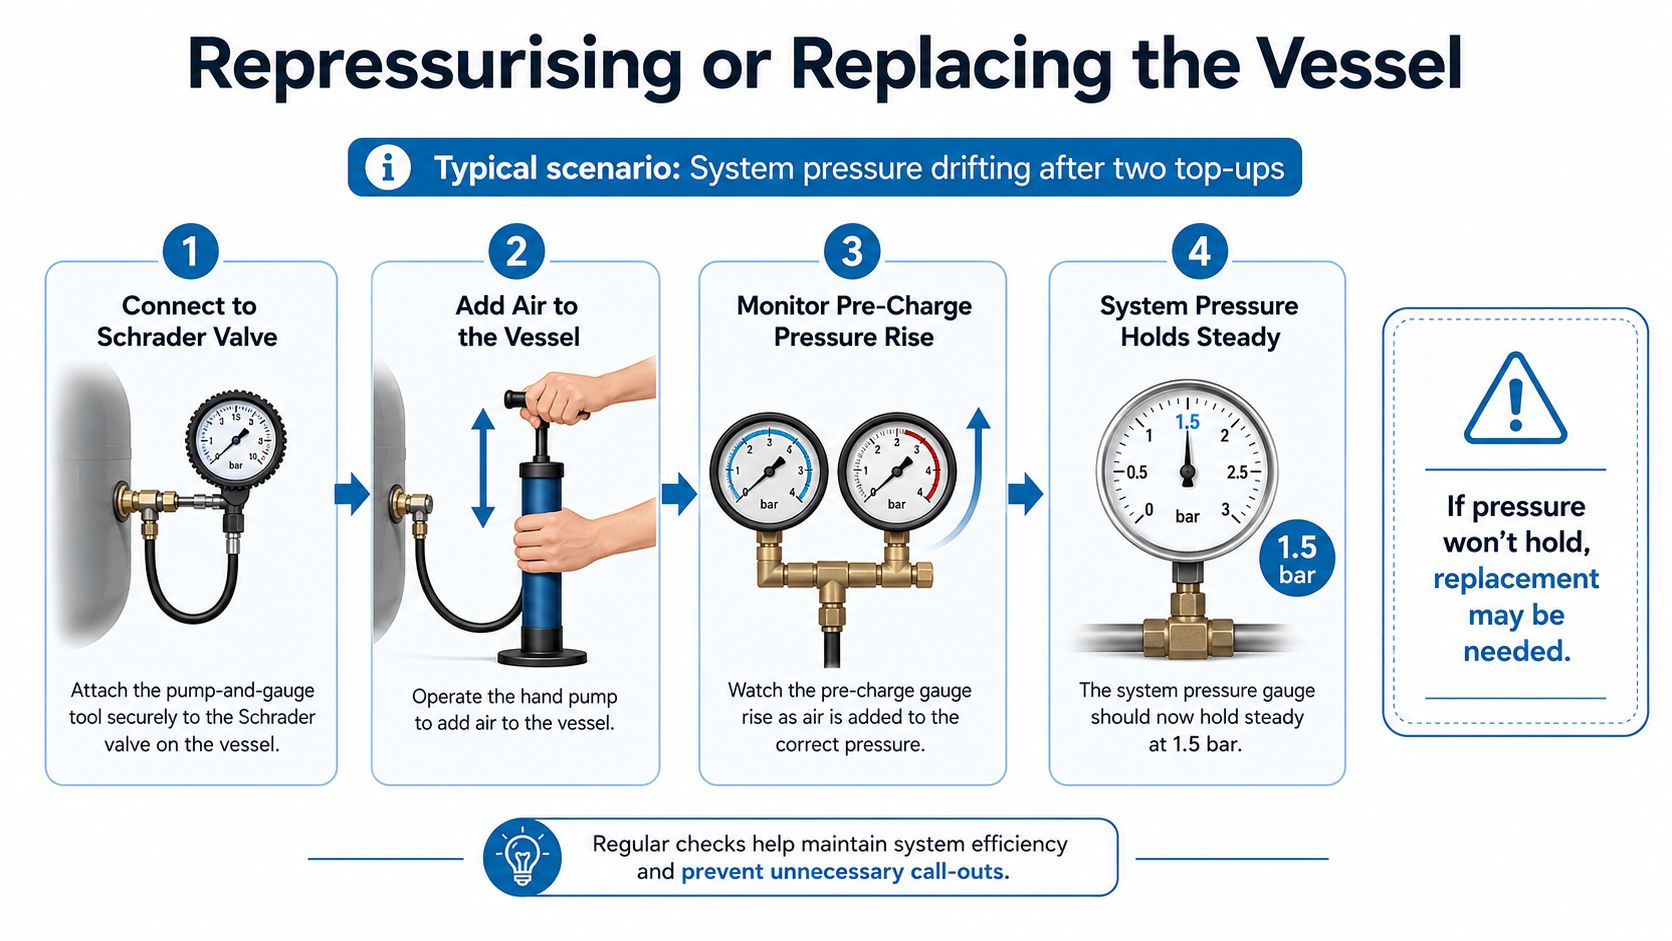
For some service situations, an engineer may use a pump-and-gauge arrangement while managing the system pressure, but the vessel's gas reading must still be interpreted correctly. The diaphragm can only do its job if the gas charge remains stable and the cold fill pressure is set appropriately for the installation height.
After recharging, refill the system, run the heating through a complete warm-up and cool-down, and compare the readings. If the gauge still climbs sharply when hot, falls markedly when cold, or the PRV discharges, recharge hasn't solved the underlying fault.
Pipework condition also matters during any heating repair. If components need to be disconnected, a practical reference on copper pipe fittings can help explain the connection types, but it doesn't replace the need for correct isolation, draining and reconnection.
Replacement becomes the sensible route where the steel vessel is visibly bulged, rusted at the seam, weeping, or unable to hold nitrogen pre-charge for more than 30 seconds. The vessel must be isolated, the system drained, the old component removed, and the replacement reconnected with the correct seals and secure, torque-checked connections. Those steps are difficult to complete safely without the right access and tools, especially where the vessel sits inside a boiler casing.
A replacement isn't complete when the new tank is fitted. The engineer should verify the pre-charge, refill the system, inspect for leaks, run the boiler, observe cold and hot pressure, and check that the PRV hasn't been forced to discharge. A stable system is the result you want, not merely a new component.
A dropping gauge does not automatically mean a leak in the heating circuit. If the vessel has lost its air charge, pressure can rise as the system heats, forcing water out through the PRV. Once the system cools, the gauge falls, leaving only the apparent pressure loss.
Use an observation test before repeatedly opening the filling loop. Record the gauge with the system cold, again when the heating is fully warm, and after it has cooled. Keep the readings for two days, noting any water or staining at the PRV discharge pipe.
A sound vessel limits pressure swings. UK boiler guidance commonly places system pressure at about 1 bar, while a marked rise or fall suggests a fault. Vaillant's UK explanation of expansion vessels also supports comparing cold and hot readings rather than judging one gauge position in isolation.
| System state | Healthy vessel, 1.0 bar pre-charge | Failing or waterlogged vessel |
|---|---|---|
| Cold start | Relatively steady cold pressure | May be low after discharge or topping up |
| During heating | Pressure rises in a controlled way | Pressure rises sharply as water expands |
| After cool-down | Returns close to its previous baseline | Drops substantially, often after PRV discharge |
| PRV discharge | No repeated discharge during normal cycles | Repeat discharge or a constant trickle |
| Schrader valve | Gas escapes when tested correctly | Water emerges, or charge won't hold |
The clearest warning is a sharp rise when hot followed by a substantial fall when cold. A brief PRV discharge during an abnormal first warm-up can happen, but discharge on every heating cycle points to a flat or waterlogged vessel. Repeatedly topping up only restores the symptom temporarily.
For broader background, see signs your water heater expansion tank is bad, but apply that terminology cautiously. Domestic hot-water cylinders and sealed central-heating circuits use different arrangements and settings. On a UK boiler, the pressure log and PRV behaviour are more useful than a generic tank symptom list.
An automatic filling arrangement can conceal the fault by replacing water discharged through the PRV. The gauge may appear normal until the vessel fails again, while the system receives more fresh water than it should. Radiator control changes can also alter heating behaviour, so understanding a radiator thermostat valve helps separate control adjustments from a pressure fault. A flat pre-charge is therefore not proof that the vessel is recoverable. If it will not hold charge, the vessel itself may have failed.
Expansion vessel pressure sits inside a safety system, not just a homeowner adjustment. UK requirements include the HSE Simple Pressure Vessels Safety Regulations, which apply to vessels with a maximum working pressure of not more than 30 bar and a PS.V limit of not more than 10,000 bar litres. The HSE guidance on simple pressure vessels sets out that regulatory boundary.
The Water Supply (Water Fittings) Regulations 1999 also require expansion valves on hot-water vessels to discharge only when pressure is at least 0.5 bar, or 50 kPa, above normal operating pressure. Don't confuse that discharge requirement with a target boiler pressure. The boiler manufacturer's instructions and the system design determine the normal operating setting.
A homeowner can read the pressure gauge, look for water at the PRV discharge pipe, record cold and hot behaviour, and use the filling loop only in line with the boiler instructions. Draining a system requires more care: isolate the boiler, allow it to cool completely, close the relevant valves, connect a hose to the drain cock, and direct the water to a suitable drain.
Never vent a hot sealed system. Water can scald, system chemicals can irritate skin, and an uncontrolled discharge can damage flooring or electrical equipment. Don't remove the boiler casing or interfere with gas components. Any work involving the boiler case, gas controls, combustion side or live electrical connections belongs with the appropriately qualified engineer.
Stop and book an engineer if: the PRV keeps discharging, the vessel is corroded or weeping, the boiler locks out, or you notice a combined gas-and-water smell.
A competent person should leave a pressure-test and commissioning record, including the vessel pre-charge, cold fill pressure, observed hot pressure, leak checks and any adjustment made. That record helps the next engineer distinguish a recurring vessel fault from a new leak.
For broader context on safe hot water systems explained, remember that Australian hot-water arrangements and regulatory language may differ from UK practice. Within a UK home, use the appliance manual and qualified local advice. Related plumbing components, such as a double check valve for an outside tap, also need correct installation to protect the water supply, but they aren't a substitute for diagnosing expansion vessel pressure.
The practical boundary is simple. Observation and careful logging can help you describe the fault. Recharging, replacing or pressure-testing the vessel requires the right equipment, isolation procedure and competence, particularly when access involves the boiler casing.
If you're sourcing reliable hardware and fittings for heating, plumbing or wider home-improvement work, visit Neasden Hardware. Their London-based team supplies trade and DIY essentials through the Wembley showroom and online shop, with practical product guidance when you need to match the right component to the job.