Order Online
- Straight to your door!
Straight to your door


Are you ready to refresh your living space but unsure where to begin? Achieving a professional-quality finish isn't just about selecting the right colour; it's about employing the correct techniques and understanding the fundamentals of good design. Whether you're a seasoned DIY enthusiast tackling a weekend project or a property manager planning a large-scale refresh, mastering a few key principles can elevate your work from amateur to outstanding.
This comprehensive guide delivers a curated collection of essential paint and decorating tips, drawing on expert knowledge to help you approach any room with confidence. We move beyond the obvious, offering specific, actionable insights that professionals rely on for a flawless result. From the meticulous art of surface preparation and strategic colour selection to precise application techniques and long-term maintenance, we cover every critical stage.
Here, you will learn how to avoid common pitfalls that can compromise your finish, such as inconsistent coverage or poor colour harmony. We will explore proven methods like the 60-30-10 colour rule for balanced interiors, the importance of sampling paints in different lighting conditions, and why investing in quality tools is non-negotiable. Forget vague advice; this listicle is organised to provide practical steps and real-world examples that guarantee a superior, durable finish you can be proud of. Let's begin the process of transforming your home with skills that make a visible difference.
Achieving a flawless, durable finish isn't about applying more paint; it's about applying it correctly. The "primer plus two coats" method is a non-negotiable standard among professional decorators for a reason. This fundamental technique involves applying one coat of a high-quality primer followed by two full coats of your chosen topcoat paint. This disciplined approach is one of the most reliable paint and decorating tips for ensuring professional-grade results.
The primer’s role is critical. It creates a uniform, sealed surface that prevents the topcoat from soaking in unevenly, which is common on porous materials like new plaster or bare wood. It also blocks stains and neutralises the underlying wall colour, ensuring the final paint colour is true to the swatch.
Adhering to this rule guarantees optimal coverage, colour accuracy, and long-term durability. A single coat of paint, even over primer, often looks patchy and uneven once dry. The second coat builds the necessary film thickness, deepening the colour and creating a robust, washable surface that withstands daily wear and tear.
This technique is particularly crucial in specific scenarios:
By committing to this structured process, you move beyond amateur results and produce a finish that looks expertly applied and is built to last.
Choosing a colour palette that feels balanced and intentional can be one of the most daunting parts of decorating. The 60-30-10 rule is a classic interior design principle that eliminates guesswork, providing a simple formula for creating a harmonious space. This foolproof method dictates how to distribute colours in a room: 60% of the room should be a dominant colour, 30% a secondary colour, and the final 10% an accent.
The dominant (60%) colour is typically a neutral that acts as the backdrop for the entire room, often used on the walls. The secondary (30%) colour is more distinct and is used on elements like furniture, curtains, or a feature wall to add visual interest. Finally, the accent (10%) is a bold shade used sparingly on accessories like cushions, artwork, or decorative objects to add a pop of personality.
This rule creates a visual hierarchy that is naturally pleasing to the eye, preventing any single colour from overwhelming the space. It ensures a professional, well-thought-out scheme rather than a chaotic mix of shades. This approach is one of the most effective paint and decorating tips for anyone struggling to build a cohesive palette from scratch.
This balanced approach is particularly useful in these scenarios:
This summary visualises the proportional breakdown of the 60-30-10 rule.
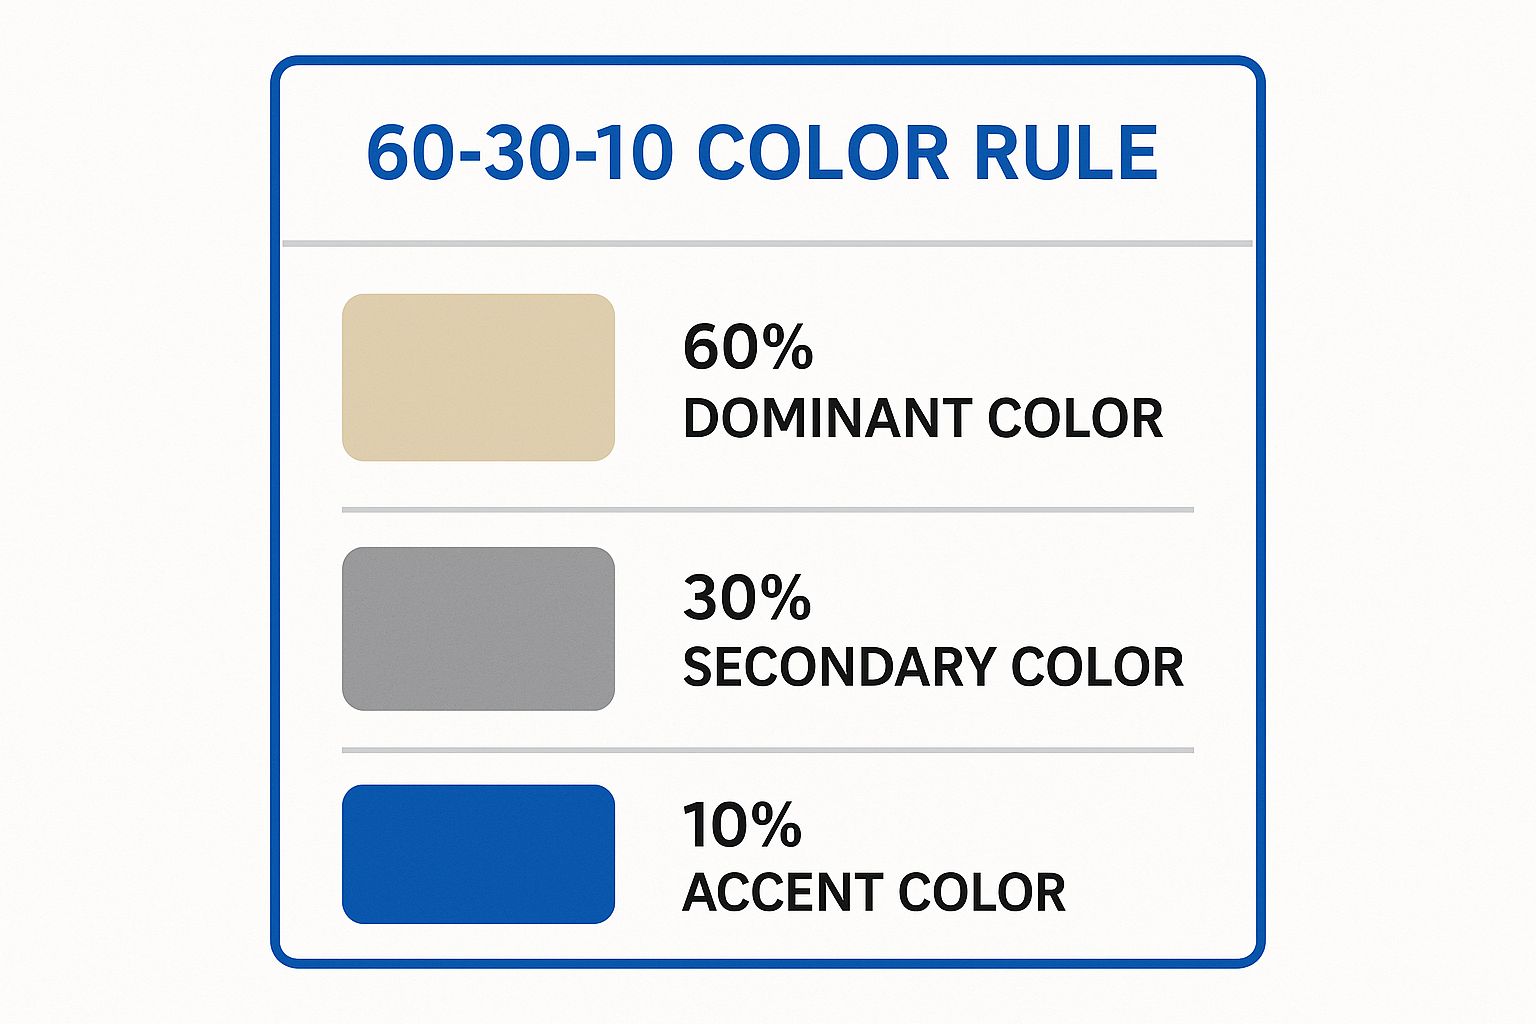
The infographic clearly illustrates how the dominant colour establishes the foundation, the secondary adds depth, and the accent provides the finishing touch. By following this simple ratio, you can confidently combine colours to produce a balanced and stylish interior that looks professionally curated.
Selecting the perfect paint colour is one of the most exciting parts of decorating, but it can also be the most deceptive. A colour that looks ideal on a small swatch in a brightly lit shop can appear completely different on your walls. This is why professional decorators always sample colours directly in the space before committing to a full purchase. This is one of the most critical paint and decorating tips to avoid costly and time-consuming mistakes.
The principle is simple: test paint in its intended environment. Light is the single most influential factor on how we perceive colour, and its quality changes dramatically from room to room and hour to hour. By sampling, you see how the colour truly behaves with your home’s unique natural and artificial lighting.
Sampling is the only way to guarantee you will be happy with your final colour choice. It allows you to observe how a shade interacts with your flooring, furniture, and fixed elements like kitchen cabinets or a fireplace. It prevents the common pitfall of choosing a colour that looked perfect on screen or in-store, only to find it appears too dark, too bright, or has unflattering undertones once applied to an entire room.
This technique is crucial in specific scenarios:
Most paint brands offer small sample pots or innovative peel-and-stick swatches. By taking the time to live with your chosen colours for a day or two, you can make a confident decision that you will love for years to come.
The single most influential factor in achieving a professional, long-lasting paint finish has little to do with the paint itself; it’s all about the preparation. Skipping or rushing this foundational stage is a false economy, as it almost guarantees a subpar result with poor adhesion, visible imperfections, and a shortened lifespan. Proper surface preparation is one of the most vital paint and decorating tips, forming the bedrock upon which a flawless finish is built.
This process involves a systematic cleaning, repairing, and priming of the surface to create the perfect canvas. It ensures that the paint can adhere uniformly and securely, resulting in a smooth, durable, and professional-looking coating that won't peel, bubble, or fail prematurely.
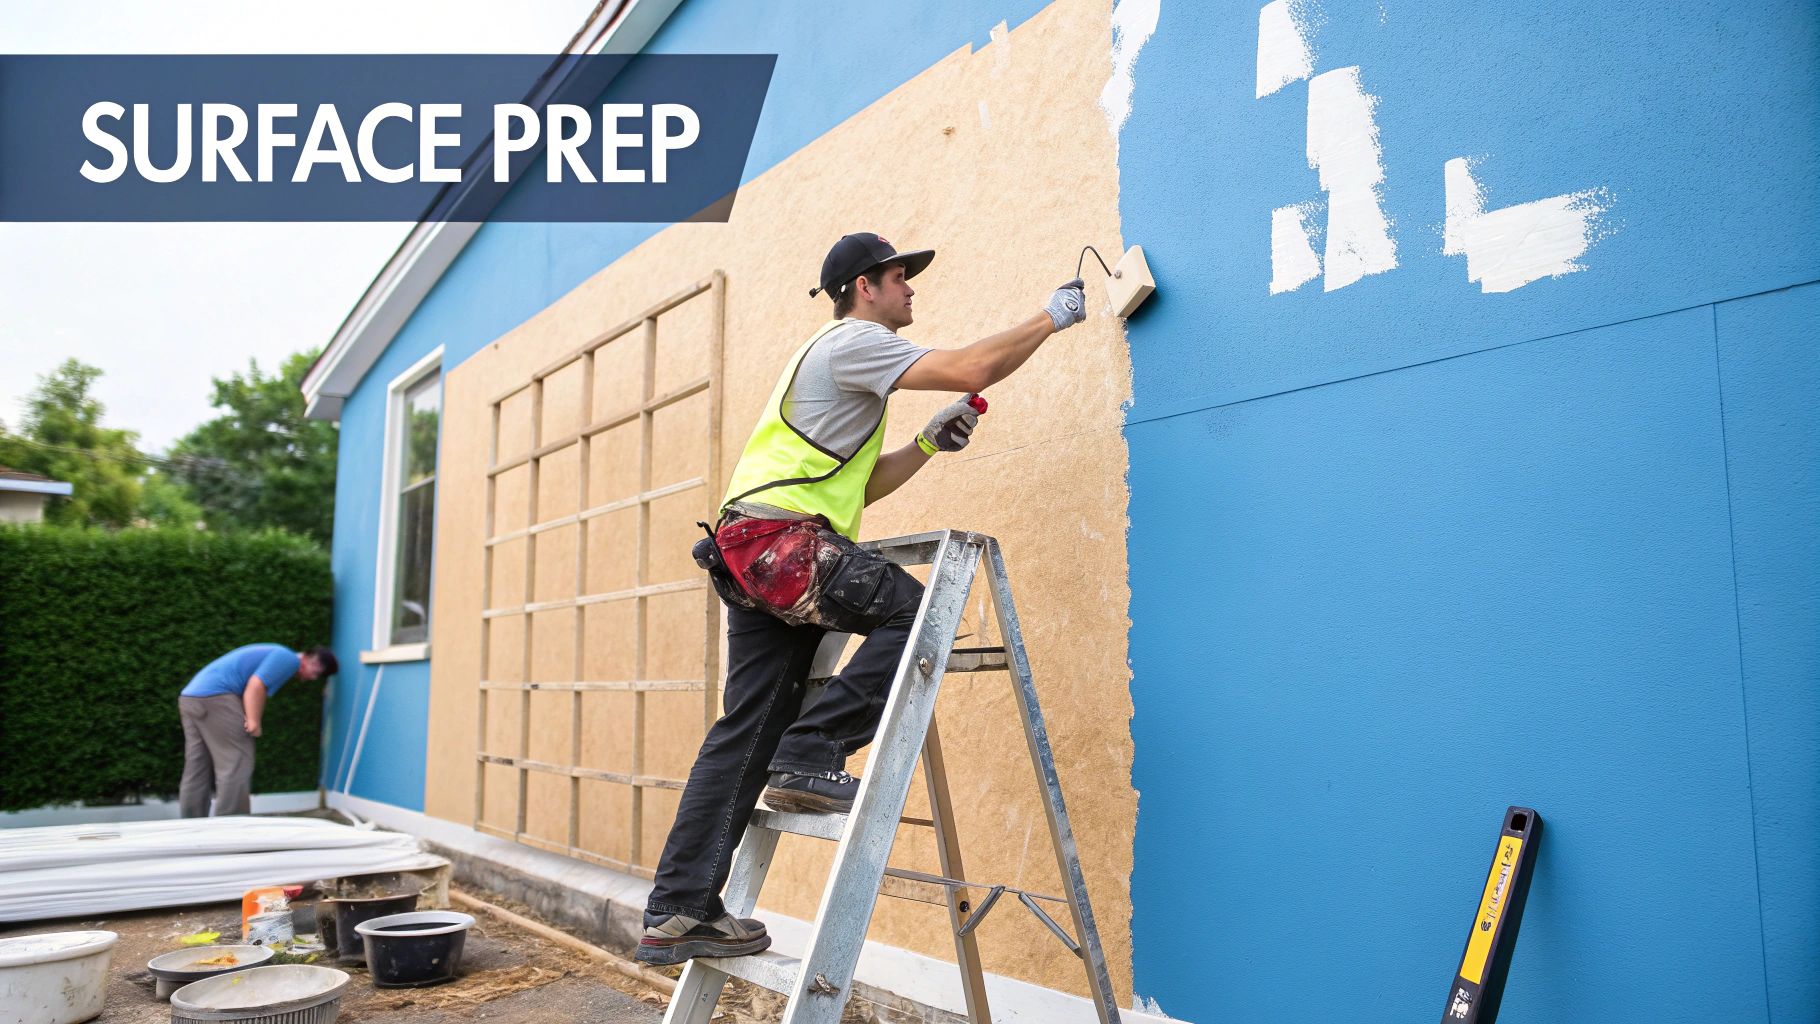
A pristine surface is non-negotiable for quality results. Dust, grease, and grime prevent paint from bonding correctly, while imperfections like cracks or holes will be magnified once a new coat of paint is applied. Taking the time to prepare the surface meticulously ensures the final finish is not only visually appealing but also resilient enough to withstand the tests of time and daily use.
This technique is particularly crucial in specific scenarios:
By dedicating sufficient time and effort to preparation, you ensure your painting project is a lasting success rather than a temporary fix.
The quality of your finish is directly linked to the quality of your tools. While it might be tempting to save money on cheaper brushes and rollers, professional decorators understand that high-quality applicators are an investment, not an expense. Premium tools are engineered to hold more paint, release it evenly, and create a smoother, more uniform finish with fewer brush marks or roller stipples. This is one of the most impactful paint and decorating tips for bridging the gap between a DIY look and a professional-grade result.
The difference lies in the details. A high-quality brush, like one from Purdy or Benjamin Moore, has densely packed, finely-tipped bristles that prevent streaking and provide sharp, clean lines when cutting in. Similarly, a superior roller sleeve from a brand like Wooster distributes paint consistently across the wall, avoiding patchiness and achieving better coverage in fewer passes.
Using professional-grade tools makes the painting process more efficient and yields a far superior outcome. They not only improve the final appearance but also last significantly longer when properly cared for, making them more cost-effective over time. A cheap brush sheds bristles into your fresh paint, while a budget roller can leave lint behind, both of which ruin a smooth finish.
This principle is particularly important in these scenarios:
By investing in the right equipment, you equip yourself to apply paint with the precision and consistency of an expert, ensuring the final result reflects the quality of your efforts.
Achieving a professional, streak-free finish with a roller is less about speed and more about a systematic application. The W-Pattern technique, a standard in the professional painting industry, is a methodical approach to loading your roller and transferring paint to the wall. It involves rolling a large ‘W’ or ‘M’ shape onto a section of the wall, then using horizontal and vertical strokes to evenly spread the paint without reloading the roller. This is one of the most effective paint and decorating tips for avoiding common issues like roller marks and uneven patches.
This method works by distributing a controlled amount of paint across a manageable area first, which you then smooth out. Starting with an arbitrary patch or a single stripe can lead to an inconsistent paint film, visible lap marks, and a blotchy appearance once the paint dries.
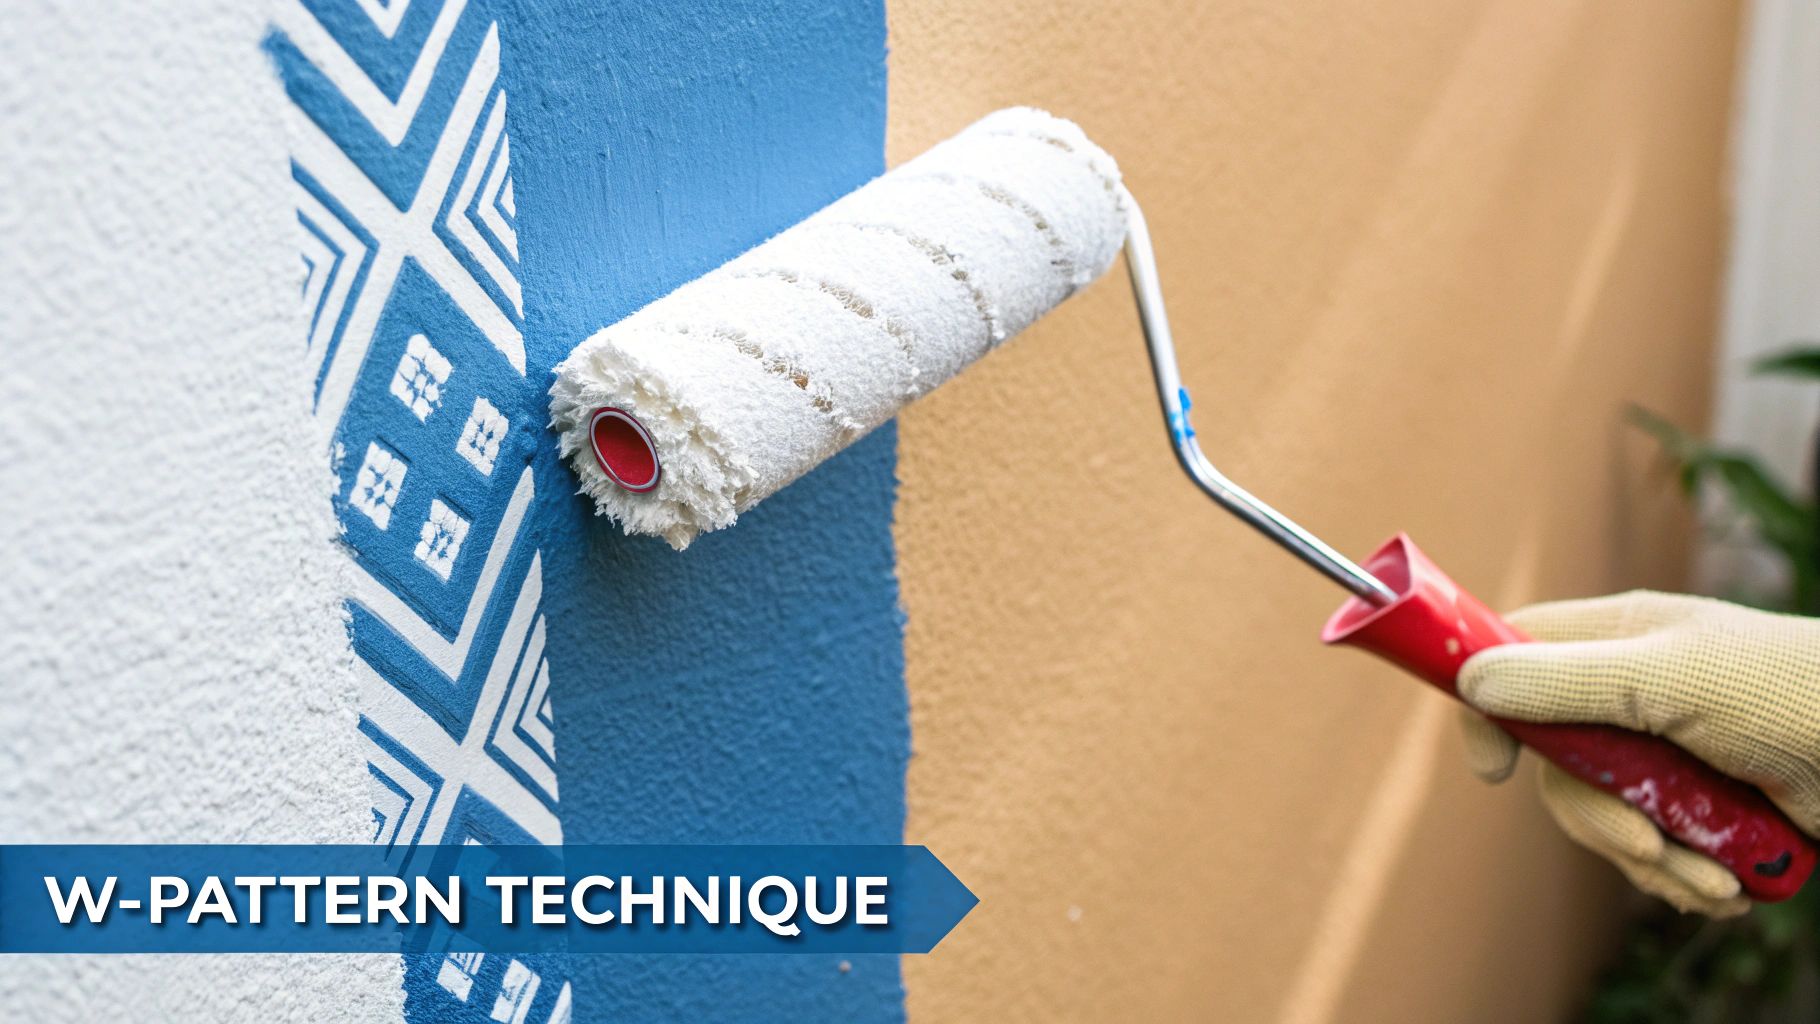
Using the W-Pattern ensures uniform paint distribution, preventing the buildup that causes raised edges and streaks. By working in defined sections (typically 3-4 feet square), you can maintain a ‘wet edge’, blending each new section seamlessly into the previous one before it starts to dry. This creates a flawless, homogenous surface that looks professionally executed.
This technique is crucial for achieving the best results in any painting project:
By mastering this simple but systematic approach, you elevate your painting from a DIY attempt to a trade-quality finish, ensuring your walls have a smooth and consistent appearance.
The perfect paint colour on a swatch can look dramatically different on a wall, a phenomenon often caused by the powerful influence of natural light. Understanding how light interacts with colour is a cornerstone of professional decorating and interior design. This crucial consideration involves assessing the direction a room faces and how the quality and temperature of daylight change throughout the day, a key factor in achieving your desired atmosphere.
A room's orientation dictates the type of natural light it receives. North-facing rooms get cool, indirect light that can wash out colours, while south-facing rooms are flooded with warm, bright light for most of the day. This knowledge is one of the most impactful paint and decorating tips for avoiding costly colour mistakes and ensuring the final result meets your expectations.
Analysing light prevents colours from appearing too cold, too stark, or unpleasantly intense. By selecting shades that complement the room's natural light, you create a harmonious and balanced environment. This principle is not just about aesthetics; it directly affects the mood and perceived temperature of a space.
This technique is particularly crucial in specific scenarios:
By thoughtfully considering the interplay between light and colour, you can select a paint that not only looks beautiful but also enhances the natural character and comfort of your home.
Creating a focal point with a feature wall is one of the most effective and accessible paint and decorating tips for transforming a room's atmosphere. This strategy involves painting a single wall in a bold, contrasting, or complementary colour while keeping the remaining walls neutral. This creates immediate visual interest and adds depth and personality to a space without overwhelming it, making it a powerful tool in any decorator's arsenal.
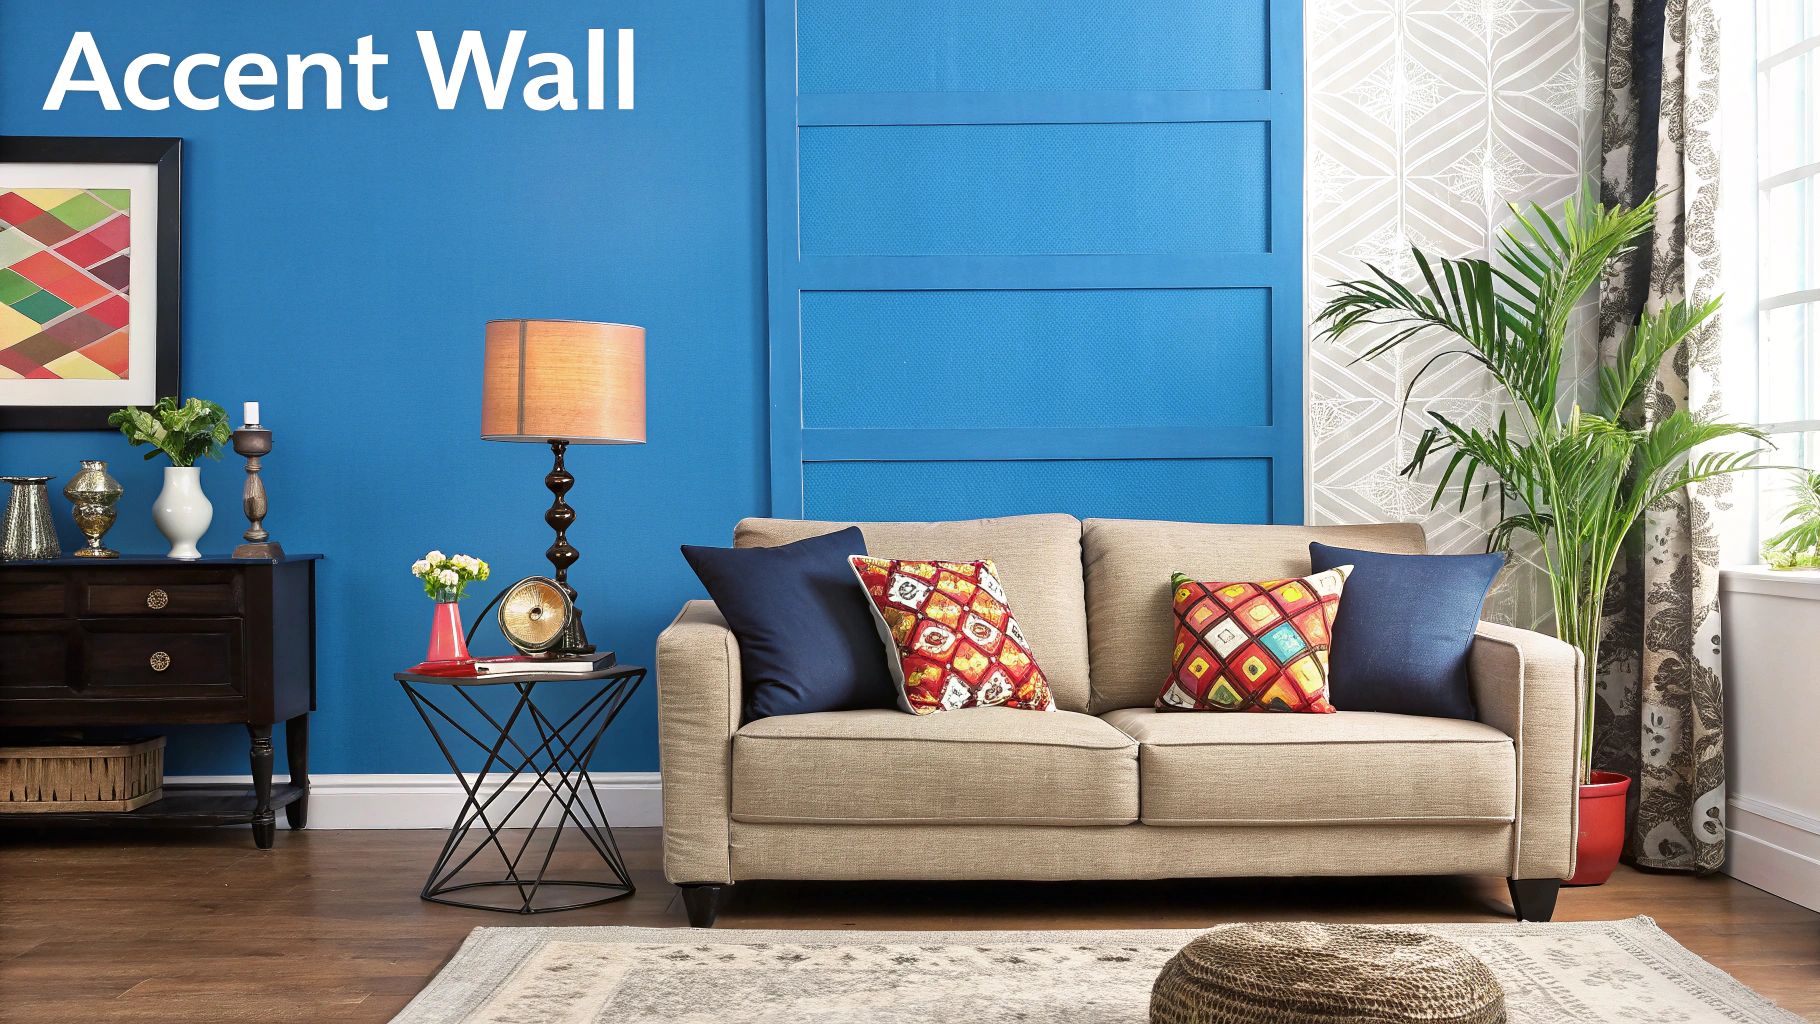
The accent wall naturally draws the eye, serving as a backdrop for key furniture, architectural features, or artwork. Its purpose is to guide focus and establish a clear design anchor within the room, providing a high-impact update with minimal time and paint investment compared to decorating an entire space.
An accent wall is a brilliant solution for adding character and preventing a room from feeling monotonous. It allows for the use of daring colours that might be too intense for all four walls, offering a balanced compromise between a neutral scheme and a full-colour immersion. It is a customisable and low-risk way to experiment with trends.
This technique is particularly impactful in specific scenarios:
By strategically selecting one wall, you can dictate the room's mood and focal point, achieving a sophisticated, designer-led look with precision and confidence.
A professional-looking finish doesn’t end when the paint dries; it extends to how you manage the leftovers. Proper storage is one of the most overlooked paint and decorating tips, yet it’s essential for future touch-ups, preventing waste, and ensuring your investment in high-quality paint isn't lost. Correctly storing paint preserves its consistency and colour, guaranteeing that any future applications will blend seamlessly with the original finish.
The core principle is to protect the paint from its two main enemies: air and extreme temperatures. Air causes a skin to form on the surface and can eventually dry the paint out completely, while freezing or excessive heat can permanently ruin its chemical composition, making it unusable. By adopting a systematic storage method, you ensure your paint remains viable for years.
Thoughtful paint storage saves you time, money, and the frustration of trying to colour-match a faded wall. A well-preserved can of the original batch is the only way to guarantee a perfect match for scuffs and repairs. It also promotes sustainability by reducing the amount of paint that is needlessly thrown away.
This technique is particularly crucial in specific scenarios:
By implementing a proper storage strategy, you professionalise the final stage of your decorating project, ensuring the longevity and easy maintenance of your work.
| Item | Implementation Complexity | Resource Requirements | Expected Outcomes | Ideal Use Cases | Key Advantages |
|---|---|---|---|---|---|
| The Two-Coat Rule with Primer | Moderate (multiple coats, drying periods) | High-quality primer, paint, brushes | Durable, even coverage, professional finish | High-end projects, restorations, dark colours | Superior colour payoff, better adhesion, long-lasting finish |
| The 60-30-10 Colour Rule | Low to moderate (colour selection discipline) | Neutral and accent paint, accessories | Balanced, cohesive room design | Interior decorating, colour planning | Prevents overwhelming schemes, visually appealing, flexible accents |
| Sample Before You Commit | Low (testing phase) | Paint samples, lighting time | Accurate colour perception, confidence | Any painting project, uncertain colours | Avoids repainting, reveals undertones, real-world testing |
| Proper Surface Preparation | High (cleaning, sanding, filling) | Cleaning materials, sandpaper, filler | Smooth, durable finish, paint longevity | All painting projects, especially older surfaces | Prevents peeling, improves adhesion, professional look |
| Invest in Quality Tools | Low to moderate (tool selection and maintenance) | High-quality brushes, rollers, tools | Smoother application, fewer marks | Any painting job requiring quality finish | Easier application, better coverage, long-term tool durability |
| The W-Pattern Technique | Low (roller technique) | Roller, paint | Even coverage, no streaks | Walls and ceilings with rollers | Professional finish, efficient use, easy to learn |
| Natural Light Considerations | Moderate (observation and analysis) | Time for testing colours in light | True colour appearance, informed choices | Rooms with variable lighting | Prevents colour surprises, optimises colour choice |
| Accent Wall Strategy | Low to moderate (selecting wall and colour) | Bold paint, neutral paint | Focal point, visual interest | Living rooms, bedrooms, feature walls | Cost-effective colour addition, adds depth, easy to update |
| Proper Paint Storage and Maintenance | Low (storage management) | Storage containers, labels, climate control | Extended paint life, consistent touch-ups | Leftover paint, maintenance projects | Saves money, preserves paint quality, reduces waste |
We've explored the foundational pillars of a truly professional-quality finish, moving beyond simple colour selection into the techniques and strategies that define exceptional decorating. The journey from a tired, uninspired space to a vibrant, polished interior is not paved with shortcuts but with deliberate, well-informed choices. By now, you'll realise that the secret to a flawless paint job lies not in a single 'hack', but in the cumulative effect of many small, masterful steps.
The wealth of paint and decorating tips covered in this guide are designed to be more than just abstract advice; they are a practical roadmap. They empower you to transform your approach, whether you are a seasoned tradesperson refining your process or a DIY enthusiast embarking on your first major project. The distinction between an amateur and a professional finish often comes down to appreciating the profound impact of preparation and the nuanced application of colour theory.
Let's distill the core principles that will elevate your next project. Think of these as the non-negotiable elements for success:
Preparation is Paramount: The most beautiful, expensive paint in the world will fail on a poorly prepared surface. Remember that cleaning, sanding, and priming aren't just preliminary chores; they are the very foundation of a durable and even finish. Skipping this stage is the most common and costly mistake in decorating.
Strategic Colour and Light: Mastering the 60-30-10 rule provides a balanced, harmonious colour palette, while understanding how natural light interacts with your chosen shades prevents unwelcome surprises. Always test sample pots in the actual room, observing them at different times of the day to see how the colour truly behaves in its intended environment.
Technique and Tools Matter: Investing in quality brushes and rollers is a direct investment in the quality of your finish. Paired with proven methods like the 'W' pattern for even roller coverage, these tools allow you to apply paint smoothly and efficiently, avoiding the streaks, drips, and uneven patches that can mar an otherwise perfect job.
Embracing these detailed paint and decorating tips does more than just ensure a beautiful result; it creates lasting value. A meticulously executed paint job protects your walls, enhances your home’s aesthetic appeal, and brings a deep sense of satisfaction. It’s the difference between a room that is merely 'painted' and one that feels thoughtfully designed and expertly finished.
This knowledge equips you to tackle any project with confidence. You now understand why a quality primer and two topcoats deliver superior depth and longevity, how to strategically use an accent wall to create a focal point without overwhelming a space, and even how to correctly store leftover paint for those inevitable future scuffs and touch-ups. You have moved beyond simply applying colour to a wall and are now orchestrating a complete and cohesive design. Your next project awaits, and you are fully prepared to make it your best one yet.
Ready to turn this expert advice into stunning reality? For a comprehensive selection of trade-quality primers, paints, precision brushes, and all the decorating supplies you'll ever need, look no further than Neasden Hardware. Visit our website at Neasden Hardware or stop by our Wembley showroom to get the professional-grade tools and expert guidance to guarantee your project's success.