
Order Online
- Straight to your door!
Straight to your door


The patio door is out, the new frame is ready, and the fitter discovers that the floor isn't as level as it looked. A small ridge by the threshold, a carpet transition on one side and a shallow fall outside can determine whether the panel glides cleanly or drags for years. The sliding door track bottom is often treated as a minor fitting accessory, but it is the line from which the rest of the installation takes its measurements.
That line controls the door's position, guide engagement, floor clearance, weather performance and, in safety-critical systems, part of the retention arrangement. Fit it accurately and adjustment becomes manageable. Fit it to a poor datum and no amount of roller adjustment will make the installation reliable.
A sliding door track bottom sits at floor level and provides the reference for the lower edge of a sliding panel. On an external patio system, it may carry or guide bottom rollers continuously across the opening. On an internal wardrobe or pocket-door arrangement, the lower component is more often a floor guide, with the weight carried by rollers or hangers at the top.
The distinction matters. A top track or hanger supports the panel's weight in a top-hung system, while the lower track or guide limits sideways movement, absorbs contact as the panel is operated and helps keep the leaf plumb. On a bottom-rolling arrangement, the rollers transfer the door load into the floor track, so the substrate and fixing pattern become part of the performance calculation.
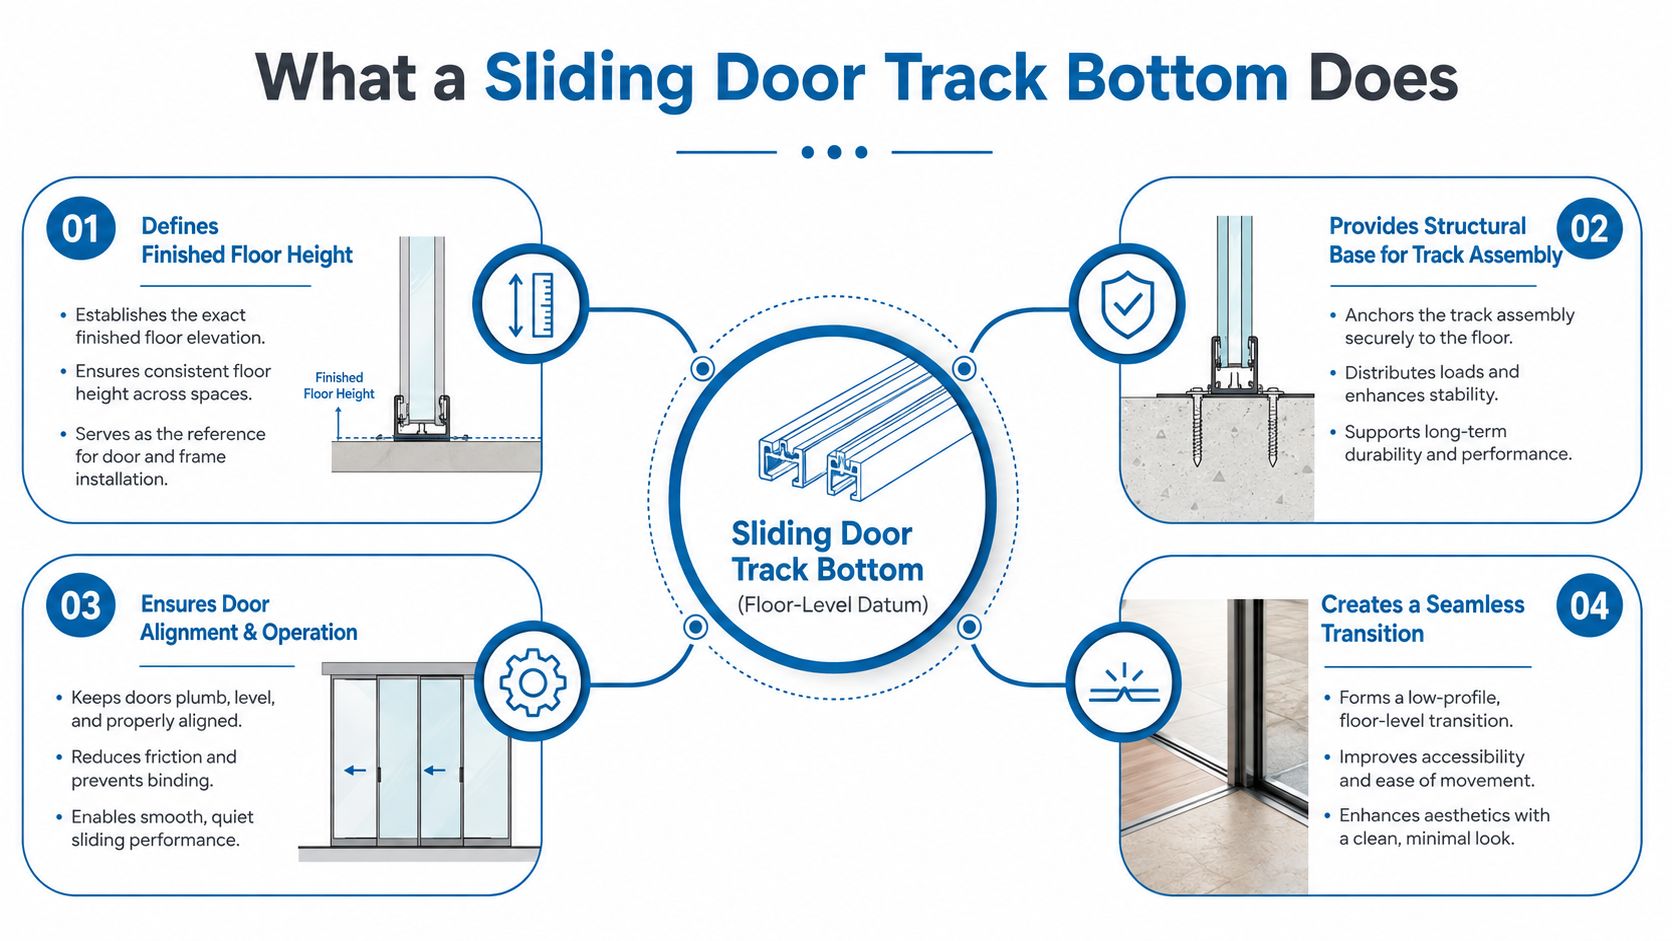
The bottom track establishes the finished floor relationship. Head clearance, door height, guide engagement and the position of seals all depend on it. If the floor datum rises, the door may foul at the head. If it falls, the panel can lose guide engagement or leave an excessive gap beneath the leaf.
UK compliance reinforces the point. Approved Document K requires sliding doors and gates to have “a stop or other effective means” to prevent them coming off the end of the track, and requires measures to prevent doors that slide or open upwards from falling onto anyone. The bottom track therefore forms part of the retention and safety system, not merely a visual floor trim.
For a wider overview of door layouts and construction considerations, a guide to sliding doors for builders can help when comparing systems before ordering hardware. Internal hardware choices also need the same care. For example, DIN locks for shipping containers involve their own preparation and alignment requirements, which illustrates why hardware should be selected around the installation rather than added afterwards.
Practical rule: establish the bottom track line before finalising the head track, jambs or floor finish.
Start with the door weight and panel size, not the appearance of the profile. UK supplier documentation lists bottom-rolling systems in set lengths from 1.2 m to 3.0 m, with lighter products commonly rated around 70 kg, while heavier-duty equipment is available for commercial applications. These figures vary by system, so use the manufacturer's rating for the exact rollers and track rather than treating a similar-looking profile as interchangeable. UK sliding-door gear specifications show how widely these arrangements can differ.
A wide external panel normally needs a continuous, properly retained track arrangement. A light internal wardrobe door may only need a compact surface-mounted floor guide. A recessed track can produce a neat threshold on a level finished screed, but it creates a drainage and cleaning concern when used outside. A raised or threshold track is more visible, yet it can shed water more reliably and protect the guide relationship on a patio opening.
| System type | Typical use | Floor condition | Retention level |
|---|---|---|---|
| Recessed bottom track | Flush internal or external sliding panels | Best on a prepared, level base | High when correctly fixed and stopped |
| Raised threshold track | External patio and weather-exposed doors | Useful where drainage and floor transitions matter | High, with system-specific retention |
| Surface-mounted floor guide | Timber wardrobes and lighter internal doors | Suitable for a sound finished floor | Guidance rather than full load support |
| Morticed guide channel | Concealed internal doors and pocket arrangements | Requires accurate door and floor preparation | Depends on the guide and top-hanger design |
Door preparation narrows the choice further. One standard timber floor guide calls for a 15 mm deep by 8 mm wide morticed groove in the bottom edge, allowing the panel to pass over the guide while keeping the threshold clear. Other systems use a 12 mm wide by 15 mm high morticed groove for a protective guide channel, so the groove must match the supplied profile rather than a general rule.
External doors also need more than quiet running. Weather seals, security, end-stops and drainage paths take priority over a completely concealed finish. If you're assessing a large glazed opening, practical planning material on buying 12 foot patio doors can help frame the space and access issues, although the track choice still depends on the door manufacturer's system.
For a broader comparison of hardware layouts, see these sliding door track systems. The final decision is a trade-off between load, floor condition, door preparation and retention. Choose the profile that suits all four, not the one that looks neatest in isolation.
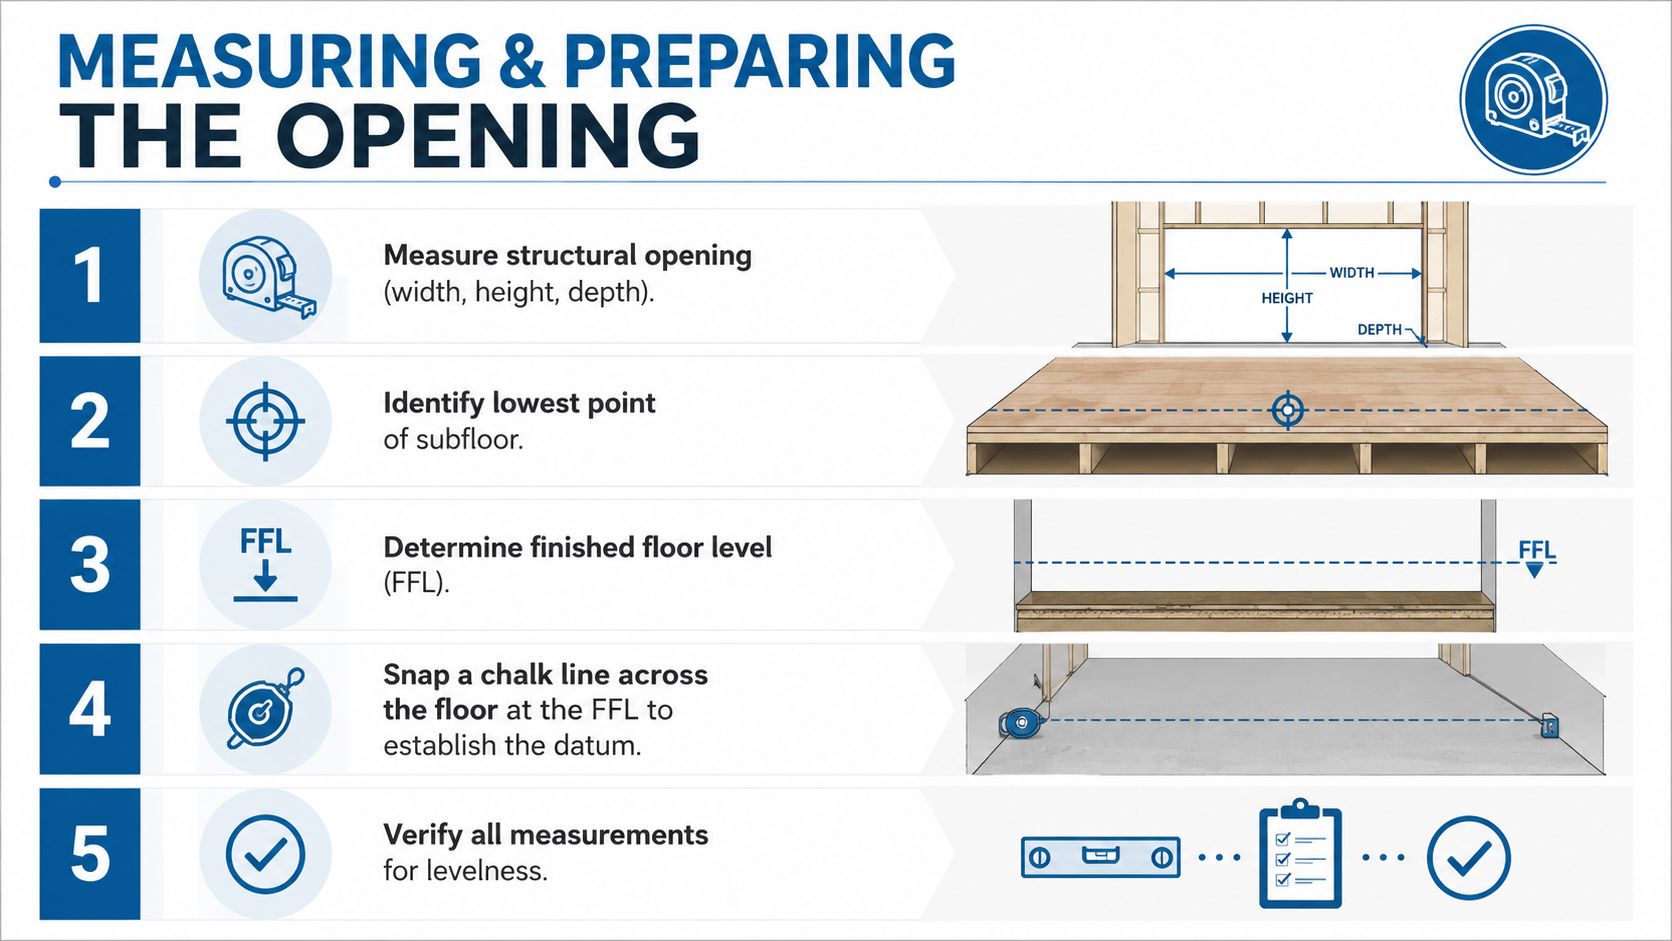
Measure the structural opening first. The door leaf is the result of the opening, finished floor and hardware relationship, not the starting point. Record the clear width at the top, middle and bottom, then measure floor-to-head height at both jambs. Use the smallest usable dimensions when checking the selected system.
Mark the finished floor level before drilling anything. A laser level is useful for transferring the line across the opening, while a long spirit level helps identify whether the substrate rises or falls between checks. Snap a chalk line at the intended finished floor level, then compare the actual floor against it at the track position.
This check should include the final floor build-up. Carpet, tiles, timber flooring, trims and thresholds can all reduce the available clearance beneath the door. A track that fits neatly on bare screed may bind once the finished floor is installed, while a guide set too high can leave the panel unstable.
The practical sequence is:
UK installation guidance highlights why these details matter. One guide specifies a 10 mm packing or levelling gap below the track and sets the structural base 85 mm below finished floor level for a flush installation. Another system uses a 10 mm levelling gap beneath the track, while sprung-loaded guides can accommodate uneven floors with 16 to 30 mm gaps. These are system-specific dimensions, not universal allowances, so follow the profile's fitting information.
Carpet is a common source of failure. Fitting directly over a soft or compressible surface lets the track move as the door operates, which changes the datum and can spoil alignment. UK installation advice recommends placing timber beneath the track rather than fixing directly to carpet, then using a level to plumb the doors before final fixing.
For wardrobe work, the track may need to finish 32 mm back from the front line of the top track, depending on the system. Another arrangement positions the bottom track 8 mm behind the front-edge plumb line from the top track. The dimensions are not interchangeable, so dry-fitting is essential.
Use the sliding wardrobe door installation guidance alongside the selected hardware instructions. Once the track sits true to the intended datum and the door preparation matches the guide, only then should you mark fixings.
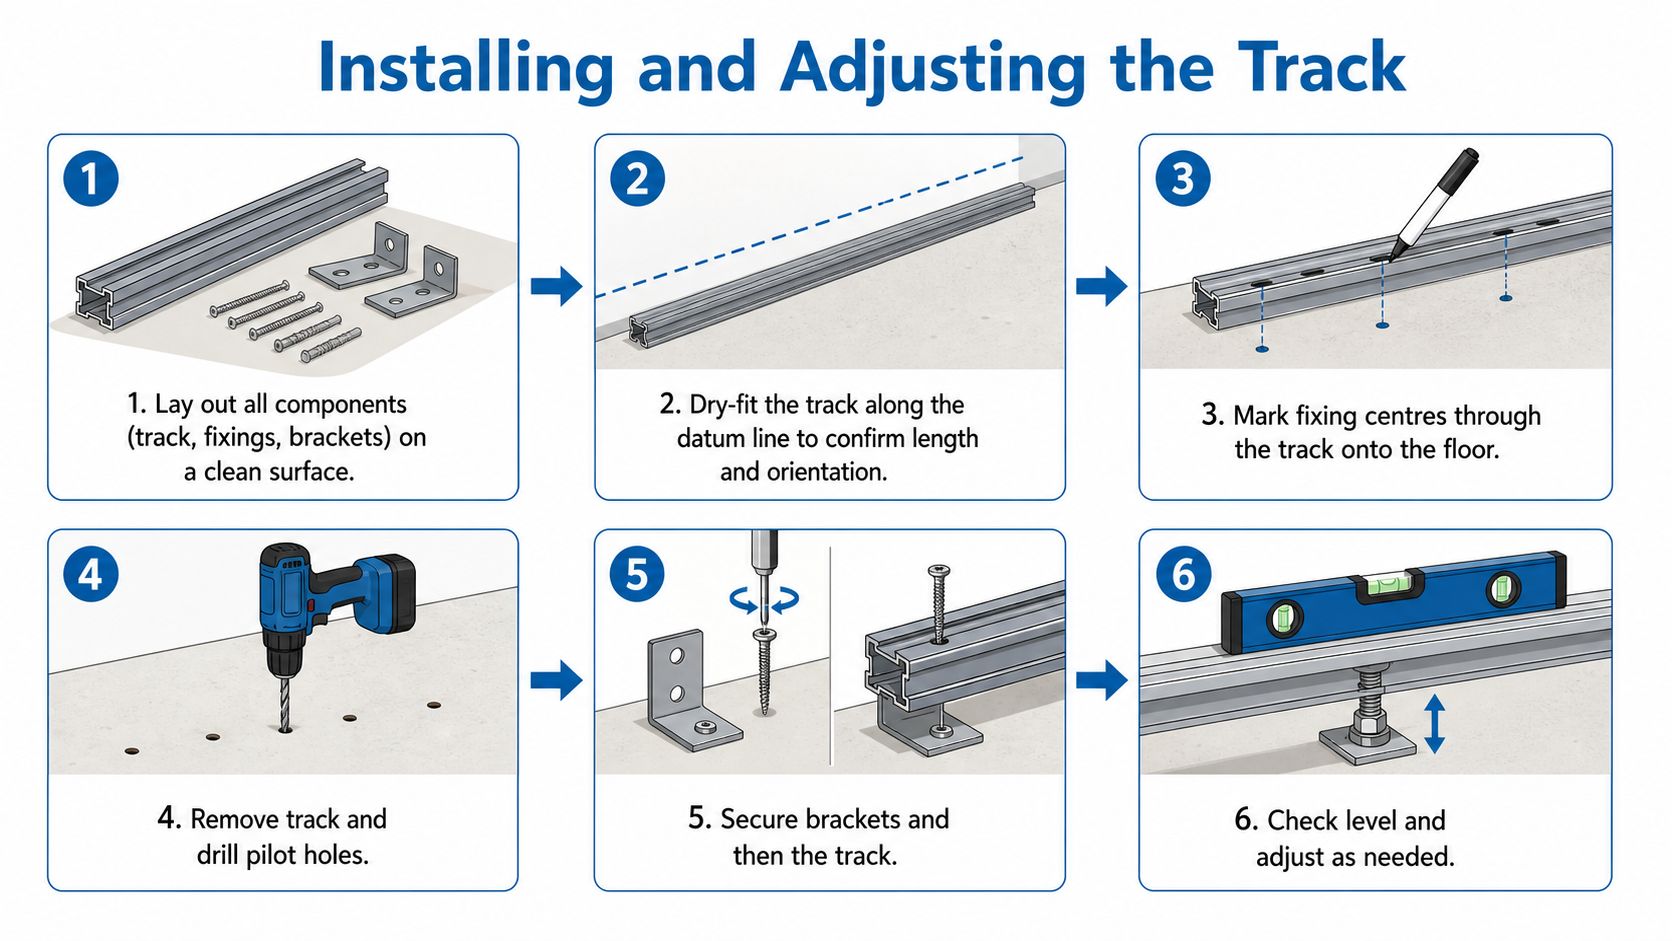
Lay the track, brackets, fixings, guides and adjustment tools on a clean surface before taking the drill to the floor. Check the length, orientation and drainage features, then place the track along the datum line without fixing it. This dry fit catches reversed profiles, wrong end positions and unexpected jamb interference while the parts are still easy to move.
Mark the fixing centres through the slots or holes. Some UK systems place screw holes about 80 mm from each end, with remaining fixings at approximately 500 mm intervals, while historic guidance commonly places fixings at each end, the centre and regularly between. Use the pattern specified for the product, and check every mark against the level line.
Remove the track and prepare pilot holes suited to the substrate. Masonry, timber and screed need different fixings, and a screw that works in a timber base may not provide dependable retention in masonry. Where packing is needed, use rigid, stable material. Avoid soft packing that compresses under repeated door movement.
For flush external installations, preserve the designed drainage route. Drilling through the wrong part of a patio track can puncture a drainage channel or thermal break. Water retained inside a track isn't automatically evidence of failure, because some systems are designed to hold and discharge rain through controlled paths. Keep those paths open and never add an unplanned hole just to make water disappear.
Fix the track with consistent pressure rather than tightening one screw fully before the others. Check the level along the whole run, then confirm that the track hasn't twisted between fixings.
Fit the panel into the top hangers or upper channel first. With help, engage the lower rollers or guide channel, then check that the leaf hangs plumb before making fine adjustments. Heavy glazed panels should never be handled by one person if the panel can tip or fall.
Adjust the roller height at each corner to equalise the head and floor clearances. Raise or lower the panel in small, balanced movements. The aim is not only to create a gap, but to keep the panel square, plumb and properly engaged with its guide.
Set the floor guide so it retains the door without clamping it. A guide that is too tight causes binding, while one that is too loose allows rattle and lateral movement. On external doors, confirm that seals engage without excessive compression and that the panel still travels freely across the full opening.
Use this safe track alignment advice for homeowners as a useful general reminder that alignment should be checked progressively rather than corrected by force. The same principle applies here.
Cycle the door several times from end to end. Check the head clearance, bottom engagement, lock position, end-stops and any anti-lift or retaining features before fitting protective caps or completing cosmetic trims.
The following installation video provides a visual reference for the sequence:
UK guidance requires an effective stop to prevent a sliding door or gate coming off the end of its track, alongside measures that prevent collapse if suspension or roller engagement fails. Treat those checks as part of handover, not as optional finishing work.
A door that feels wrong doesn't automatically need a new track. First separate alignment faults, guide faults, roller faults and door-preparation faults. Forcing the panel usually hides the symptom temporarily and can damage the roller, guide or track lip.
| Symptom | Likely cause | First action |
|---|---|---|
| Door binds or needs heavy force | Track out of level, compressed packing or guide set too tightly | Recheck the level and reset guide clearance |
| Panel jumps or derails | Loose guide, worn guide, shifted hanger or poor retention | Check guide engagement and retention geometry |
| Travel changes across the opening | Track follows an uneven floor | Repack or scribe the track rather than trimming the door |
| External door rattles | Inadequate guide or missing brush seal | Inspect guide fit and seal continuity |
| Water pools at the threshold | Blocked or damaged drainage path | Clear the designed drainage route and inspect the track |
| Timber door changes seasonally | Door swelling has reduced guide clearance | Confirm moisture-related movement and ease the guide carefully |
Binding through the full opening often points to roller height, a tight guide or a track that has moved from its intended line. Binding at one location suggests a local high spot, damaged profile or packed debris. If the panel rises and falls as it travels, the track is likely following an undulating substrate.
A door that jumps out repeatedly needs a retention check before adjustment. Inspect whether the lower guide is loose, whether the top hanger has shifted and whether the panel is still centred in the channel. UK safety guidance places emphasis on stops and retaining measures, so a derailment shouldn't be dismissed as a minor nuisance.
A straight door on a crooked datum will still operate badly. Correct the reference line before altering the panel.
Water requires a separate diagnosis. On some external systems, the track is designed to retain rain temporarily and discharge it through built-in drainage paths. Clearing those paths is appropriate. Drilling into the channel without understanding its construction is not, because it can damage drainage or the thermal break.
For timber leaves, seasonal swelling can reduce the clearance around a floor guide. Ease the guide relationship rather than cutting the track, and avoid removing door material until you've confirmed that the floor and guide remain correctly aligned.
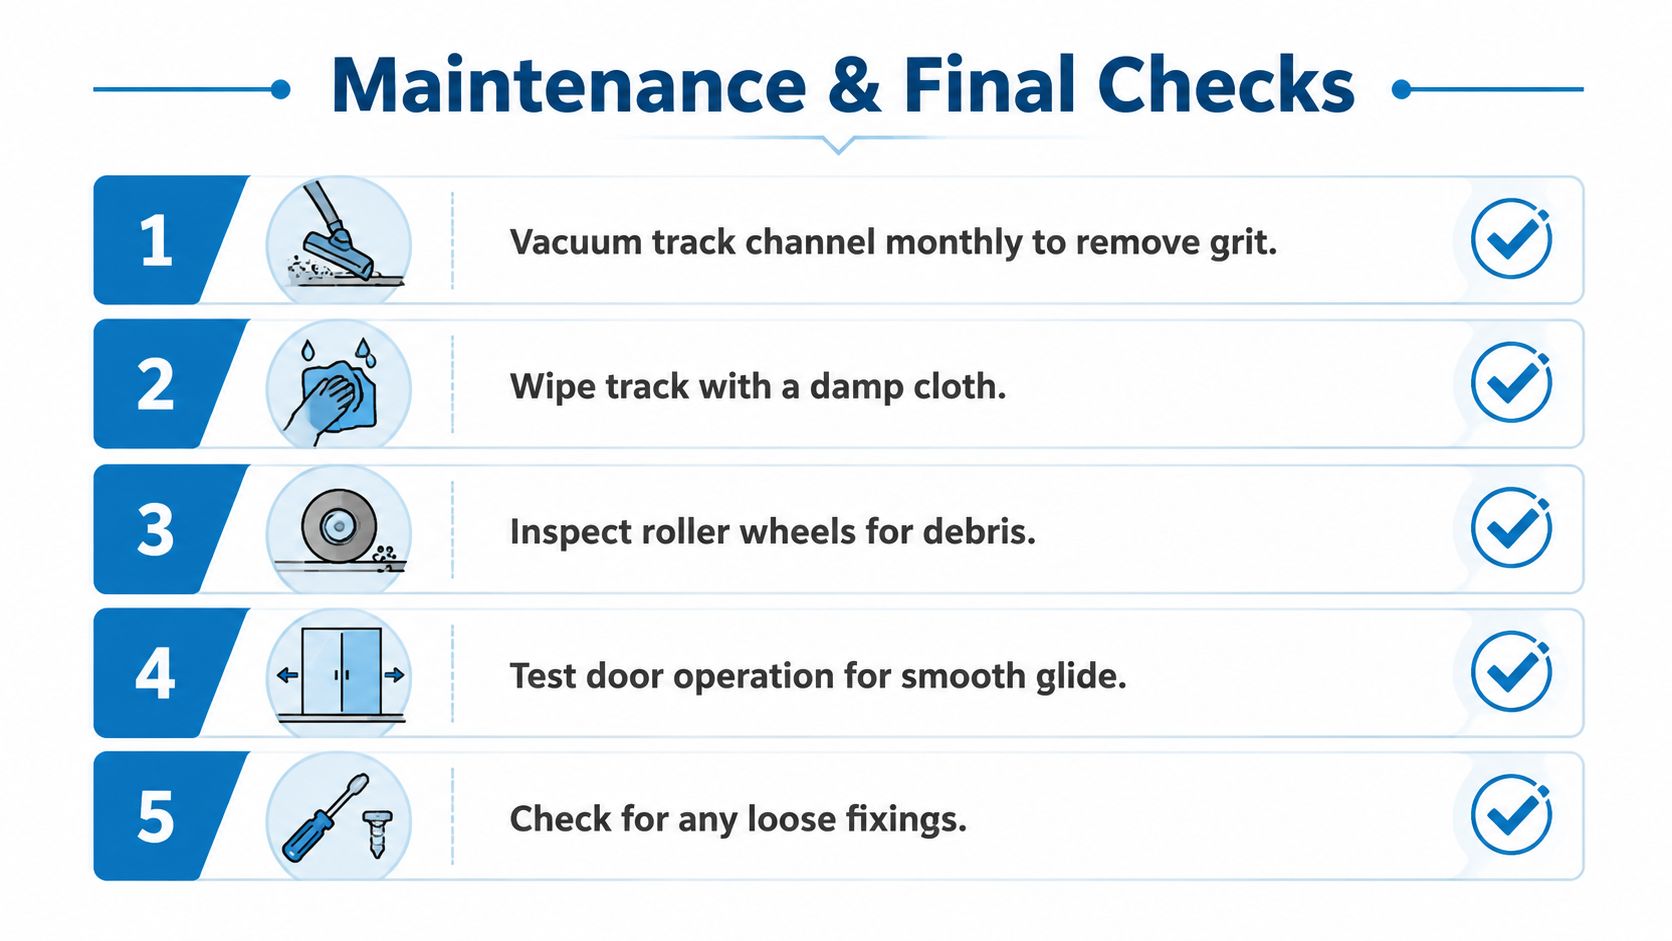
Maintenance should reflect the environment. Interior wardrobe tracks collect dust and fibres, while external patio tracks face grit, leaves and rain. Vacuum the channel monthly where the door is used regularly, wipe it with a damp cloth and inspect the roller contact surfaces for debris.
Avoid solvent cleaners that can attack seals or anodised finishes. Apply silicone or PTFE spray sparingly to suitable roller and guide contact points. Oil attracts dust, turning grit and lubricant into an abrasive paste that accelerates wear.
Clear drainage gaps each season and confirm that water leaves the threshold through the intended route rather than collecting in the channel. Don't seal over drainage openings to stop a small leak before identifying where the water is meant to go.
Inspect fixings annually, particularly where thermal movement, settlement or renovation work may have affected the base. If packing has loosened or a high spot has developed, correct the support before the door begins to bind. Recheck the level across the opening rather than adjusting one roller to compensate.
Handover should confirm:
For tracks, rollers, floor guides and related sliding-door hardware, visit Neasden Hardware and match the component to the door's load, groove, floor condition and retention requirements. Their range supports both trade installations and competent DIY work, so check the product details before ordering and prepare the opening around the selected system.