Order Online
- Straight to your door!
Straight to your door


A water seal for brickwork is essentially a chemical treatment that makes porous masonry water-repellent, stopping moisture from soaking into the wall. Think of it as an invisible barrier, and it's absolutely vital for protecting UK homes from damp, frost damage, and the general decay that comes with our relentless rainfall.
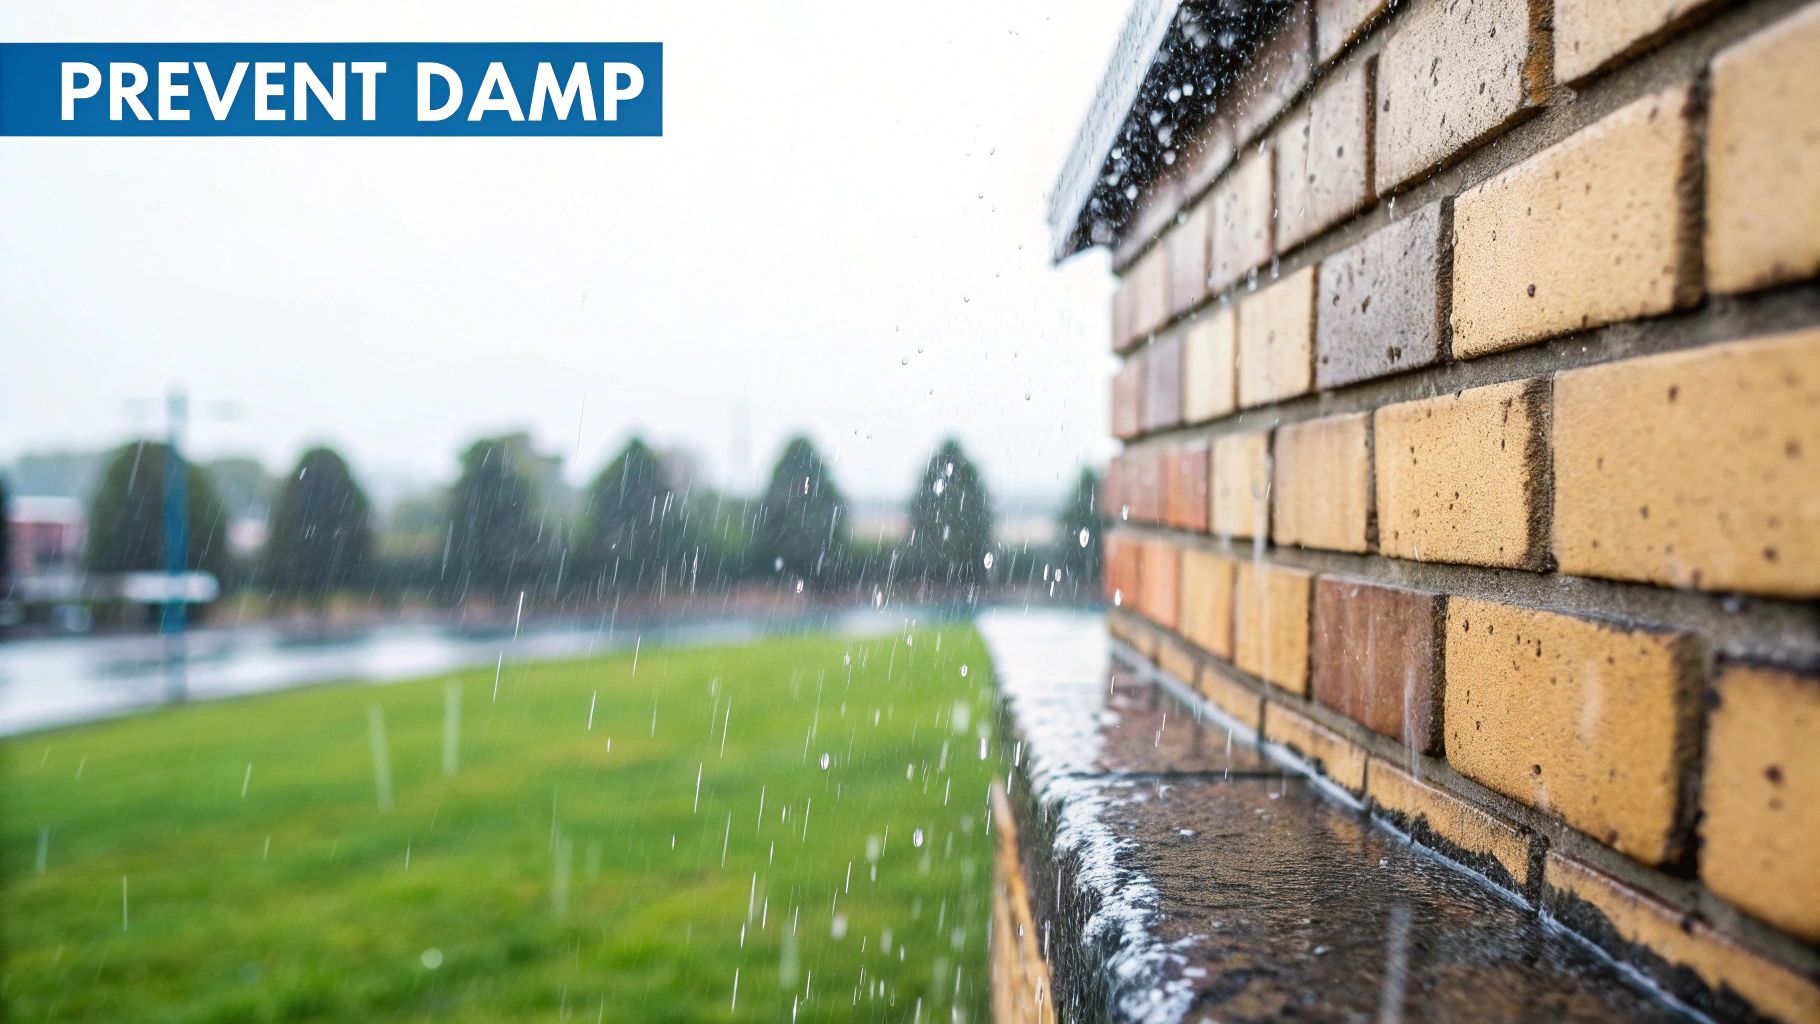
It’s easy to look at a brick wall and think it’s indestructible, but the reality is that bricks are surprisingly porous. Over time, constant exposure to rain lets water seep deep into the masonry, setting the stage for some serious and often expensive problems. This isn’t just a cosmetic issue; it threatens the structure itself.
When that water soaks into the brick and mortar and then freezes during a cold snap, it expands. The pressure this creates from inside is immense, causing the face of the brick to literally pop or flake off. We call this spalling, and the relentless freeze-thaw cycle is one of the biggest enemies of brickwork in the UK.
The trouble doesn't just stay on the outside. As moisture travels through the brickwork, it can lead to those persistent damp patches on your interior walls. This not only ruins your decorating but creates the perfect breeding ground for mould and mildew, which can have real health implications.
If it gets out of hand, you'll be dealing with musty smells and might need specialist intervention, like using a professional mould remover to tackle the visible signs of a much deeper problem.
Water penetration is more than just a nuisance; it's a direct threat to your property's structural integrity and value. An effective water seal for brickwork shifts your approach from reactive repairs to proactive, long-term defence.
On top of all that, saturated brickwork is a terrible insulator. A wall that's holding onto moisture loses a huge amount of its thermal resistance, which means you're spending more on heating just to keep your home warm. By keeping the bricks dry, a sealant helps maintain their natural insulating properties.
Protecting your home means understanding all the ways the elements can compromise it, and a water seal prevents a whole cascade of issues. For a wider look at these issues, it's worth reading up on the potential exterior defects that can shorten a home's lifespan.
Ultimately, applying a modern, breathable sealant is one of the most cost-effective bits of maintenance you can do. It provides a robust shield against:
By taking this simple step, you're not just painting on a protective layer; you're fundamentally safeguarding the health and longevity of your property for years to come.
Choosing the right water seal for your brickwork can feel like wading through a sea of technical jargon. The market is flooded with products all promising to keep water out, but they work in fundamentally different ways. Understanding these differences is the key to picking a product that actually protects your home, rather than causing more problems down the line.
The main split is between two camps: penetrating sealants and surface coatings. Each has its place, but for the vast majority of UK properties, especially older ones with solid walls, one approach is miles better than the other.
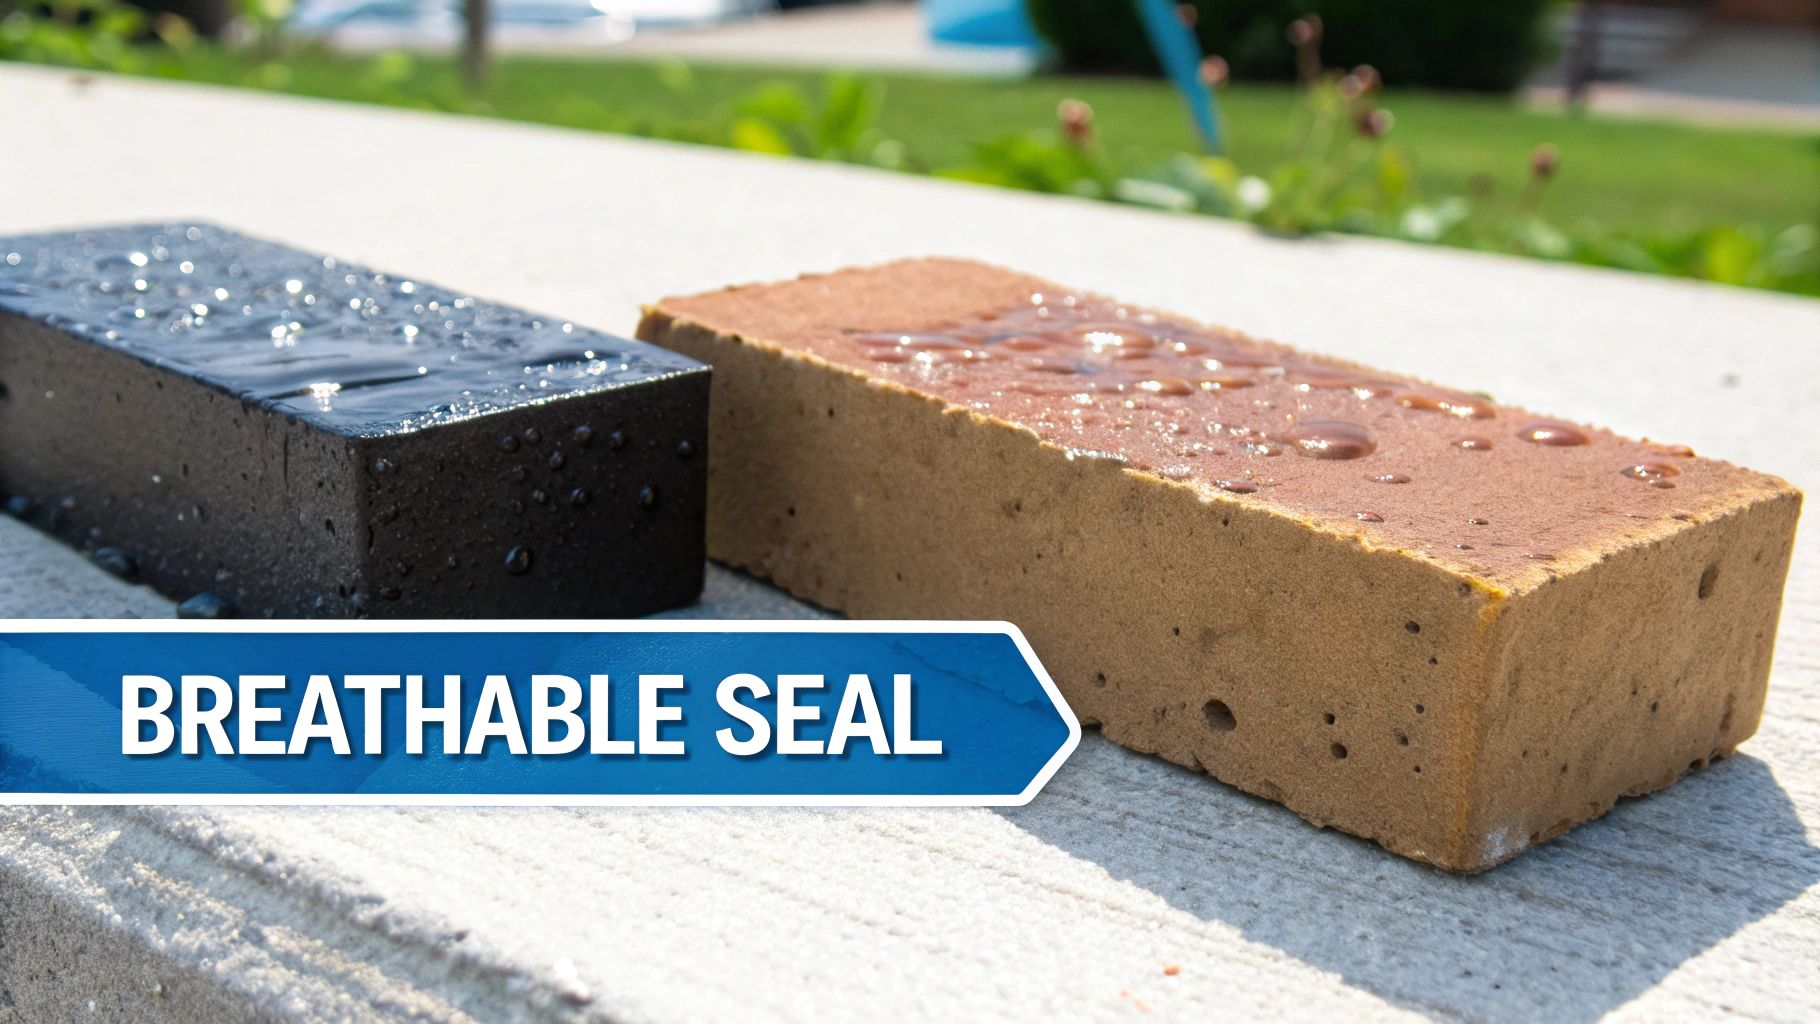
The most advanced and widely recommended water sealants today are the penetrating, or 'impregnating', kind. These aren't like paints at all; they're designed to soak deep into the tiny pores of the brick and mortar.
The leading technology here is based on silanes and siloxanes. These are microscopic molecules that, once absorbed by the masonry, trigger a chemical reaction with the minerals inside. This reaction creates a powerful, water-repellent barrier by lining the pores instead of just blocking them up.
Think of it like waterproofing a high-end Gore-Tex jacket. The fabric still lets air and moisture vapour pass through, keeping you comfortable, but it stops liquid rainwater from soaking in. That’s exactly what a silane/siloxane sealant does for your brickwork.
This breathable quality is non-negotiable for UK homes. Bricks need to breathe to let trapped moisture from inside the house escape. If you block this vapour with a non-breathable coating, you’re asking for trouble. It can lead to devastating issues like damp, mould, and even serious structural damage over time.
A huge advantage of penetrating sealants is how long they last. Because the protective layer is formed inside the brick, it isn't battered by UV rays or surface scuffs. This means top-quality products can offer protection for 10 to 25 years before you need to think about reapplying.
The move towards these breathable solutions has been happening for decades. Water sealants for brickwork started gaining serious traction in the UK back in the 1980s, and by the early 2000s, silane/siloxane products had become the go-to choice. A 2021 government-commissioned report confirmed this, finding that these advanced blends were the most common type of waterproofing treatment used on UK brickwork. You can dig into the detailed findings of the government's research on waterproofing products for yourself.
On the other hand, you have surface coatings. These are often based on acrylics or other polymers that form a physical film over the top of the brickwork. Whilst this can stop water getting in, it often comes with some serious downsides.
The biggest issue is their lack of breathability. By sealing the surface completely, these coatings trap moisture inside the wall. Come winter, this trapped water can freeze and expand, leading to spalling and crumbling of the brick behind the coating—where you can't see the damage until it's too late.
What's more, because these coatings sit on the surface, they’re exposed to the elements. UV light from the sun can cause them to break down, peel, or turn yellow within just a few years, meaning you’re stuck with a frequent and laborious reapplication job. They also tend to change how the brick looks, often leaving a noticeable sheen or a 'wet look' that can really detract from a property's natural character.
To make the choice clearer, here’s a side-by-side look at the most common types of water seals for brickwork. This should help you pick the right solution for your specific job.
| Sealant Type | How It Works | Breathability | Expected Lifespan | Best Suited For |
|---|---|---|---|---|
| Silane/Siloxane | Soaks in and chemically bonds inside the pores of the brick. | Excellent. Allows water vapour to escape freely. | 10-25+ years | The vast majority of brickwork, especially period properties and homes needing to manage internal moisture. |
| Acrylic Coating | Forms a plastic-like film or membrane on the brick surface. | Very poor. Can trap moisture inside the wall, risking frost damage. | 1-5 years | Limited use cases, perhaps on modern, non-critical decorative surfaces where breathability is not a concern. |
| Silicone Resin Emulsion | A hybrid that penetrates slightly but also forms a thin surface film. | Good. More breathable than acrylics but less than silanes. | 5-10 years | A mid-range option for modern cavity walls where a slight sheen is acceptable. |
| Waterproof Paint/Membrane | A thick, opaque coating designed for total water blockage. | None. Completely seals the surface, trapping all moisture. | 5-10 years | Below-ground tanking or specific commercial applications; generally unsuitable for external house walls above ground. |
For most projects, from Victorian terraces to modern new-builds, a high-performance, breathable water seal for brickwork based on silane/siloxane technology is what the professionals use. It offers durable, invisible protection that works with your home's natural structure, not against it.
Choosing a water seal for brickwork isn't a one-size-fits-all job. The character of your home, from the type of brick to the condition of its mortar, dictates which product will give you lasting protection and which might just cause more harm than good. Honestly, getting this decision right is the most important step in the entire process.
Making the wrong choice can be costly. For example, slapping a non-breathable sealant on a soft, porous Victorian brick wall is a recipe for disaster. It traps moisture inside, accelerating decay instead of preventing it. The goal is to match the sealant's properties to what your wall actually needs.
Before you even think about looking at a tin of sealant, get up close and personal with your walls. Different bricks have vastly different levels of porosity, and that’s the key.
Just as important is the state of your mortar. If you’ve got cracked, crumbling, or missing pointing, no sealant in the world is going to help. Water will simply bypass the treated bricks and sneak in through the gaps. Repointing has to be your first job, and remember to give the new mortar at least a month to cure properly before sealing.
Every reputable sealant comes with a Technical Data Sheet (TDS). This document is your best friend. Ignore the marketing slogans on the front of the tin and focus on the hard facts inside.
You’re looking for key information like the percentage of active ingredients (higher is generally better), the expected coverage rate in square metres per litre (m²/L), and the product's vapour permeability. A good breathable sealant will have a clear 'SD value' (steam diffusion resistance), which tells you how easily it lets vapour pass through.
The most reliable products are often those with independent certifications. Keep an eye out for confirmation that a sealant has been tested to standards like BS EN 1504-2. This proves its performance for protecting concrete and masonry surfaces and is a clear sign you’re buying a professional-grade product.
Understanding these details helps you choose a water seal that’s technically suited to your property, ensuring you get effective, long-lasting results.
Real-world walls often throw a few extra puzzles your way. Two of the most common are efflorescence—those chalky white salt deposits—and previously painted surfaces.
If you see efflorescence, it's a tell-tale sign that water is moving through the wall and evaporating from the surface, leaving salts behind. You absolutely must remove this with a stiff brush before sealing. If you seal over it, you're just trapping the salts, and the problem will likely reappear underneath the sealant.
For previously painted brickwork, the situation is more complex. A penetrating sealant can’t soak through a non-breathable paint film. In this scenario, the paint must be completely stripped off. Alternatively, you could look at using a high-quality breathable masonry paint that has built-in water-repellent properties instead of a clear sealant.
UK building practices have long recognised the need for durable external walls, especially in areas with severe weather. Historically, robust mortar mixes were specified to withstand wind-driven rain, and applying modern water sealants is really just an evolution of this same principle. If you're interested in the background of these construction standards, you can discover more insights about historic and current mortar recommendations in UK building practices.
You’ve got the right product in hand, so now it’s time to get it on the wall. Applying a water seal is a job where your prep and technique make all the difference. If you rush it or cut corners, you’ll end up with a patchy, useless finish that’s wasted your time and money. Let’s walk through the professional approach to give your brickwork a flawless, long-lasting barrier against the weather.
The most important part of this whole job happens before you even pry the lid off the tin. I can't stress this enough: proper surface preparation accounts for at least 80% of a successful outcome. A sealant needs to soak into a clean, sound, and dry surface to do its job. Slapping it over dirt, algae, or dodgy mortar is like painting over rust – you’re just hiding a problem that will bubble up again in no time.
First things first, give your walls a proper clean. For general grime, a stiff brush and a bucket of water might be all you need. If you're dealing with more stubborn dirt or a bit of green growth, a pressure washer on a low or medium setting can work wonders. Just be careful not to blast the face off older, softer bricks or dislodge any weak mortar.
Got significant green algae, mould, or lichen? You'll need to kill that off first with a dedicated fungicidal wash. Just follow the instructions on the bottle – it usually involves applying the solution, letting it sit for a bit, then rinsing it off completely. This step is non-negotiable. If you seal over these organisms, you’re just trapping them, which leads to ugly dark stains showing up under your new protective layer.
Next, get up close and personal with your mortar. Inspect every inch for cracks, crumbling bits, or gaps where the pointing has failed. These are basically motorways for water to get in. Any dodgy sections must be raked out and repointed. To get a really professional finish, it helps to know about the essential masonry tools every DIYer needs, including a good chisel. Once you’ve repointed, you have to let the new mortar fully cure. There are no shortcuts here; sealing too soon traps moisture inside and will cause the new mortar to fail.
As a rule of thumb, allow fresh cement-based mortar to cure for a minimum of 28 days before you even think about applying a water seal. Honestly, in the damp and cool British climate, playing it safe and waiting four to six weeks is a much better bet.
With a clean, sound, and bone-dry wall, you can finally think about application. The best tool for the job really depends on the size of the wall and the product you’re using.
The pro-standard for applying penetrating sealants is the 'wet-on-wet' technique, especially if you're spraying. This means applying a second coat while the first is still damp (usually within 10-20 minutes, but always check the product’s data sheet). This method ensures the masonry gets fully saturated, creating a much tougher, more uniform waterproof barrier.
Start at the top of the wall and work your way down in manageable sections, about a metre wide at a time. Apply the first coat until the surface looks wet, then immediately go over it with the second coat before it dries. The goal is to see a 'curtain' of sealant running down the wall about 15-20cm below where you’re applying. That’s the sign you’ve put enough on for it to soak in deep.
This diagram breaks down the key decisions you need to make before you start.
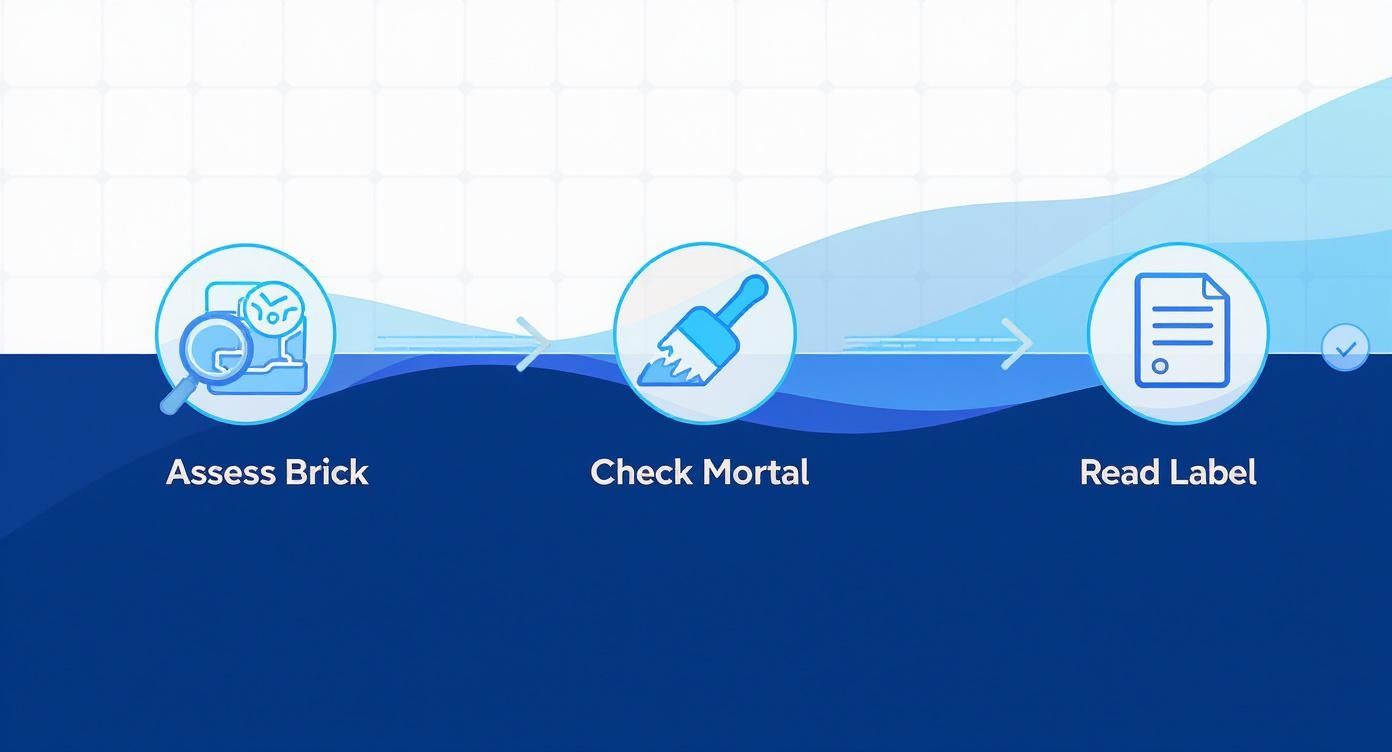
It’s a great reminder that a successful job is built on careful assessment long before any sealant comes out of the tin.
Picking the right day to do the job is absolutely crucial. You need a dry spell, not just for the application itself, but for at least 24 hours afterwards to let the sealant cure. Don't do it in strong, direct sunlight or on a scorching hot day, as the sealant can evaporate before it gets a chance to penetrate the brickwork properly. Likewise, don't apply it if the temperature is likely to drop below 5°C.
Before you buy anything, figure out how much you’ll need. The product's technical data sheet will give you a coverage rate, usually in square metres per litre (m²/L). This can vary massively depending on how porous your bricks are—older, softer bricks will drink the stuff up, whereas dense engineering bricks won't need nearly as much. Always measure your walls (width x height) and buy a bit more than you think you need. Running out halfway through is a real pain.
Once it's on, keep the treated area protected from rain until it has fully cured. Most silane/siloxane sealants are showerproof within a couple of hours, but the full chemical reaction that forms the barrier can take several days. During this time, that invisible shield is forming deep inside the masonry, getting ready to give you decades of protection.
Getting the sealant on is a big step, but the job isn’t quite done. Real protection is all about long-term performance, which means knowing how to look after your sealed brickwork and catch any issues before they turn into bigger problems. A high-quality water seal for brickwork is an investment, and a little bit of maintenance ensures you get the most out of it.
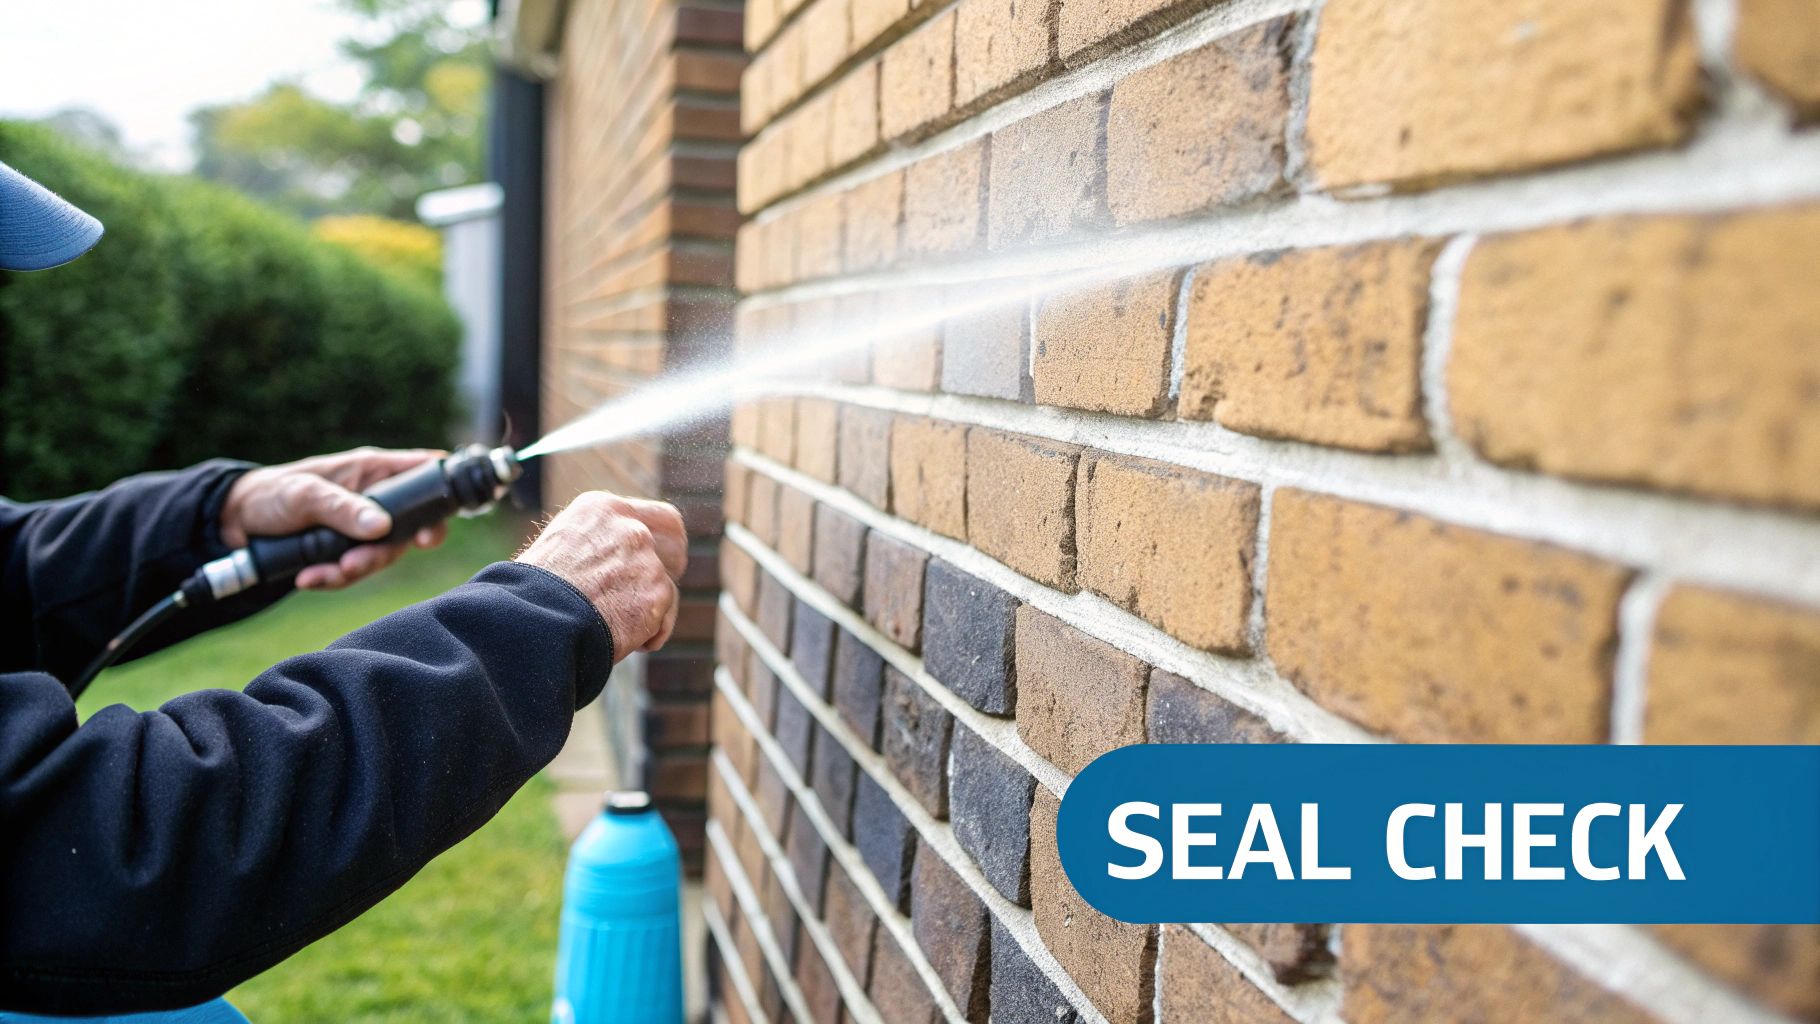
The good news is that once a quality penetrating sealant is applied, it requires very little upkeep. Your main job is just to keep an eye on how it’s holding up over the years. The easiest way to do this? A simple water test.
Every year or so, especially after giving the walls a clean, it’s smart to check that the water-repellent barrier is still doing its job. It’s incredibly straightforward and gives you instant feedback on the state of your brickwork.
Just spray a section of the wall with a garden hose or chuck a bucket of water at it. You’re looking for the water to bead up on the surface and run off, just like rain on a freshly waxed car. If the water soaks in and darkens the brick, that’s a clear sign the sealant is losing its effectiveness and it might be time to think about a recoat.
How long a water seal lasts depends massively on the product quality and how much weather exposure the wall gets. Top-tier silane/siloxane treatments are incredibly durable, often providing 10 to 25 years of solid protection before a top-up coat is needed. These aren't just marketing claims; lab studies show that walls treated with high-performance sealants hold their water repellency for a very long time.
Even when you’re careful, you can sometimes run into minor issues. The trick is to figure out the cause and deal with it quickly. Here are a couple of the most common problems you might see and how to sort them out.
Always do a test patch on a discreet area before you commit to the main walls. This simple step can save you a world of hassle by confirming the product is compatible and showing you exactly what the final finish will look like.
If you spot more significant problems like deep cracks appearing through the sealed surface, the issue isn't the sealant—it's the masonry underneath. These cracks need to be properly filled and repaired. Using a reliable exterior masonry filler is crucial before you touch up the sealant over the repair.
For severe issues with your sealed brickwork that need a proper assessment, you might need to consult a waterproofing specialist for a professional opinion. But for most jobs, whether DIY or professional, good prep and careful application will stop these problems from ever happening.
Even with the best plan, it’s completely normal to have a few questions before you start a job like sealing brickwork. Getting some clear, straight answers is the best way to feel confident you’ll get the professional-looking results your property deserves. Let's tackle some of the most common queries we hear from homeowners and DIYers.
This is probably the number one concern, and for good reason—you want to protect your home, not change its character. A high-quality penetrating silane/siloxane sealant is formulated to be completely invisible once it has cured.
These products work by lining the pores deep inside the brick, not by forming a shiny film on the surface. This means they shouldn’t darken the brick, alter its colour, or leave any kind of sheen or 'wet look' finish. Your brickwork will look exactly the same as before, just with powerful water-repellent properties built in.
That said, it’s wise to be wary of cheaper, film-forming surface coatings. Some of these can leave a slight gloss, which might not be the look you're going for.
The golden rule is simple: always test the product on a small, inconspicuous patch of brickwork first. Let it dry completely so you can see the final result before you commit to the entire wall. This one step takes all the guesswork out of the equation and gives you total peace of mind.
This is a common question, and the situation can be a bit tricky. Penetrating sealants are designed to soak into the porous structure of the brick. If the wall is covered with a standard, non-breathable masonry paint that forms a plastic-like film, the sealant simply can't get through to do its job.
If your wall is coated with a modern, breathable mineral paint, a compatible breathable sealant might work, but you absolutely must check the manufacturer's guidance for both products. In most cases, though, applying a penetrating water seal for brickwork over paint means stripping the old paint off completely—which is a huge job.
A more practical approach for an already painted wall is often to use a high-quality, breathable masonry paint that has its own water-repellent properties, rather than trying to add a clear sealant on top.
Patience is a real virtue when it comes to any kind of masonry work. New mortar needs time to cure fully and properly before you can even think about sealing it. Applying a sealant too early is a critical mistake, as it will trap the moisture from the fresh mortar inside the wall.
This trapped moisture stops the mortar from hardening correctly, leading to a weak joint that will almost certainly fail prematurely. It basically undoes all your hard repair work.
As a general rule, you should wait at least 28 days for new cement-based mortar to cure. Given the UK's often cool and damp climate, it’s even safer to extend this to between four and six weeks, just to be absolutely certain the mortar is ready.
Whilst it’s true that new brickwork is strong and in good condition, applying a water seal is a very smart preventative move. This is especially true for walls that will face the brunt of wind-driven rain. Sealing a new wall right from the start has several benefits:
However, timing is absolutely crucial. You must wait for all the moisture from the original construction process to evaporate completely. Most professionals recommend waiting at least a few months—ideally letting the wall go through one dry summer—before applying a sealant to a brand-new build.
At Neasden Hardware, we provide the professional-grade products and expert advice you need to protect your property effectively. Explore our range of decorating and protective supplies today. Find everything you need at https://neasdenhardware.co.uk.