Order Online
- Straight to your door!
Straight to your door


Getting a sliding door installation right comes down to three things: solid preparation, a perfectly fitted frame, and careful adjustments. Nail these basics, and you'll end up with a professional-quality finish that works like a dream and keeps your home weathertight.
Before you even touch a power tool, the real work begins. This first stage isn't just about ticking off a list; it’s about creating a solid foundation that prevents common headaches like draughts, leaks, or doors that judder and stick. Trust me, a bit of extra time here will save you a world of frustration down the line.
First up, you need to give the opening a proper once-over. The new door system is likely much heavier than whatever was there before, so you have to be sure the wall can handle the weight.
Your biggest concern here is the lintel—that's the horizontal support beam sitting above the door opening. Is it there? Is it the right size and in good nick? A cracked or sagging lintel is a massive red flag. If you spot one, you absolutely must get a structural engineer to look at it before you go any further.
While you're at it, have a good look at the surrounding brickwork or blockwork for any signs of movement or damage. The sides (jambs) and bottom (sill) of the opening have to be solid, plumb, and level. If they're not, you'll need to carry out repairs to create a perfectly square and stable space for the new frame.
A classic mistake is thinking you can just force a new frame into a wonky opening. The frame has to be installed perfectly level and plumb, using packers to fill any gaps. This is the only way to ensure the door panels hang correctly and operate without any strain.
When it comes to measuring, precision is everything. Take at least three measurements for both the height and the width of the opening—at the top, middle, and bottom, and again on the left, centre, and right. Always, and I mean always, use the smallest measurement for each dimension when you place your order. This simple rule guarantees the frame will actually fit and gives you a bit of wiggle room for adjustments.
As for the door itself, think about the material. uPVC is a popular, wallet-friendly choice that’s low maintenance, whereas aluminium gives you slimmer sightlines and a more premium look and feel. Whichever you go for, make sure it has a good thermal rating to handle the famously unpredictable British weather.
Don't skimp on the hardware, either. Smooth-gliding rollers and a robust locking mechanism are essential for a door that lasts. While you’re thinking about quality fittings, it’s a good time to consider consistency throughout your home, perhaps by using top-notch components like Tactus Hinges for your internal doors.
Getting a handle on the costs is just as important. In the UK, sliding patio door installation prices vary massively depending on the material, glazing, and how complex the job is. You could be looking at anything from around £600 for basic uPVC doors to over £4,000 for high-end aluminium systems. Labour costs also vary, typically falling between £300 and £800, but this can jump up if any structural work is needed. Sorting out your budget now ensures you're ready for both the practical and financial side of the project.
Right then, with your shiny new sliding door system waiting in the wings, it's time to roll up your sleeves and create a clean slate. Getting rid of the old door and prepping the opening is, without a doubt, the most important part of this whole job.
This is where your attention to detail really counts. If you get this bit wrong, you’ll be in for a world of pain later on, trying to get things aligned and weatherproof. It’s a classic case of measure twice, cut once – but for door openings.
Before you even think about picking up a tool, you need to contain the inevitable mess. Lay down some heavy-duty dust sheets inside and out, and tape them down properly. If you can, get furniture out of the room or, at the very least, cover it completely. Ripping out an old door frame, especially from a brick or blockwork wall, kicks up a surprising amount of dust. You'll thank yourself for this prep work later.
First things first, the old door panels have to go. For something like French doors, it’s usually just a case of unscrewing the hinges. If you’re replacing old sliding doors, you’ll likely need to lift the panel up and then pull the bottom towards you to get it off the track. These things are often heavier than they look, so make sure you have a second pair of hands to help you out.
Once the panels are gone, you can turn your attention to the frame. The trick here is to be methodical – don’t just go at it with a crowbar like a bull in a china shop. A careful approach will save you a lot of hassle repairing damaged plaster and brickwork.
With the frame cut, now you can bring in the pry bar. Gently start working the pieces loose, beginning at the bottom. Go slowly and work your way around, and whatever you do, don't lever against your finished plasterwork.
With the old frame out of the way, you’ve got a clear view of the structural opening. This is your one and only chance to spot and fix any hidden issues before your new, expensive door covers them up for good.
In older British homes, it’s not uncommon to find a bit of damp or rot in the timber sill or the bottom of the jambs. It’s tempting to ignore it, but don’t. A dodgy opening will ruin your installation. Any rotten wood or crumbling mortar needs to be cut out and repaired properly.
Give the brickwork or blockwork a good check-over for any cracks or loose bits. Make sure the damp-proof course (DPC) – that’s the plastic membrane you can usually see below the sill – is still in one piece. If it’s damaged, it absolutely must be repaired to stop damp from creeping up your walls.
The last job before the fun part begins is making sure the opening is a perfect canvas for your new frame. We’re talking clean, level, plumb, and square. No compromises.
Honestly, taking the time to get the opening spot-on is non-negotiable. It’s the difference between a door that glides like a dream and one that sticks, jams, and lets in every draught going. Once you’re happy that the opening is as good as it can be, you’re ready to start fitting the new frame.
With the old door out of the way and the opening prepped, this is where the new setup really starts to come together. Fitting the frame and tracks is all about precision. A bit of patience now will pay off with doors that glide like a dream for years to come.
First things first, you need to create a watertight seal. Before you even think about lifting the frame into place, run a generous bead of high-quality, exterior-grade silicone sealant along the bottom of the opening, right where the frame's sill will sit.
This bead of silicone is your first line of defence against the classic British weather. For some extra peace of mind, I also like to apply flashing tape along the sill and a little way up the sides of the opening. It's a self-adhesive, waterproof membrane that does a brilliant job of stopping wind-driven rain from sneaking in behind the frame.
Right, time for the heavy lifting. You'll need a helper for this bit. Carefully lift the new frame and guide it into the prepared opening, setting it down gently onto the bead of sealant. Your entire focus here is on one thing: getting it perfectly plumb, level, and square.
Never assume the opening itself is perfect—they rarely are. Grab your spirit level and a handful of plastic shims (or packers) to make those tiny, critical adjustments.
Don't rush this. A frame that's out by just a few millimetres can cause the doors to bind, create draughty gaps, or even stop them from locking properly. Every moment spent with the spirit level now is worth its weight in gold later.
Once you’re absolutely happy that the frame is perfect, you can fix it into place. Drill through the pre-drilled holes in the frame and into the surrounding brickwork. Use the right fixings for the job—frame fixings or masonry screws are usually best—and tighten them up. Be firm, but don't go overboard, as you could warp the frame.
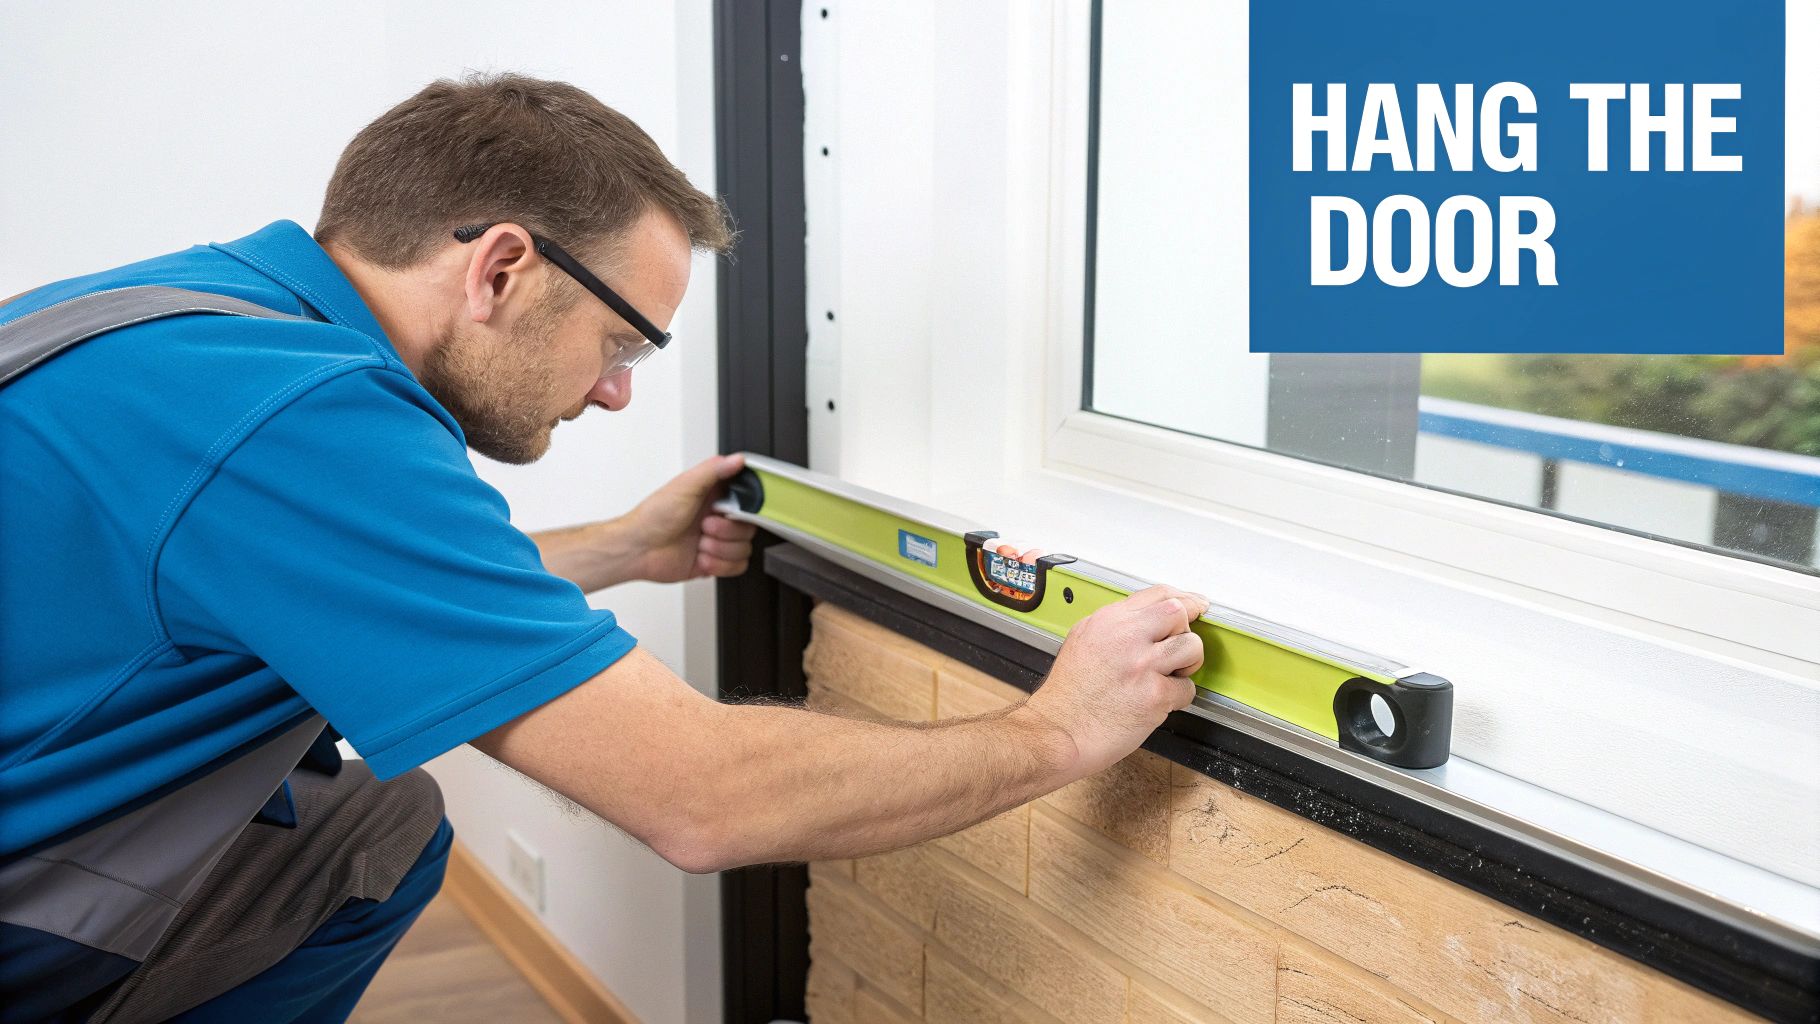
This image shows just how crucial precise measurements are when you're installing a new frame and track.
It’s a good reminder that every cut and every line has to be exact for the frame to sit perfectly in the opening.
With the main frame solidly in place, it’s time to focus on the tracks. Think of these as the railway lines for your doors; their alignment is non-negotiable for a smooth glide.
The bottom track usually slots or screws straight onto the frame's sill. Make sure it's clean, clear of any debris, and fixed down securely as per the manufacturer's guide. A loose bottom track is one of the most common reasons for wobbly or noisy doors.
Next up is the top track, which you'll install into the head of the frame. This track takes a fair bit of the door's weight, so it's vital it's fastened correctly. Double-check that it runs perfectly parallel to the bottom track along its entire length. Any deviation here will make the doors drag.
The demand for high-performance doors has shot up recently, with over 4.1 million sliding door units installed across Europe. Here in the UK, the big focus is on thermal efficiency. In fact, over 75% of new sliding doors are double-glazed, improving insulation by up to 30%. This shift means that modern installations need meticulous sealing and frame fitting to hit these high standards and prevent heat loss.
Getting the details right is what separates a good job from a great one, whether it's a complex door system or something much simpler. For instance, knowing how quality hardware performs can make a real difference elsewhere in your home. If you're interested, have a look at our guide on how butt hinges make all the difference in joinery projects. A commitment to good components pays off in the long run.
Now that your frame and tracks are securely in place, you're ready for the best part: hanging the doors themselves.
With the frame perfectly fitted, you’re onto the most rewarding part of the job. Hanging the glass panels is where your project really starts to look like a finished door and less like a construction site. This stage is all about technique and careful fine-tuning, not brute force.
First things first, lifting and positioning these panels is a two-person job. No question. They are deceptively heavy and awkward, so trying to go it alone is asking for a strained back or, worse, a damaged door. Before you even think about lifting, give the track a final check to make sure it's completely clear of any dust, stray screws, or bits of debris left over from the frame installation.
The technique for hanging sliding door panels is pretty standard across most brands. You'll need to lift the panel and angle the top edge into the upper track first. Once the top is securely sitting in its channel, you can gently lower the bottom of the panel, guiding the rollers onto the bottom track.
You should feel a solid clunk as the rollers engage. Give the panel a gentle push to see how it moves. If it feels stuck or makes a grinding sound, don't try to force it. The most likely culprit is a misaligned roller. Just lift the panel off and try again, making sure both rollers are seated correctly this time.
Once one panel is hanging nicely, you’ll repeat the process for the second one. Don't forget to install any interlocking blocks or weatherstripping between the panels, just as the manufacturer’s guide specifies. It's a small detail, but it's absolutely vital for creating a draught-proof seal when the doors are shut.
This is the step that really separates a professional-looking installation from a frustrating DIY job. Getting the doors perfectly aligned isn't just about looks; it ensures they glide smoothly, lock securely, and form an airtight seal. The key to all of this is adjusting the rollers.
You'll usually find the adjustment screws on the bottom edge or face of the door panels, often hidden behind little plastic covers. These screws allow you to raise or lower the rollers on each side of the panel independently.
Using the right screwdriver or Allen key, you can make tiny adjustments:
Your goal is to get a consistent, even gap of around 5-6mm between the door panel and the frame all the way around. Get your spirit level out and place it on top of the panel to check it’s perfectly horizontal. Adjust one corner at a time, sliding the door back and forth after each small turn to check its movement. This can be a fiddly process of trial and error, but the patience you show here will pay off every single time you use the door.
A common mistake is only checking the alignment when the door is fully shut. Make sure you also slide the panel to the halfway point. If it rubs or catches in the middle, that's a clear sign you need to do a bit more fine-tuning on the rollers. A perfectly adjusted door should feel almost weightless as it glides.
With the panels gliding beautifully, it's time to fit the handles and locking hardware. This part is usually quite straightforward, as the holes will be pre-drilled. Just follow the instructions to attach the handle set, making sure all the screws are tight but not so tight you risk stripping the threads.
Once the handles are on, test the locking mechanism properly. The bolt or hook should engage smoothly with the keep on the door frame, without any resistance. If it feels stiff or doesn't line up, it’s back to the roller adjustments. A slight tweak to raise or lower one side of the panel is often all it takes to get the lock perfectly aligned.
A correctly installed sliding door not only looks fantastic but adds a real sense of quality to your home. This same principle of using superior components applies everywhere, right down to the smaller details. For instance, fitting high-quality Tactus Hinges on your internal doors can create a cohesive feel of reliability and smooth operation throughout your property. For further reading, you might be interested in our guide on how to choose the best blade for every type of cut, as the right tools are always essential.
The doors are in and gliding like a dream, but you're not quite over the finish line yet. These final steps are what separate a decent DIY job from a truly professional installation that blends seamlessly into your home. It’s all about the details: weatherproofing, insulating, and getting that clean, sharp look.
Skipping these finishing touches is a recipe for future headaches. You could end up with annoying draughts, heat loss, or a finish that just looks incomplete. Taking the time now to seal and trim everything properly is well worth the effort, ensuring your new doors perform beautifully and look fantastic for years to come.
First things first, you need to create a solid, weatherproof seal around the outside of the frame. This is absolutely essential for protecting your home from the notoriously unpredictable British weather. For this, you’ll need a good quality, exterior-grade silicone sealant and a caulking gun.
Carefully apply a continuous, even bead of sealant into the gap where the door frame meets the wall. The trick is to keep a steady hand for a consistent line. Here's a pro tip I've used for years: dip your finger in some soapy water and run it gently along the bead. It smooths it out perfectly before it starts to set, giving you a flawless finish.
Now, let's head inside. You’ll almost certainly have a small gap between the new frame and your interior plasterwork. This is a classic weak spot for heat to escape and cold air to creep in. The best way to sort this is with a low-expansion foam filler.
Gently spray the foam into the gap, but be careful not to overdo it – this stuff expands! Once it has fully cured, just grab a sharp utility knife and trim any excess so it’s completely flush with the wall. It’s a simple step, but it makes a massive difference to the door's thermal efficiency.
The final piece of the aesthetic puzzle is the architrave, or trim. This decorative moulding is what covers the joint between the frame and the wall, giving you that clean, professional edge. Cut your pieces to size with mitred corners for a seamless look, then fix them in place with a nail gun or adhesive before filling any nail holes.
It's clear that homeowners are prioritising a top-tier finish. The UK patio door market is growing, with installations projected to climb from 840,000 units to roughly 1.2 million by 2030. This shift shows just how much the small details matter. For example, aluminium frames are expected to grab a 38% market share, largely due to their premium look and feel.
With everything sealed and trimmed, it’s time for the final once-over. Start by carefully peeling off any protective film from the glass and frame. Go slowly to avoid leaving behind any of that annoying sticky residue. If you've made a bit of a mess with the sealant, a dedicated silicone remover will clean it up without damaging your new frames.
Next, give the glass a proper clean and wipe down the tracks to get rid of any dust or debris from the installation. This ensures the rollers have a clear path for that silky-smooth glide. As you're finalising the look, you might be inspired to make other upgrades around the house. For some related ideas, have a look at our article on how to upgrade your cabinets with the right finishing touches.
Finally, do one last check of the door's operation. Open and close it fully a few times, test the lock mechanism repeatedly, and just make sure everything feels solid, secure, and completely effortless. Now you can stand back and admire your handiwork.
Even the most straightforward installation can throw a few curveballs. When you're in the middle of a project, questions are bound to pop up. Here are some practical answers to the queries we hear most often, designed to help you plan your project and tackle any issues with confidence.
This is a classic "how long is a piece of string?" question, but I can give you a pretty solid estimate based on experience.
If you're a reasonably handy DIYer replacing an existing door with a new one of a similar size, you can usually get the job done in a single day. Think somewhere around 6-8 hours.
However, that timeline can stretch out fast. If you’re cutting a brand-new opening in a wall or you uncover a nasty surprise like a rotten lintel, you’ll want to set aside a full weekend. That buffer gives you plenty of time to handle the unexpected without rushing the all-important finishing touches.
For most jobs, the answer is no. Swapping an old door for a new one of roughly the same size and in the same spot usually falls under 'permitted development' rights. That means you won't need to get planning permission.
The rules change significantly if your project is more ambitious. Creating a new opening where there wasn't one before, or making an existing one substantially larger, will likely need approval. Furthermore, if your home is a listed building or located in a conservation area, the regulations are much stricter, and you will almost certainly need to contact your local planning authority before starting any work. Always check with your local council first to be safe.
I've seen it time and time again. By far the most common—and most costly—mistake is not getting the frame perfectly level, plumb, and square before fixing it in place.
It's tempting to think a few millimetres won't matter, but that tiny error has a massive knock-on effect. An improperly set frame will cause the doors to drag, jam, or fail to seal properly. That leads to frustrating draughts, potential water leaks, and a door that just never feels right. Use your spirit level religiously on all four sides of the frame and use shims for those micro-adjustments before you drill the final fixings.
Honestly, I would strongly advise against trying this as a solo job. Modern sliding door panels, especially those with double or triple glazing, are incredibly heavy and awkward to handle.
Trying to lift and manoeuvre one by yourself is a recipe for disaster. You’re not just risking serious personal injury; you could easily damage the new door, the frame, or your home in the process. This is a two-person job at the absolute minimum, particularly for the critical moments of lifting the frame into the opening and hanging the glass panels on the tracks.
If you decide the DIY route isn't for you, finding a reliable handyman service can be a great move for a professional, stress-free installation. And while you're thinking about home security, you might find our guide on how to install door locks useful for other projects around the house.
For all your project needs, from robust sliding door systems to the smallest finishing touches, Neasden Hardware has you covered. Explore our extensive range of high-quality ironmongery and hardware online today.