Order Online
- Straight to your door!
Straight to your door


Fixing kitchen cabinets can be anything from a quick ten-minute job, like tightening a loose hinge, to a more involved project like filling deep scratches and refinishing the surface. The secret to getting it right is figuring out exactly what you're dealing with before you even think about picking up a tool.
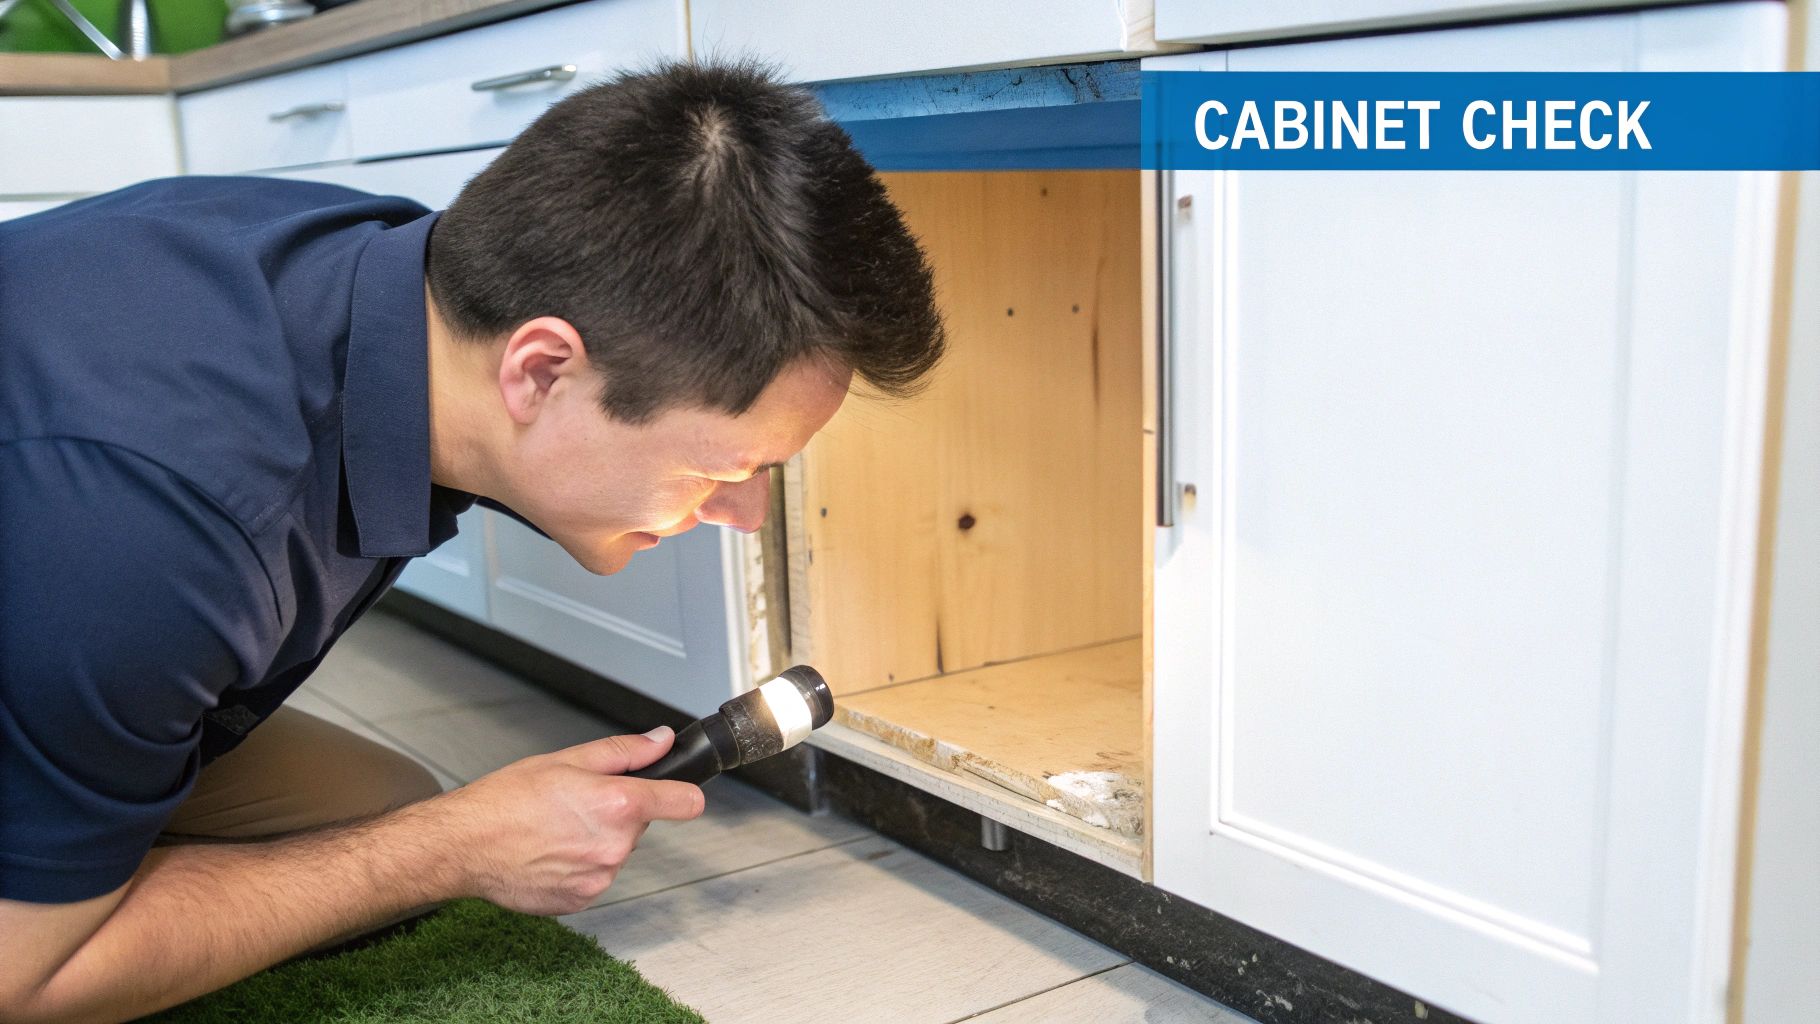
Before you reach for a screwdriver or a tin of paint, the most important thing you can do is give your cabinets a proper once-over. This isn't about making a mountain out of a molehill; it's about making a smart diagnosis. A careful inspection tells you the true extent of the damage, which in turn dictates the materials, time, and effort you'll need.
Think of it as the triage stage. By checking each cabinet systematically, you can sort the issues into a clear plan of action. This simple step stops you from starting a small fix only to uncover a much bigger problem halfway through.
To really assess your kitchen cabinets, you need to look beyond the obvious scuffs and scrapes. Open every door, pull out every drawer, and grab a torch to get a good look inside – especially under the sink. Pay close attention to the areas that get the most use.
Here’s a practical checklist to guide your inspection:
Knowing the difference between a simple cosmetic issue and a more serious underlying problem is vital. A few scratches are one thing, but signs of water damage are another entirely. Look for discolouration, bubbling surfaces, or a soft, spongy feel in the wood or MDF, particularly around the sink area.
A musty smell inside a cabinet is often the first red flag for hidden damp or mould. Don't just cover it up; investigate the source. It could be a slow leak from the plumbing that needs fixing before you can even think about repairing the cabinet itself.
For example, a cabinet door that won’t close might just need a simple hinge adjustment – a ten-minute job with a screwdriver. But if the door itself is warped, that points to a bigger moisture problem that needs drying, sanding, and sealing. Spotting this difference early on helps you create a realistic timeline and budget for your repair project, ensuring you tackle the root cause, not just the symptom.
Walking into a hardware shop without a clear plan can be a bit overwhelming, especially when you’re trying to figure out how to repair kitchen cabinets. To get the job done right, you need the right tools and materials. Let’s build your perfect toolkit, going beyond a simple shopping list to explain why certain items make all the difference.
Having the right gear doesn't just make the work easier; it has a direct impact on how good your repair looks and how long it lasts. A professional-looking finish often comes down to the small details, like using the right grade of sandpaper or the best type of adhesive. Putting a little thought into your toolkit now will save you a world of frustration later on.
For most common cabinet fixes, from filling deep scratches to re-attaching a loose hinge, a few core materials are non-negotiable. It’s tempting to grab the cheapest option off the shelf, but quality materials are the foundation of a repair that won’t let you down in six months.
Your essential shopping list should include:
With the right materials sorted, it’s time to think about the tools you'll use to apply them with precision. You probably have some of these already, but make sure they're the right type for cabinet work. A cheap, ill-fitting screwdriver, for example, can easily chew up a hinge screw, turning a simple five-minute adjustment into a real headache.
Clamps are the unsung heroes of cabinet repair. When you’re glueing anything from a peeling laminate edge to a split drawer front, applying even pressure is the only way to guarantee a strong, permanent bond. Even a couple of small, inexpensive C-clamps will dramatically improve your results.
Don’t forget about a good set of screwdrivers. A lot of modern cabinet hinges use PoziDriv screws, not Phillips. Using the wrong bit is a surefire way to strip the screw head, making future adjustments impossible. For more on this, you can learn all about the best screws for woodworking in our detailed guide.
To help you decide where to spend your money, here’s a quick comparison of some key items.
Choosing the right tools and materials often comes down to balancing cost with quality. This table breaks down some common choices, helping you decide whether a budget-friendly option will do the trick or if it’s worth investing in a professional-grade product for a more durable, long-lasting repair.
| Tool/Material | Budget Option (e.g., Brand/Type) | Professional Grade (e.g., Brand/Type) | Best For |
|---|---|---|---|
| Wood Glue | Standard PVA Wood Glue | Titebond II or Gorilla Wood Glue | Titebond II offers superior water resistance, ideal for kitchens. |
| Wood Filler | Ready-mixed acrylic filler | Two-part epoxy putty (e.g., Ronseal) | Epoxy fillers are stronger, won't shrink, and are better for deep repairs. |
| Screwdriver Set | Basic Phillips/Flathead Set | Wera or Stanley FatMax Pozi/Phillips Set | A proper PoziDriv bit prevents stripping on modern hinge screws. |
| Clamps | Small Plastic Spring Clamps | Irwin Quick-Grip Bar Clamps | Bar clamps provide stronger, more evenly distributed pressure for larger jobs. |
Ultimately, deciding where to invest depends on the scale of your repairs. For a quick, one-off fix, budget options might be perfectly fine. But if you see more DIY projects on the horizon, spending a bit more on professional-grade tools will pay for itself in the quality of your work and their longevity.
Right, you’ve got your tools sorted, so it’s time to get your hands dirty. Tackling those common kitchen cabinet problems isn’t nearly as intimidating as it looks once you break them down. Forget the confusing jargon; we're going to walk through the same straightforward techniques the professionals use for the most frequent fixes.
From a wonky door that just won’t close right to that annoying bit of peeling laminate, a few simple repairs can make a massive difference to the look and feel of your kitchen. This is where a little bit of patience and the right method really pay off, helping you get a finish that looks like you hired someone in.
This simple workflow shows the essential tools you'll need for many common repairs, forming the core of your cabinet-fixing process.
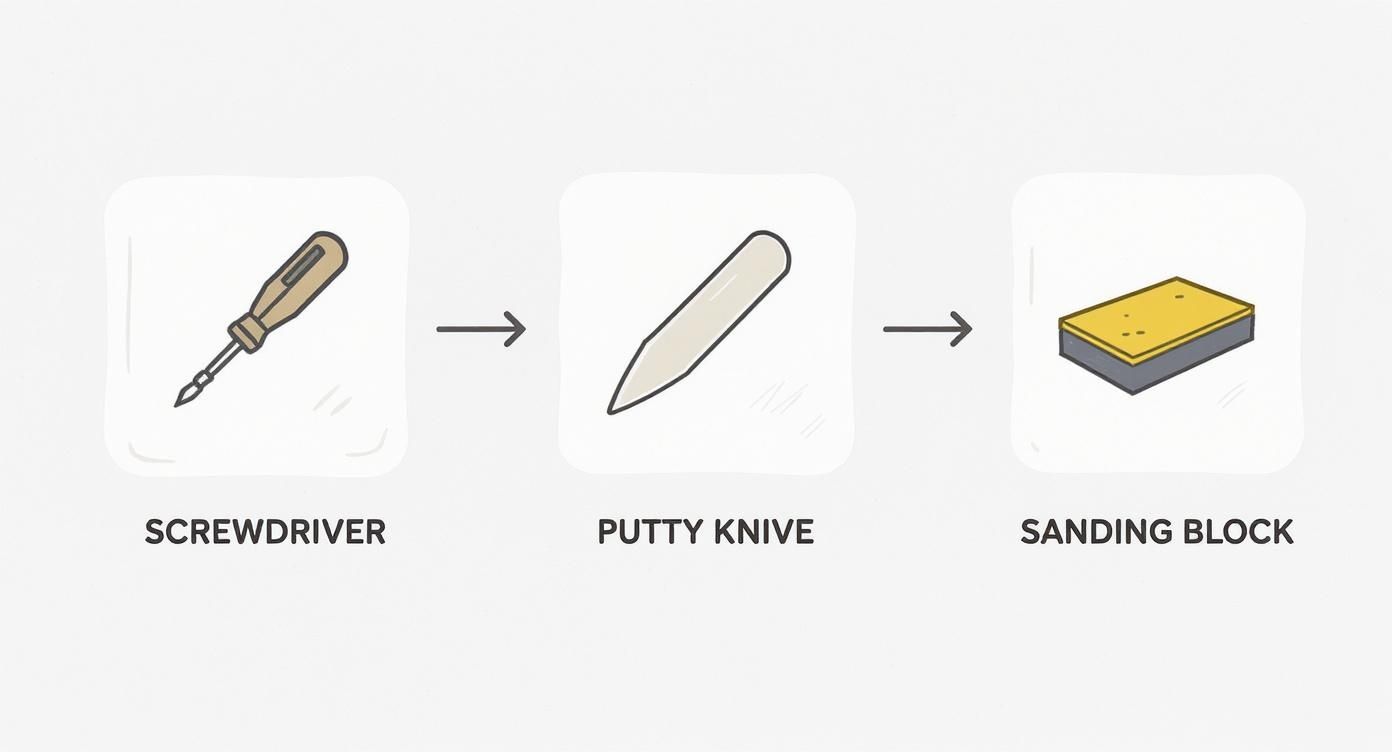
The sequence—adjusting with a screwdriver, filling with putty, and smoothing with sandpaper—is a logical progression for most cosmetic and minor structural repairs you'll face.
Deeper scratches and nasty gouges are beyond what a touch-up pen can hide, but filling them correctly can make them disappear completely. The goal is to create a seamless, invisible repair that blends perfectly with the rest of the cabinet.
The secret is using the right filler and taking your time with the application. A two-part epoxy wood filler is your best bet here, as it’s incredibly durable and won’t shrink or crack down the line.
To get started:
Peeling laminate is a common sight in kitchens, especially near kettles, toasters, and ovens where heat and steam are always present. It looks untidy, but it's often a straightforward fix if you catch it early.
The key to a lasting repair is a strong contact adhesive, which creates a powerful, permanent bond once the two coated surfaces touch.
Before you even think about glue, gently warm the peeling laminate with a hairdryer. This makes the material more flexible and less likely to crack or snap as you work with it. Be careful not to blast it with too much heat, as that can cause it to warp for good.
Start by carefully cleaning under the peeling section to remove any dust or debris. Apply a thin, even layer of contact adhesive to both the back of the laminate and the cabinet surface itself. You need to let the adhesive become tacky to the touch—this usually takes 10-15 minutes. Then, carefully press the laminate back into place. Use a J-roller or a block of wood to apply firm, even pressure across the entire repaired area to ensure there are no trapped air bubbles.
A cabinet door that sags or refuses to close properly is incredibly frustrating, but it’s also one of the easiest problems to solve. In almost every case, the culprit is a misaligned hinge that just needs a simple tweak.
Most modern kitchen cabinet hinges have two or three adjustment screws that control the door's position. All you’ll need is a Phillips or PoziDriv screwdriver.
Make small, half-turn adjustments to one screw at a time, closing the door after each turn to check your progress. It can feel like a bit of a balancing act between the top and bottom hinges, but with a bit of trial and error, you’ll have your doors hanging perfectly straight in no time. If your drawers are also giving you trouble, check out our helpful guide on how to install drawer slides for another smooth and satisfying fix.
Minor water damage, like slight swelling or discolouration on the cabinet under the sink, can often be repaired without replacing the whole unit. The absolute first step, though, is to find and fix the source of the leak—there's no point in repairing the cabinet if the problem is just going to come back.
Once you’re sure the area is completely dry, you can get to work on the repair. To fix the damage, you'll need to sand the affected area down to remove any bubbled varnish or softened material. If the wood or MDF is swollen, you may need to sand it back until it’s level with the rest of the surface. Fill any remaining imperfections with wood filler, sand it smooth once dry, and then seal the entire area with a good quality primer and paint or varnish to protect it from any future moisture.
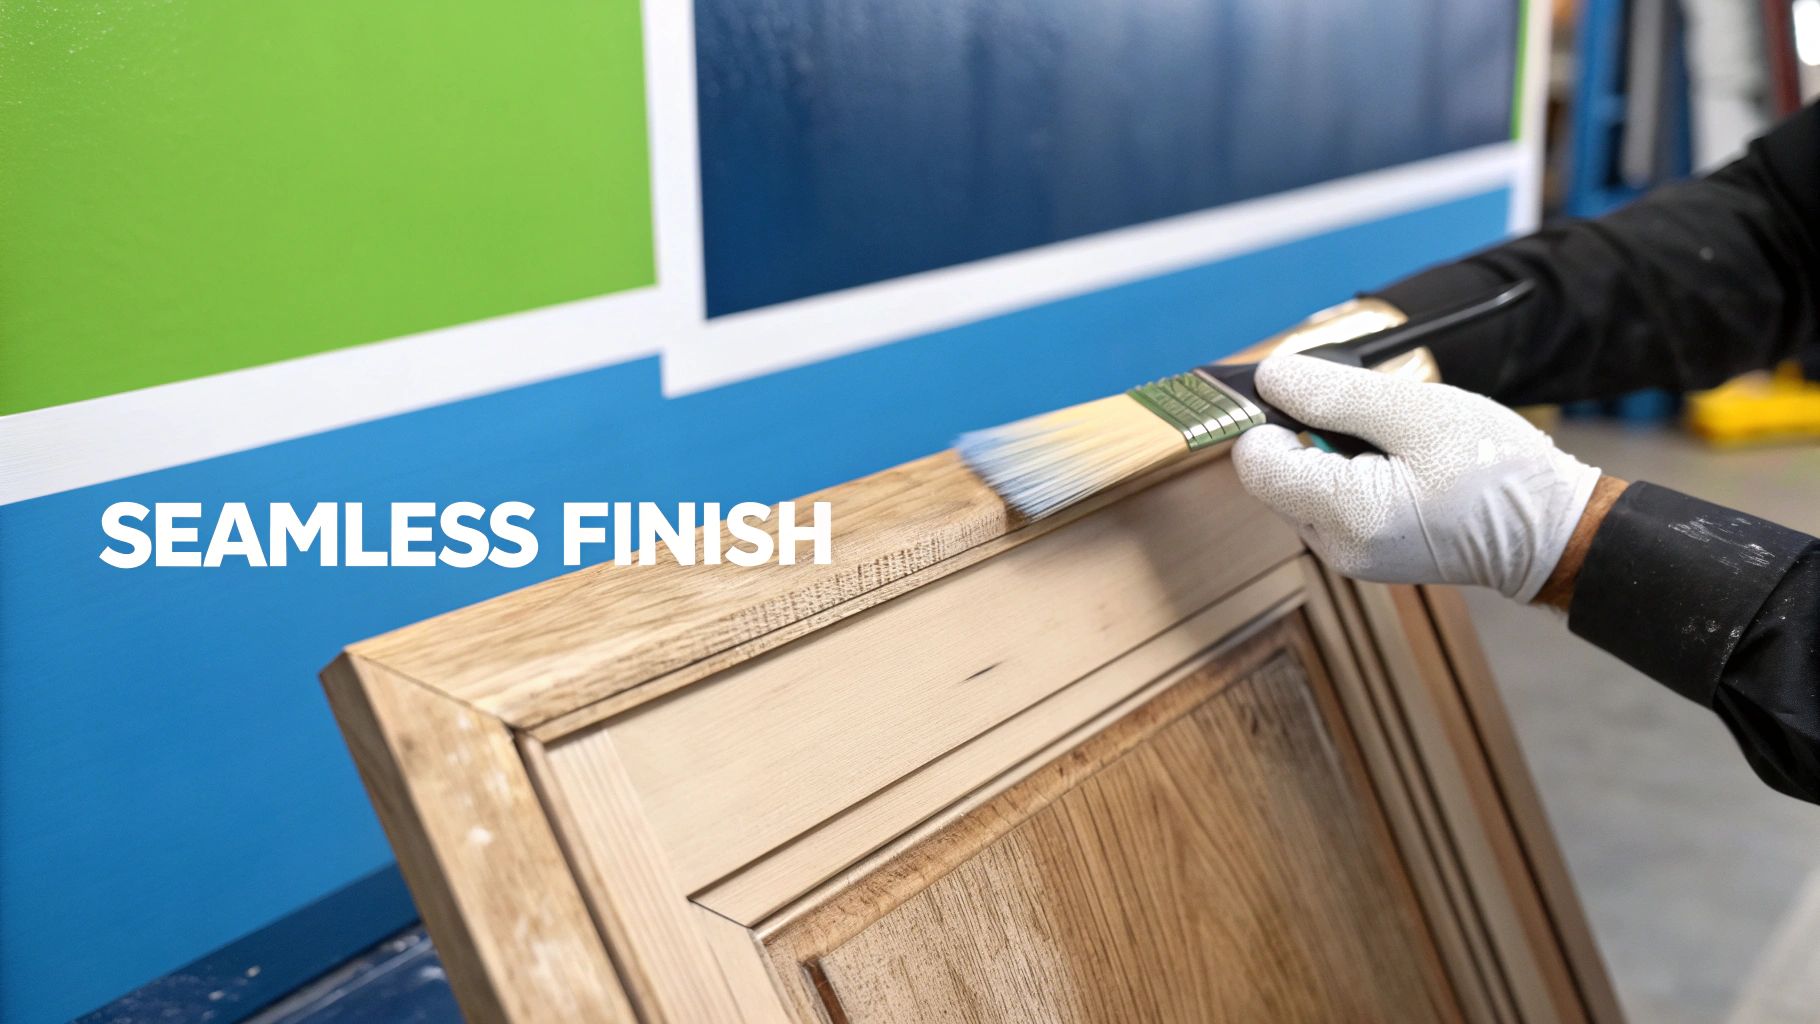
Even the most perfect repair can be let down by a shoddy finish. This final stage is all about making your hard work disappear, blending the patch so seamlessly that you forget it was ever damaged. It’s the difference between a quick fix and a proper, professional-quality restoration.
Getting this right is more than just slapping on a coat of paint. It comes down to careful surface prep, picking the right primer and topcoat, and having a bit of technique to avoid those tell-tale brush strokes. Whether you're touching up a tiny spot or refinishing an entire door, these steps will give you a durable, flawless result that can handle the chaos of a busy kitchen.
If there's one part of the process you absolutely cannot cut corners on, it’s the prep work. A pristine surface is the foundation of any long-lasting finish. Any leftover dust, grease, or unevenness will stop the paint or varnish from bonding properly, which means peeling and chipping are just around the corner.
Start by giving the entire surface a thorough clean with a good degreasing agent to cut through any kitchen grime. Once it’s completely dry, it’s time to sand. Grab some fine-grit sandpaper (around 220-grit) and lightly scuff the surface. This creates a microscopic texture, or 'key', that gives the primer something to grip onto.
For anyone new to this crucial stage, our guide on how to prep wood for painting has a load of practical advice. After sanding, wipe away every last speck of dust with a tack cloth or a slightly damp microfibre cloth.
With a perfectly prepped surface, the next decision is your primer and topcoat. Don't be tempted to use leftover emulsion paint from your walls; kitchen cabinets need something far tougher. They face constant touching, steam, and splashes, so a durable, scrubbable finish is non-negotiable.
For your primer, go for a high-adhesion formula, especially if you’re painting over a glossy or tricky surface like laminate. This creates the perfect base for your paint to stick to. When it comes to the topcoat, look for paints specifically designed for wood and trim, often labelled as acrylic eggshell or satinwood. These give you a tough finish with a subtle sheen that’s easy to wipe clean.
Here are a few product types widely available in the UK:
How you apply the paint is just as important as the paint itself. The goal is to get a smooth, even coat without any drips, runs, or those dreaded brush marks. Often, using a combination of tools gives the best results.
A small, high-density foam roller is brilliant for covering the large, flat areas of a cabinet door quickly and smoothly. For the detailed edges and corners where a roller can’t reach, switch to a high-quality synthetic paintbrush.
To minimise brush strokes, always paint in the direction of the wood grain. Apply thin, even coats rather than one thick one. It's far better to apply two or three light coats, letting each one dry completely in between, than to overload your brush and end up with a gloopy, uneven mess.
A complete refinish can transform your kitchen's entire look without the cost of a full replacement. For a deep dive into refreshing your cabinets after a repair, check out this brilliant guide on how to paint kitchen cabinets for a professional result.
Knowing your limits is one of the most important skills you can have in any DIY project. While tackling repairs yourself can be incredibly rewarding, there are certain situations where stepping back and calling in a professional kitchen fitter or joiner is the smartest, safest, and most cost-effective decision. It’s all about recognising when a problem goes beyond a simple fix and needs specialist tools and experience.
Making the right call here can save you a huge amount of stress and stop a small issue from spiralling into a costly disaster. Learning to spot the red flags that signal a job is better left to an expert is key to a successful outcome for your kitchen.
Some repair jobs look simple on the surface but hide deeper complexities. Trying to tackle these without the right knowledge can easily make things worse. Be realistic about the scope of the damage and your own skillset before you start unscrewing doors.
Here are some clear signs it’s time to pick up the phone:
Hiring a professional is about more than just getting the job done; it's an investment in quality and peace of mind. They bring a level of precision that’s difficult to replicate with DIY tools and experience. The joinery and installation sector is a significant part of the UK economy for good reason.
Professional kitchen cabinet installation and repair services are part of a broader industry generating an estimated £15.3 billion in revenue. With 45% of homeowners employing specialist kitchen fitters for renovations, it shows the value placed on expert work. This isn't just about big projects; repair work is a growing part of the industry, and you can review the latest industry insights to see the trends.
A professional's biggest asset is their experience. They’ve seen every possible problem and know the quickest, most effective way to fix it, often preventing other issues from arising in the process.
Ultimately, they guarantee a perfect result that stands the test of time. For extensive damage or if you're planning a complete overhaul of your kitchen, considering professional kitchen renovation services can provide expert solutions and a flawless finish. Making that call isn’t admitting defeat; it’s making a smart, strategic decision for your home.
Even with the best guide in hand, you're bound to run into a few specific snags during a DIY project. To help you get over those final hurdles, here are some straightforward answers to the questions we hear most often about repairing kitchen cabinets.
A door that won’t sit flush or stubbornly refuses to close all the way is almost always a hinge problem. The good news? Most modern kitchen hinges are designed to be adjusted, usually with just two or three small screws.
First off, check that all the screws holding the hinge to both the door and the cabinet frame are properly tightened. If they're snug, you can start making small, half-turn adjustments with a Phillips or PoziDriv screwdriver. One screw typically moves the door left and right, another handles up-and-down alignment, and a third can adjust the depth, pulling the door closer to or pushing it away from the frame. Tweak both the top and bottom hinges a little at a time until the door hangs perfectly straight.
If the door still sags after you’ve fiddled with the adjustments, the hinge itself has probably seen better days. Thankfully, replacing a worn-out hinge is as simple as unscrewing the old one and popping a new one in its place.
Stripped screw holes are a classic DIY headache, especially in softer materials like MDF and particleboard where a hinge or handle has been yanked on one too many times. The screw just spins, unable to get a grip.
The most reliable fix is to fill the hole completely, giving the screw fresh material to bite into. For a rock-solid, permanent repair, a two-part epoxy putty is your best bet. Clean out any loose bits of wood from the hole, mix the putty according to the instructions, and pack it in tightly.
For a quick and surprisingly effective fix, try this classic joiner's trick: dip a few wooden toothpicks into good quality wood glue, stuff as many as you can into the stripped hole, and then snap them off flush with the surface.
Once the epoxy or glue has fully cured (always check the manufacturer's guidelines), you can drill a new, small pilot hole right into the centre of your repair. This will let you drive the original screw back in for a grip that’s as good as new.
It’s tempting to think a quick coat of paint will hide peeling laminate, but this will only lead to frustration down the line. Painting directly over a loose or bubbling surface will give you a terrible finish that will chip and peel away in no time, making the problem look even worse than when you started.
You have to tackle the peeling laminate first. For a small, localised area, you can often use a strong contact adhesive to glue it back down. Apply the adhesive to both the back of the laminate and the cabinet surface, let it get tacky, and then press the two together firmly. Use clamps or heavy weights to hold it tight while it cures.
If the damage is more widespread, you’ll need to carefully remove all the loose laminate using a putty knife. After that, you must sand the entire surface to create a smooth, even base and to scuff up any remaining gloss. Finally—and this part is crucial—apply a high-adhesion primer designed for tricky surfaces before you even think about painting. This step is what ensures your topcoat will stick properly and give you a durable, long-lasting finish.
For all the tools, fixings, and expert supplies you need to get your cabinet repairs done right, visit Neasden Hardware. With over thirty years of experience and a huge range of products available for next-day delivery, we're here to help you achieve a professional result on your next DIY project. Find everything you need at https://neasdenhardware.co.uk.